
for 2.5-series (FHS layout)
Abstract
The dCache Book is the guide for administrators of dCache systems. The first part describes the installation of a simple single-host dCache instance. The second part describes the components of dCache and in what ways they can be configured. This is the place for finding information about the role and functionality of components in dCache as needed by an administrator. The third part contains solutions for several problems and tasks which might occur during operating of a dCache system. Finally, the last two parts contain a glossary and a parameter and command reference.
Table of Contents
- Preface
- I. Getting started
- II. Configuration of dCache
- 4. Chimera
- 5. The Cell Package
- 6. The
replicaService (Replica Manager) - 7. The
poolmanagerService - 8. The dCache Tertiary Storage System Interface
- 9. File Hopping
- 10. Authorization in dCache
- 11. dCache as xRootd-Server
- 12. dCache as
NFSv4.1Server - 13. dCache Storage Resource Manager
- 14. The
statisticsService - 15. The
billingService - 16. The
alarmsService - 17. dCache Webadmin Interface
- 18. ACLs in dCache
- 19. GLUE Info Provider
- 20. Stage Protection
- III. Cookbook
- IV. Reference
List of Figures
- 1.1. The dCache Layer Model
- 6.1. Pool State Diagram
List of Tables
- 22.1. Checksum calculation flow
- 23.1. Protocol Overview
- 24.1. Protocol Overview
- 25.1. Open Timeout mechanisms
- 26.1. Property Overview
- 26.2. Property Overview
- 26.3. Property Overview
- 29.1.
List of Examples
- 18.1. ACL allowing specific user to delete files in a directory
- 18.2. ACL to deny a group
- 18.3. ACL to allow a user to delete all files and subdirectories
- 18.4. Obtain ACL information by absolute path
- 21.1. surveying the space tokens available in a directory.
- 21.2. Listing the space tokens for a
SRM: - 21.3. Using
srmls -l: - 21.4. Using
srmls -l: - 21.5. Limited directory listing
- 24.1. Batch file for two
GridFTPdoors serving separate network interfaces - 24.2. Batch file for two
GridFTPdoors serving separate network interfaces
Table of Contents
Welcome to the dCache. dCache is a distributed storage solution for storing huge amounts of data without a hard limit, used to provide storage in the petabyte range. Therefore it qualifies as the storage system supporting data intensive experiments.
dCache is a joined effort between the Deutsches Elektronen-Synchrotron (DESY) in Hamburg, Nordic Data Grid Facility (NDGF based in Copenhagen), the Fermi National Accelerator Laboratory near Chicago with significant distributions and support from the University of California, San Diego, INFN, Bari as well as Rutherford Appleton Laboratory, UK and CERN in Geneva.
dCache can use hierarchical storage management (e.g., hard disk and tape), provides mechanisms to automatically increase performance and balance loads, increase resilience and availability. It also supplies advanced control systems to manage data as well as data flows. Normal filesystem (btrfs, ext4, XFS, ZFS) is used to store data on storage nodes. There are several ways of accessing data stored in dCache:
NFS4.1 (Chimera)HTTPandWebDAVGridFTP(GSI-FTP)xrootd
SRM(versions 1.1 and 2.2)dCapandGSIdCap
dCache supports certificate based authentication through the Grid Security Infrastructure
used in GSI-FTP, GSIdCap transfer protocols and the SRM management protocol.
Certificate authentication is also available for HTTP and WebDAV.
dCache also supports fine-grain authorization with support for POSIX file permissions
and NFS-style access control lists.
Other features of dCache are:
Resilience and high availability can be implemented in different ways by having multiple replicas of the same files.
Easy migration of data via the migration module.
A powerful cost calculation system that allows to control the data flow (reading and writing from/to pools, between pools and also between pools and tape).
Load balancing and performance tuning by hot pool replication (via cost calculation and replicas created by pool-to-pool-transfers).
Space management and support for space tokens.
Garbage collection of replicas, depending on their flags, age, et cetera.
Detailed logging and debugging as well as accounting and statistics.
XML information provider with detailed live information about the cluster.
Scriptable adminstration interface with a terminal-based front-end.
Web-interface with live information of the most important information.
Ensuring data integrity through checksumming.
dCache / SRM can transparently manage data distributed among
dozens of disk storage nodes (sometimes distributed over several countries).
The system has shown to significantly improve the efficiency of connected tape storage
systems, by caching, gather and flush and scheduled staging techniques.
Furthermore, it optimizes the throughput to and from data clients by dynamically
replicating datasets on the detection of load hot spots. The system
is tolerant against failures of its data servers, which allows administrators
to deploy commodity disk storage components.
Access to the data is provided by various standard protocols. Furthermore
the software comes with an implementation of the Storage Resource Manager
protocol (SRM), which is an open standard for grid middleware
to communicate with site specific storage fabrics.
This book is primerally targeted at system administrators.
For minimal test installation:
Hardware: contemporary CPU , 1 GiB of RAM , 100 MiB free harddisk space
Software: Oracle/Sun Java, Postgres SQL Server
For a high performance Grid scenario the hardware requirements highly differ, which
makes it impossible to provide such parameters here. However, if you wish to setup a
dCache-based storage system, just let us know and we will help you with your system
specifications. Just contact us: <support@dcache.org>.
This book shall introduce you to dCache and provide you with the details of the installation. It describes configuration, customization of dCache as well as the usage of several protocols that dCache supports. Additionally, it provides cookbooks for standard tasks.
Here is an overview part by part:
Part 1, Getting started: This part introduces you to the cells and domain concept in dCache. It provides a detailed description of installing, the basic configuration, and upgrading dCache.
Part 2, Configuration of dCache: Within this part the configuration of several additional features of dCache is described. They are not necessary to run dCache but will be needed by some users depending on their requirements.
Part 3, Cookbook: This part comprises guides for specific tasks a system administrator might want to perform.
This part gets you all the help that you might need:
For acquiring resources:
The download page.
The YUM repositories.
For getting help during installation:
Developers
<support@dcache.org>Additional Support:
German support:
<german-support@dcache.org>UK support:
<GRIDPP-STORAGE@JISCMAIL.AC.UK>USA support:
<osg-storage@opensciencegrid.org>User Forum:
<user-forum@dcache.org>
For features that you would like to see in dCache or bugs that should be fixed: Just write an e-mail to
<support@dcache.org>If you like to stay up-to-date about new releases you can use the RSS feeds available from our downloads page.
For EMI releases of dCache please visit the EMI dCache download page.
This part is intended for people who are new to dCache. It gives an introduction to dCache, including how to configure a simple setup, and details some simple and routine administrative operations.
Table of Contents
dCache is a distributed storage solution. It organises storage across computers so the combined storage can be used without the end-users being aware of where their data is stored. They simply see a large amount of storage.
Because end-users do not need to know on which computer their data is stored, it can be migrated from one computer to another without any interruption of service. As a consequence, (new) servers may be added to or taken away from the dCache storage cluster at any time.
dCache supports requesting data from a tertiary storage system. Such systems typically store data on magnetic tapes instead of disks, which must be loaded and unloaded using a tape robot. The main reason for using tertiary storage is the better cost-efficiency, archiving a very large amount of data on rather inexpensive hardware. In turn the access latency for archived data is significantly higher.
dCache also supports many transfer protocols (allowing users to read and write to data). These have a modular deployment, allowing dCache to support expanded capacity by providing additional front-end machines.
Another performance feature of dCache is hot-spot data migration. In this process, dCache will detect when files are requested very often. If this happens, dCache can generate duplicates of the popular files on other computers. This allows the load to be spread across multiple machines, so increasing throughput.
The flow of data within dCache can also be carefully controlled. This is especially important for large sites as chaotic movement of data may lead to suboptimal usage. Instead, incoming and outgoing data can be marshaled so they use designated resources guaranteeing better throughput and improving end-user experience.
dCache provides a comprehensive administrative interface for configuring the dCache instance. This is described in the later sections of this book.
dCache, as distributed storage software, can provide a coherent service using multiple computers or nodes (the two terms are used interchangeable). Although dCache can provide a complete storage solution on a single computer, one of its strengths is the ability to scale by spreading the work over multiple nodes.
A cell is dCache’s most fundamental executable building block. Even a small dCache deployment will have many cells running. Each cell has a specific task to perform and most will interact with other cells to achieve it.
Cells can be grouped into common types; for example, pools, doors. Cells of the same type behave in a similar fashion and have higher-level behaviour (such as storing files, making files available). Later chapters will describe these different cell types and how they interact in more detail.
There are only a few cells where (at most) only a single instance is required. The majority of cells within a dCache instance can have multiple instances and dCache is designed to allow load-balancing over these cells.
A domain is a container for running cells. Each domain runs in its own Java Virtual Machine (JVM) instance, which it cannot share with any other domain. In essence, a domain is a JVM with the additional functionality necessary to run cells (such as system administration and inter-cell communication). This also implies, that a node’s resources, such as memory, available CPU and network bandwidth, are shared among several domains running on the same node.
dCache comes with a set of domain definitions, each specifying a useful set of cells to run within that domain to achieve a certain goal. These goals include storing data, providing a front-end to the storage, recording file names, and so on. The list of cells to run within these domains are recommended deployments: the vast majority of dCache deployments do not need to alter these lists.
A node is free to run multiple domains, provided there’s no conflicting requirement from the domains for exclusive access to hardware. A node may run a single domain; but, typically a node will run multiple domains. The choice of which domains to run on which nodes will depend on expected load of the dCache instance and on the available hardware. If this sounds daunting, don’t worry: starting and stopping a domain is easy and migrating a domain from one node to another is often as easy as stopping the domain on one node and starting it on another.
dCache is scalable storage software. This means that (in most cases) the performance of dCache can be improved by introducing new hardware. Depending on the performance issue, the new hardware may be used by hosting a domain migrated from a overloaded node, or by running an additional instance of a domain to allow load-balancing.
Most cells communicate in such a way that they don’t rely on in which domain they are running. This allows a site to move cells from one domain to another or to create new domain definitions with some subset of available cells. Although this is possible, it is rare that redefining domains or defining new domains is necessary. Starting or stopping domains is usually sufficient for managing load.
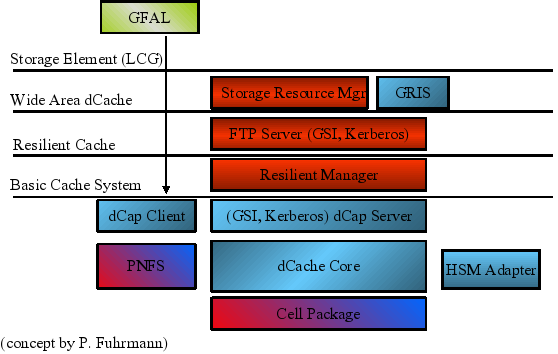
The layer model shown in Figure 1.1, “The dCache Layer Model” gives an overview of the architecture of the dCache system.
Table of Contents
The first section describes the installation of a fresh dCache instance using RPM files downloaded from the dCache home-page. It is followed by a guide to upgrading an existing installation. In both cases we assume standard requirements of a small to medium sized dCache instance without an attached tertiary storage system. The third section contains some pointers on extended features.
In the following the installation of a dCache
instance will be described. The Chimera name space provider,
some management components, and the SRM need a PostgreSQL server
installed. We recommend running this PostgreSQL on the local
node. The first section describes the configuration of a PostgreSQL
server. After that the installation of Chimera and of the
dCache components will follow. During the whole installation
process root access is required.
In order to install dCache the following requirements must be met:
An RPM-based Linux distribution is required for the following procedure. For Debian derived systems we provide Debian packages and for Solaris the Solaris packages or the tarball.
dCache requires Java 1.7 JRE. Please use the latest patch-level and check for upgrades frequently. It is recommended to use JDK as dCache scripts can make use of some extra features that JDK provides to gather more diagnostic information (heap-dump, etc). This helps when tracking down bugs.
PostgreSQL must be installed and running. We recommend the use of PostgreSQL version 9.2 (at least PostgreSQL version 8.3 is required).
Important
For good performance it is necessary to maintain and tune your PostgreSQL server. There are several good books on this topic, one of which is PostgreSQL 9.0 High Performance.
The RPM packages may be installed right away, for example using the command:
[root] #rpm -ivh dcache-2.5.0-1.noarch.rpm
The actual sources lie at http://www.dcache.org/downloads/IAgree.shtml. To install for example Version 2.5.0-1 you would use this:
[root] #rpm -ivh http://www.dcache.org/downloads/1.9/repo/2.5/dcache-2.5.0-1.noarch.rpm
The client can be found in the download-section of the above url, too.
Using a PostgreSQL server with dCache places a number of requirements on the database. You must configure PostgreSQL for use by dCache and create the necessary PostgreSQL user accounts and database structure. This section describes how to do this.
Install the PostgreSQL server with the tools of the operating system.
Initialize the database directory (for PostgreSQL version 9.2
this is /var/lib/pgsql/9.2/data/) , start the
database server, and make sure that it is started at system
start-up.
[root] #service postgresql-9.2 initdbInitializing database: [ OK ][root] #service postgresql-9.2 startStarting postgresql-9.2 service: [ OK ][root] #chkconfig postgresql-9.2 on
Perhaps the simplest configuration is to allow password-less access to the database and the following documentation assumes this is so.
To allow local users to access PostgreSQL without requiring a
password, ensure the file
pg_hba.conf, which (for PostgreSQL
version 9.2) is located in /var/lib/pgsql/9.2/data,
contains the following lines.
# TYPE  DATABASE        USER            ADDRESS                 METHOD

# "local" is for Unix domain socket connections only
local   all             all                                     trust
# IPv4 local connections:
host    all             all             127.0.0.1/32            trust
# IPv6 local connections:
host    all             all             ::1/128                 trust
Note
Please note it is also possible to run dCache with all PostgreSQL accounts requiring passwords. See the section called “Configuring Access to PostgreSQL” for more advice on the configuration of PostgreSQL.
Restarting PostgreSQL
If you have edited PostgreSQL configuration files, you must restart PostgreSQL for those changes to take effect. On many systems, this can be done with the following command:
[root] #service postgresql-9.2 restartStopping postgresql-9.2 service: [ OK ] Starting postgresql-9.2 service: [ OK ]
Chimera is a library providing a hierarchical name space
with associated meta data. Where pools in dCache store the
content of files, Chimera stores the names and meta data
of those files. Chimera itself stores the data in a
relational database. We will use PostgreSQL in this tutorial.
The properties of Chimera are defined in
/usr/share/dcache/defaults/chimera.properties.
See Chapter 4, Chimera for more information.
Create the Chimera user and database and add the Chimera-specific tables and stored procedures:
[root] #createdb -U postgres chimeraCREATE DATABASE[root] #createuser -U postgres --no-superuser --no-createrole --createdb --pwprompt chimeraEnter password for new role: Enter it again: CREATE ROLE You do not need to enter a password.[root] #psql -U chimera chimera -f /usr/share/dcache/chimera/sql/create.sqlpsql:/usr/share/dcache/chimera/sql/create.sql:23: NOTICE: CREATE TABLE / PRIMARY KEY will create implicit index "t_inodes_pkey" for table "t_inodes" CREATE TABLE psql:/usr/share/dcache/chimera/sql/create.sql:35: NOTICE: CREATE TABLE / PRIMARY KEY will create implicit index "t_dirs_pkey" for table "t_dirs" CREATE TABLE psql:/usr/share/dcache/chimera/sql/create.sql:45: NOTICE: CREATE TABLE / PRIMARY KEY will create implicit index "t_inodes_data_pkey" for table "t_inodes_data" many more like this... INSERT 0 1 many more like this... INSERT 0 1 CREATE INDEX CREATE INDEX psql:/usr/share/dcache/chimera/sql/create.sql:256: NOTICE: CREATE TABLE / PRIMARY KEY will create implicit index "t_storageinfo_pkey" for table "t_storageinfo" CREATE TABLE psql:/usr/share/dcache/chimera/sql/create.sql:263: NOTICE: CREATE TABLE / PRIMARY KEY will create implicit index "t_access_latency_pkey" for table "t_access_latency" CREATE TABLE psql:/usr/share/dcache/chimera/sql/create.sql:270: NOTICE: CREATE TABLE / PRIMARY KEY will create implicit index "t_retention_policy_pkey" for table "t_retention_policy" CREATE TABLE psql:/usr/share/dcache/chimera/sql/create.sql:295: NOTICE: CREATE TABLE / PRIMARY KEY will create implicit index "t_locationinfo_pkey" for table "t_locationinfo" CREATE TABLE psql:/usr/share/dcache/chimera/sql/create.sql:311: NOTICE: CREATE TABLE / PRIMARY KEY will create implicit index "t_locationinfo_trash_pkey" for table "t_locationinfo_trash" CREATE TABLE CREATE INDEX psql:/usr/share/dcache/chimera/sql/create.sql:332: NOTICE: CREATE TABLE / PRIMARY KEY will create implicit index "t_acl_pkey" for table "t_acl" CREATE TABLE CREATE INDEX[root] #createlang -U postgres plpgsql chimerasuperfluous with PostgreSQL version 9.2[root] #psql -U chimera chimera -f /usr/share/dcache/chimera/sql/pgsql-procedures.sqlCREATE FUNCTION CREATE FUNCTION CREATE FUNCTION CREATE TRIGGER CREATE FUNCTION CREATE TRIGGER CREATE SEQUENCE CREATE FUNCTION CREATE TRIGGER
The dCache components will access the database server with the user srmdcache which can be created with the createuser; for example:
[root] #createuser -U postgres --no-superuser --no-createrole --createdb --pwprompt srmdcacheYou do not need to enter a password
Several management components running on the head node as
well as the SRM will use the database
dcache for storing their state
information:
[root] #createdb -U srmdcache dcache
There might be several of these on several hosts. Each is used by the dCache components running on the respective host.
Now the configuration of PostgreSQL is done. Before the first
start of dCache replace the file
/etc/dcache/gplazma.conf with an
empty file.
[root] #mv /etc/dcache/gplazma.conf /etc/dcache/gplazma.conf.bak[root] #touch /etc/dcache/gplazma.conf
dCache can be started now.
[root] #dcache startStarting dCacheDomain done
So far, no configuration of dCache is done, so only the predefined domain is started.
dCache consists of one or more domains. A domain in dCache is a Java Virtual Machine hosting one or more dCache cells. Each domain must have a name which is unique throughout the dCache instance and a cell must have a unique name within the domain hosting the cell.
A service is an abstraction used in the dCache configuration to describe atomic units to add to a domain. It is typically implemented through one or more cells. dCache keeps lists of the domains and the services that are to be run within these domains in the layout files. The layout file may contain domain- and service- specific configuration values. A pool is a cell providing physical data storage services.
In the setup of dCache, there are three main places for configuration files:
/usr/share/dcache/defaults/etc/dcache/dcache.conf/etc/dcache/layouts
The folder /usr/share/dcache/defaults
contains the default settings of the dCache. If one of
the default configuration values needs to be changed, copy
the default setting of this value from one of the files in
/usr/share/dcache/defaults to
the file /etc/dcache/dcache.conf,
which initially is empty and update the value.
Note
In this first installation of dCache your dCache
will not be connected to a tape sytem. Therefore please
change the values for
DefaultRetentionPolicy and
DefaultAccessLatency in the file
/etc/dcache/dcache.conf.
DefaultRetentionPolicy=REPLICA
DefaultAccessLatency=ONLINE
Layouts describe which domains to run on a host and which
services to run in each domain. For the customized
configuration of your dCache you will have to create a
layout file in /etc/dcache/layouts. In
this tutorial we will call it the
mylayout.conf file.
Important
Do not update configuration values in the files in the defaults folder, since changes to these files will be overwritten by updates.
As the files in /usr/share/dcache/defaults/ do
serve as succinct documentation for all available
configuration parameters and their default values it is
quite useful to have a look at them.
Domains and services are defined in the layout files. Depending on your site, you may have requirements upon the doors that you want to configure and domains within which you want to organise them.
A domain must be defined if services are to run in that domain. Services will be started in the order in which they are defined.
Every domain is a Java Virtual Machine that can be started and stopped separately. You might want to define several domains for the different services depending on the necessity of restarting the services separately.
The layout files define which domains to start and which services to put in which domain. Configuration can be done per domain and per service.
A name in square brackets, without a
forward-slash (/) defines a domain. A
name in square brackets with a
forward slash defines a service that is to run in a
domain. Lines starting with a hash-symbol
(#) are comments and will be ignored by
dCache.
There may be several layout files in the layout directory,
but only one of them is read by dCache when starting
up. By default it is the single.conf.
If the dCache should be started with another layout file
you will have to make this configuration in
/etc/dcache/dcache.conf.
Example:
dcache.layout=mylayoutThis entry in
/etc/dcache/dcache.conf will
instruct dCache to read the layout file
/etc/dcache/layouts/mylayout.conf
when starting up.
Example:
These are the first lines of
/etc/dcache/layouts/single.conf:
broker.scheme=none

[dCacheDomain]
[dCacheDomain/admin]
[dCacheDomain/broadcast]
[dCacheDomain/poolmanager]
[ defines a domain
called dCacheDomain]dCacheDomain. In this example only one domain
is defined. All the services are running in that
domain. Therefore no messagebroker is needed, which is
the meaning of the entry
messageBroker=none.
[
declares that the dCacheDomain/admin]admin service is to be run in
the dCacheDomain domain.
Example:
This is an example for the mylayout.conf file of a single node
dCache with several domains.
[dCacheDomain]
[dCacheDomain/broadcast]
[dCacheDomain/loginbroker]
[dCacheDomain/topo]
[dCacheDomain/info]

[namespaceDomain]
[namespaceDomain/pnfsmanager]
[namespaceDomain/cleaner]
[namespaceDomain/dir]

[poolmanagerDomain]
[poolmanagerDomain/poolmanager]

[adminDoorDomain]
[adminDoorDomain/admin]

[httpdDomain]
[httpdDomain/httpd]
[httpdDomain/billing]
[httpdDomain/srm-loginbroker]

[gPlazmaDomain]
[gPlazmaDomain/gplazma]
Note
If you defined more than one domain, a messagebroker is
needed, because the defined domains need to be able to
communicate with each other. This means that if you use
the file single.conf as a template
for a dCache with more than one domain you need to
delete the line
messageBroker=none. Then the default
value will be used which is
messageBroker=cells, as defined in
the defaults
/usr/share/dcache/defaults/dcache.properties.
dCache will need to write the files it keeps in pools. These pools are defined as services within dCache. Hence, they are added to the layout file of your dCache instance, like all other services.
The best way to create a pool, is to use the dcache script and restart the domain the pool runs in. The pool will be added to your layout file.
[<domainname>/pool]
name=<poolname>
path=/path/to/pool
waitForFiles=${path}/data
The property waitForFiles instructs the
pool not to start up until the specified file or directory
is available. This prevents problems should the underlying storage be unavailable (e.g., if a
RAID device is offline).
Note
Please restart dCache if your pool is created in a domain that did not exist before.
Example:
[root] #dcache pool create /srv/dcache/p1 pool1 poolDomainCreated a pool in /srv/dcache/p1. The pool was added to poolDomain in file:/etc/dcache/layouts/mylayout.conf.
In this example we create a pool called pool1 in the directory /srv/dcache/p1.
The created pool will be running in the domain poolDomain.
Mind the Gap!
The default gap for poolsizes is 4GiB. This means you should make a bigger pool than 4GiB otherwise you would have to change this gap in the dCache admin tool. See the example below. See also the section called “The Admin Interface”.
(local) admin >cd <poolname>(<poolname>) admin >set gap 2G(<poolname>) admin >save
Adding a pool to a configuration does not modify the pool or the data in it and can thus safely be undone or repeated.
Restart dCache to start the newly configured components
dcache restart and
check the status of dCache with
dcache status.
Example:
[root] #dcache restartStopping dCacheDomain 0 1 done Starting dCacheDomain done Starting namespaceDomain done Starting poolmanagerDomain done Starting adminDoorDomain done Starting httpdDomain done Starting gPlazmaDomain done Starting poolDomain done[root] #dcache statusDOMAIN STATUS PID USER dCacheDomain running 17466 dcache namespaceDomain running 17522 dcache poolmanagerDomain running 17575 dcache adminDoorDomain running 17625 dcache httpdDomain running 17682 dcache gPlazmaDomain running 17744 dcache poolDomain running 17798 dcache
Now you can have a look at your dCache via The Web
Interface, see the section called “The Web Interface for Monitoring dCache”:
http://<httpd.example.org>:2288/,
where <httpd.example.org> is the node on which your
httpd service is running.
For a single node dCache this is the machine on which your dCache is running.
By default the Java heap size and the maximum direct buffer size are defined as
dcache.java.memory.heap=512m
dcache.java.memory.direct=512m
Again, these values can be changed in
/etc/dcache/dcache.conf.
For optimization of your dCache you can define the Java heap size in the layout file separately for every domain.
Example:
[dCacheDomain]
dcache.java.memory.heap=2048m
dcache.java.memory.direct=0m
...
[utilityDomain]
dcache.java.memory.heap=384m
dcache.java.memory.direct=16m
Note
dCache uses Java to parse the configuration files and
will search for Java on the system path first; if it is
found there, no further action is needed. If Java is not
on the system path, the environment variable
JAVA_HOME defines the location of the Java
installation directory. Alternatively, the environment
variable JAVA can be used to point to the
Java executable directly.
If JAVA_HOME or JAVA cannot be
defined as global environment variables in the operating
system, then they can be defined in either
/etc/default/dcache or
/etc/dcache.env. These two files are
sourced by the init script and allow
JAVA_HOME, JAVA and
DCACHE_HOME to be defined.
Installing dCache on several nodes is not much more
complicated than installing it on a single node. Think about
how dCache should be organised regarding services and
domains. Then adapt the layout files, as described in the section called “Defining domains and services”, to the layout that you have in
mind. The files
/etc/dcache/layouts/head.conf and
/etc/dcache/layouts/pool.conf contain
examples for a dCache head-node and a dCache pool
respectively.
Important
You must configure a domain called dCacheDomain but the
other domain names can be chosen freely.
Please make sure that the domain names that you choose are unique. Having the same domain names in different layout files on different nodes may result in an error.
On any other nodes than the head node, the property broker.host
has to be added to the file /etc/dcache/dcache.conf. This property
should point to the host containing the special domain dCacheDomain, because that domain acts implicitly as a broker.
Tip
On dCache nodes running only pool services you do not need to install PostgreSQL. If your current node hosts only these services, the installation of PostgreSQL can be skipped.
Important
Always read the release notes carefully before upgrading!
Upgrading to bugfix releases within one supported branch (e.g. from 2.5.0 to 2.5.1) may be done by upgrading the packages with
[root] #rpm -Uvh <packageName>
Now dCache needs to be started again.
For major upgrades please
- use The Ultimate Golden Release Upgrade Guide I to upgrade from 1.9.5 to 1.9.12.
- use the The Ultimate Golden Release Upgrade Guide II to upgrade from 1.9.12 to 2.2.
- use the /opt to /usr migration guide to migrate from the /opt layout to the fhs-compliant layout.
Table of Contents
This section is a guide for exploring a newly installed dCache system. The confidence obtained by this exploration will prove very helpful when encountering problems in the running system. This forms the basis for the more detailed stuff in the later parts of this book. The starting point is a fresh installation according to the the section called “Installing a dCache instance”.
Reading and writing data to and from a dCache instance can be
done with a number of protocols. After a standard installation,
these protocols are dCap, GSIdCap, and GridFTP. In
addition dCache comes with an implementation of the SRM
protocol which negotiates the actual data transfer protocol.
Create the root of the Chimera namespace and a world-writable directory by
[root] #/usr/bin/chimera-cli mkdir /data[root] #/usr/bin/chimera-cli mkdir /data/world-writable[root] #/usr/bin/chimera-cli chmod /data/world-writable 777
To use WebDAV you need to define a WebDAV service in
your layout file. You can define this service in an extra
domain, e.g. [webdavDomain] or add it to
another domain.
[webdavDomain]
[webdavDomain/webdav]
webdavAnonymousAccess=FULL
to the file /etc/dcache/layouts/mylayout.conf.
Note
Depending on the client you might need to set
webdav.redirect.on-read=false and/or
webdav.redirect.on-write=false.
#  ---- Whether to redirect GET requests to a pool
#
#   If true, WebDAV doors will respond with a 302 redirect pointing to
#   a pool holding the file. This requires that a pool can accept
#   incoming TCP connections and that the client follows the
#   redirect. If false, data is relayed through the door. The door
#   will establish a TCP connection to the pool.
#
(one-of?true|false)webdav.redirect.on-read=true

#  ---- Whether to redirect PUT requests to a pool
#
#   If true, WebDAV doors will respond with a 307 redirect pointing to
#   a pool to which to upload the file. This requires that a pool can
#   accept incoming TCP connections and that the client follows the
#   redirect. If false, data is relayed through the door. The door
#   will establish a TCP connection to the pool. Only clients that send
#   a Expect: 100-Continue header will be redirected - other requests
#   will always be proxied through the door.
#
(one-of?true|false)webdav.redirect.on-write=true
Now you can start the WebDAV domain
[root] #dcache start webdavDomain
and access your files via
http://<webdav-door.example.org>:2880
with your browser.
You can connect the webdav server to your file manager and copy a file into your dCache.
To use curl to copy a file into your dCache you will need
to set webdav.redirect.on-write=false.
Example:
Write the file test.txt
[root] #curl -T test.txt http://webdav-door.example.org:2880/data/world-writable/curl-testfile.txt
and read it
[root] #curl http://webdav-door.example.org:2880/data/world-writable/curl-testfile.txt
To be able to use dCap you need to have the dCap door
running in a domain.
Example:
[dCacheDomain]
[dCacheDomain/dcap]
For this tutorial install dCap on your worker node. This
can be the machine where your dCache is running.
Get the gLite repository (which contains dCap) and
install dCap using yum.
[root] #cd /etc/yum.repos.d/[root] #wget http://grid-deployment.web.cern.ch/grid-deployment/glite/repos/3.2/glite-UI.repo[root] #yum install dcap
Create the root of the Chimera namespace and a
world-writable directory for dCap to write into as described
above.
Copy the data (here /bin/sh is used as
example data) using the dccp command and the dCap
protocol describing the location of the file using a URL,
where <dcache.example.org> is
the host on which the dCache is
running
[root] #dccp -H /bin/sh dcap://<dcache.example.org>/data/world-writable/my-test-file-1[##########################################################################################] 100% 718 kiB 735004 bytes (718 kiB) in 0 seconds
and copy the file back.
[root] #dccp -H dcap://<dcache.example.org>/data/world-writable/my-test-file-1 /tmp/mytestfile1[##########################################################################################] 100% 718 kiB 735004 bytes (718 kiB) in 0 seconds
To remove the file you will need to mount the namespace.
In the standard configuration the dCache web interface is
started on the head node (meaning that the domain hosting the
httpd service is running on the head node) and can be
reached via port 2288. Point a web browser to
http://<head-node.example.org>:2288/
to get to the main menu of the dCache web interface. The
contents of the web interface are self-explanatory and are the
primary source for most monitoring and trouble-shooting tasks.
The “Cell Services” page displays the status of some important cells of the dCache instance.
The “Pool Usage” page gives a good overview of the current space usage of the whole dCache instance. In the graphs, free space is marked yellow, space occupied by cached files (which may be deleted when space is needed) is marked green, and space occupied by precious files, which cannot be deleted is marked red. Other states (e.g., files which are currently written) are marked purple.
The page “Pool Request Queues” (or “Pool Transfer Queues”) gives information about the number of current requests handled by each pool. “Actions Log” keeps track of all the transfers performed by the pools up to now.
The remaining pages are only relevant with more advanced configurations: The page “Pools” (or “Pool Attraction Configuration”) can be used to analyze the current configuration of the pool selection unit in the pool manager. The remaining pages are relevant only if a tertiary storage system (HSM) is connected to the dCache instance.
Just use commands that are documented here
Only commands described in this documentation should be used for the administration of a dCache system.
dCache has a powerful administration interface. It can be
accessed with the ssh1 or with the ssh2 protocol. The
server is part of the adminDoor domain.
The admin interface used to be available using ssh1, which
is insecure and therefore discouraged.
The property sshVersion controls which
version to start. Valid values are ssh1 to
start only the ssh1 interface, ssh2 to
start the ssh2 interface and both to
start both ssh1 and ssh2 interfaces. Specify the ssh
version in the file
/etc/dcache/dcache.conf.
Example:
Set sshVersion=ssh2
# This is the main configuration file of dCache.
#
...

# use ssh2
sshVersion=ssh2
[root] #dcache restartStopping dCacheDomain 0 1 2 3 4 done Starting dCacheDomain done
Connect to the server using ssh1 with:
[user] $ssh -c blowfish -p 22223 -l admin headnode.example.org
The initial password is
“dickerelch” (which is German
for “fat elk”) and you will be greeted by the
prompt
   dCache Admin (VII) (user=admin)


(local) admin >
The password can now be changed with
(local) admin >cd acm(acm) admin >create user admin(acm) admin >set passwd -user=admin <newPasswd> <newPasswd>(acm) admin >..(local) admin >logoff
There are two ways of authorizing administrators to access the
dCache ssh2 admin interface. The preferred method
authorizes users through their public key. The second method
employs gPlazma2 and the dcache.kpwd
file. Thereby authorization mechanisms can be added later by
deploying another gPlazma2 plugin. The configuration of both
authorization mechanisms is described in the following.
Note
All configurable values of the ssh2 admin interface can
be found in the
/usr/share/dcache/defaults/admin.properties
file. Please do NOT change any value in this file. Instead
enter the key value combination in the
/etc/dcache/dcache.conf.
To authorize administrators through their public key just
insert it into the file
authorized_keys2 which should by
default be in the directory /etc/dcache/admin as specified in
the file
/usr/share/dcache/defaults/admin.properties
under admin.authorizedKey2=. Keys have to
be in one line and should have a standard format, such as:
ssh-dss AAAAB3....GWvM= /Users/JohnDoe/.ssh/id_dsa
Important
Please make sure that the copied key is still in one line. Any line-break will prevent the key from being read.
Note
You may omit the part behind the equal sign as it is just a comment and not used by dCache.
Key-based authorization will always be the default. In case
the user key can not be found in the file
authorized_keys2 or the file does not
exist, ssh2Admin will fall back to authorizing the user via
gPlazma2 and the dcache.kpwd
file.
Now you can login to the admin interface by
[user] $ssh -l admin -p 22224 headnode.example.orgdCache Admin (VII) (user=admin) (local) admin >
To use gPlazma make sure that you defined a
gPlazmaDomain in your layout file.
Example:
/etc/dcache/layouts:
[<gplazma-${host.name}>Domain]
[<gplazma-${host.name}>Domain/gplazma]
To use gPlazma2 you need to specify it in the
/etc/dcache/dcache.conf file:
# This is the main configuration file of dCache.
#
...
#
# use gPlazma2
gplazma.version=2
Moreover, you need to create the file
/etc/dcache/gplazma.conf with the content
auth optional kpwd "kpwd=/etc/dcache/dcache.kpwd"
map optional kpwd "kpwd=/etc/dcache/dcache.kpwd"
session optional kpwd "kpwd=/etc/dcache/dcache.kpwd"
and add the user admin to the
/etc/dcache/dcache.kpwd file using
the dcache script.
Example:
[user] $dcache kpwd dcuseradd admin -u 12345 -g 1000 -h / -r / -f / -w read-write -p passwordwriting to /etc/dcache/dcache.kpwd : done writing to /etc/dcache/dcache.kpwd :[user] $
adds this to the /etc/dcache/dcache.kpwd file:
# set pwd
passwd admin 4091aba7 read-write 12345 1000 / /
Edit the file
/etc/dcache/dcachesrm-gplazma.policy
to switch on the kpwd-plugin. For more
information about gPlazma see Chapter 10, Authorization in dCache.
Now the user admin can login to the admin
interface with his password password by:
[user] $ssh -l admin -p 22224 headnode.example.orgadmin@headnode.example.org's password: dCache Admin (VII) (user=admin) (local) admin >
To allow other users access to the admin interface add them
to the /etc/dcache/dcache.kpwd file
as described above.
Just adding a user in the dcache.kpwd
file is not sufficient. The generated user also needs access
rights that can only be set within the admin interface
itself.
See the section called “Create a new user” to learn how to create the user in the admin interface and set the rights.
The command help lists all commands the cell knows and their parameters. However, many of the commands are only used for debugging and development purposes.
Warning
Some commands are dangerous. Executing them without understanding what they do may lead to data loss.
Starting from the local prompt ((local) admin >) the command
cd takes you to the specified cell. In general the address of a
cell is a concatenation of cell name @ symbol
and the domain name. cd to a cell by:
(local) admin >cd<cellName>@<domainName>
Note
If the cells are well-known, they can be accessed without adding the domain-scope. See Chapter 5, The Cell Package for more information.
The domains that are running on the dCache-instance, can be
viewed in the layout-configuration (see Chapter 2, Installing dCache). Additionally, there is the topo cell, which keeps
track of the instance’s domain topology. If it is running, it
can be used to obtain the list of domains the following way:
Note
The topo cell rescans every five minutes which domains
are running, so it can take some time until
ls displays the full domain list.
Example:
As the topo cell is a well-known
cell you can cd to it directly by
cd topo.
Use the command ls to see which domains are running.
(local) admin >cd topo(topo) admin >lsadminDoorDomain gsidcapDomain dcapDomain utilityDomain gPlazmaDomain webdavDomain gridftpDomain srmDomain dCacheDomain httpdDomain namespaceDomain poolDomain(topo) admin >..(local) admin >
The escape sequence .. takes you back to the local prompt.
The command logoff exits the admin shell.
If you want to find out which cells are running on a certain
domain, you can issue the command ps in the
System cell of the domain.
Example:
For example, if you want to list the cells running on the
poolDomain, cd to its
System cell and issue the ps
command.
(local) admin >cd System@poolDomain(System@poolDomain) admin >psCell List ------------------ c-dCacheDomain-101-102 System pool_2 c-dCacheDomain-101 pool_1 RoutingMgr lm
The cells in the domain can be accessed using cd together with the cell-name scoped by the domain-name. So first, one has to get back to the local prompt, as the cd command will not work otherwise.
Note
Note that cd only works from the local prompt. If the cell you are trying to access does not exist, the cd command will complain.
Example:
(local) admin >cd nonsensejava.lang.IllegalArgumentException: Cannot cd to this cell as it doesn't exist
Type .. to return to the (local) admin >
prompt.
Login to the routing manager of the dCacheDomain to get a
list of all well-known cells you can directly
cd to without having to add the domain.
Example:
(System@poolDomain) admin >..(local) admin >cd RoutingMgr@dCacheDomain(RoutingMgr@dCacheDoorDomain) admin >lsOur routing knowledge : Local : [PoolManager, topo, broadcast, LoginBroker, info] adminDoorDomain : [pam] gsidcapDomain : [DCap-gsi-example.dcache.org] dcapDomain : [DCap-example.dcache.org] utilityDomain : [gsi-pam, PinManager] gPlazmaDomain : [gPlazma] webdavDomain : [WebDAV-example.dcache.org] gridftpDomain : [GFTP-example.dcache.org] srmDomain : [RemoteTransferManager, CopyManager, SrmSpaceManager, SRM-example.dcache.org] httpdDomain : [billing, srm-LoginBroker, TransferObserver] poolDomain : [pool_2, pool_1] namespaceDomain : [PnfsManager, dirLookupPool, cleaner]
All cells know the commands info for general information about the cell and show pinboard for listing the last lines of the pinboard of the cell. The output of these commands contains useful information for solving problems.
It is a good idea to get aquainted with the normal output in the
following cells: PoolManager, PnfsManager, and the pool
cells (e.g., <poolHostname>_1).
The most useful command of the pool cells is rep ls. To execute this command
cd into the pool. It lists the files which
are stored in the pool by their pnfs IDs:
Example:
(RoutingMgr@dCacheDoorDomain) admin >..(pool_1) admin >rep ls000100000000000000001120 <-P---------(0)[0]> 485212 si={myStore:STRING} 000100000000000000001230 <C----------(0)[0]> 1222287360 si={myStore:STRING}
Each file in a pool has one of the 4 primary states:
“cached” (<C---),
“precious” (<-P--),
“from client” (<--C-), and
“from store” (<---S).
See the section called “How to Store-/Restore files via the Admin Interface” for more information about rep ls.
The most important commands in the PoolManager are: rc ls and cm ls -r.
rc ls lists the requests currently handled
by the PoolManager. A typical line of output for a read request
with an error condition is (all in one line):
Example:
(pool_1) admin >..(local) admin >cd PoolManager(PoolManager) admin >rc ls000100000000000000001230@0.0.0.0/0.0.0.0 m=1 r=1 [<unknown>] [Waiting 08.28 19:14:16] {149,No pool candidates available or configured for 'staging'}
As the error message at the end of the line indicates, no pool was found containing the file and no pool could be used for staging the file from a tertiary storage system.
See the section called “Obtain information via the dCache Command Line Admin Interface” for more information about the command rc ls
Finally, cm ls with the option
-r gives the information about the pools
currently stored in the cost module of the pool manager. A
typical output is:
Example:
(PoolManager) admin >cm lspool_1={R={a=0;m=2;q=0};S={a=0;m=2;q=0};M={a=0;m=100;q=0};PS={a=0;m=20;q=0};PC={a=0;m=20;q=0}; (...continues...) SP={t=2147483648;f=924711076;p=1222772572;r=0;lru=0;{g=20000000;b=0.5}}} pool_1={Tag={{hostname=example.org}};size=0;SC=0.16221282938326134;CC=0.0;} pool_2={R={a=0;m=2;q=0};S={a=0;m=2;q=0};M={a=0;m=100;q=0};PS={a=0;m=20;q=0};PC={a=0;m=20;q=0}; (...continues...) SP={t=2147483648;f=2147483648;p=0;r=0;lru=0;{g=4294967296;b=250.0}}} pool_2={Tag={{hostname=example.org}};size=0;SC=2.7939677238464355E-4;CC=0.0;}-r
While the first line for each pool gives the information stored in the cache of the cost module, the second line gives the costs (SC: space cost, CC: performance cost) calculated for a (hypothetical) file of zero size. For details on how these are calculated and their meaning, see the section called “Classic Partitions”.
To create a new user, <new-user> and set a new password for
the user cd from the local prompt
((local) admin >) to the acm, the access control
manager, and run following command sequence:
(local) admin >cd acm(acm) admin >create user <new-user>(acm) admin >set passwd -user=<new-user> <newPasswd> <newPasswd>
For the new created users there will be an entry in the
directory /etc/dcache/admin/users/meta.
Note
As the initial user admin has not been
created with the above command you will not find him in the
directory /etc/dcache/admin/users/meta.
Give the new user access to a particular cell:
(acm) admin >create acl cell.<cellName>.execute(acm) admin >add access -allowed cell.<cellName>.execute <new-user>
Example:
Give the new user access to the PnfsManager.
(acm) admin >create acl cell.PnfsManager.execute(acm) admin >add access -allowed cell.PnfsManager.execute <new-user>
Now you can check the permissions by:
(acm) admin >check cell.PnfsManager.execute <new-user>Allowed(acm) admin >show acl cell.PnfsManager.execute<noinheritance> <new-user> -> true
The following commands allow access to every cell for a user <new-user>:
(acm) admin >create acl cell.*.execute(acm) admin >add access -allowed cell.*.execute <new-user>
The following command makes a user as powerful as admin
(dCache’s equivalent to the root user):
(acm) admin >create acl *.*.*(acm) admin >add access -allowed *.*.* <new-user>
The ssh admin interface can be used non-interactively by
scripts. For this the dCache-internal ssh server uses
public/private key pairs.
The file /etc/dcache/authorized_keys~/.ssh/authorized_keys which is used by
sshd. The keys in
/etc/dcache/authorized_keys
[user] $ssh-keygen -t rsa1 -C 'SSH1 key of <user>'Generating public/private rsa1 key pair. Enter file in which to save the key (/home/<user>/.ssh/identity): Enter passphrase (empty for no passphrase): Enter same passphrase again: Your identification has been saved in /home/<user>/.ssh/identity. Your public key has been saved in /home/<user>/.ssh/identity.pub. The key fingerprint is: c1:95:03:6a:66:21:3c:f3:ee:1b:8d:cb:46:f4:29:6a SSH1 key of <user>
The passphrase is used to encrypt the private key (now stored in
/home/<user>/.ssh/identity). If
you do not want to enter the passphrase every time the private
key is used, you can use ssh-add to add it to
a running ssh-agent. If no agent is running
start it with
[user] $if [ -S $SSH_AUTH_SOCK ] ; then echo "Already running" ; else eval `ssh-agent` ; fi
and add the key to it with
[user] $ssh-addEnter passphrase for SSH1 key of <user>: Identity added: /home/<user>/.ssh/identity (SSH1 key of <user>)
Now, insert the public key
~/.ssh/identity.pub as a separate line into
/etc/dcache/authorized_keys
1024 35 141939124(... many more numbers ...)15331 admin
Using ssh-add -L >> /etc/dcache/authorized_keys will not work, because the line added is not correct.
The key manager within dCache will read this file every minute.
Now, the ssh program should not ask for a password anymore. This
is still quite secure, since the unencrypted private key is only
held in the memory of the ssh-agent. It can
be removed from it with
[user] $ssh-add -dIdentity removed: /home/<user>/.ssh/identity (RSA1 key of <user>)
In scripts, one can use a “Here Document” to list the commands, or supply them to ssh as standard-input (stdin). The following demonstrates using a Here Document:
#!/bin/sh
#
#  Script to automate dCache administrative activity

outfile=/tmp/$(basename $0).$$.out

ssh -c blowfish -p 22223 admin@<adminNode> > $outfile << EOF
cd PoolManager
cm ls -r
(more commands here)
logoff
EOF
or, the equivalent as stdin.
#!/bin/bash
#
#   Script to automate dCache administrative activity.

echo -e 'cd <pool_1>\nrep ls\n(more commands here)\nlogoff' \
  | ssh -c blowfish -p 22223 admin@<adminNode> \
| tr -d '\r' > rep_ls.outIn dCache digital certificates are used for authentication and authorisation. To be able to verify the chain of trust when using the non-commercial grid-certificates you should install the list of certificates of grid Certification Authorities (CAs). In case you are using commercial certificates you will find the list of CAs in your browser.
[root] #wget http://grid-deployment.web.cern.ch/grid-deployment/glite/repos/3.2/lcg-CA.repo--2011-02-10 10:26:10-- http://grid-deployment.web.cern.ch/grid-deployment/glite/repos/3.2/lcg-CA.repo Resolving grid-deployment.web.cern.ch... 137.138.142.33, 137.138.139.19 Connecting to grid-deployment.web.cern.ch|137.138.142.33|:80... connected. HTTP request sent, awaiting response... 200 OK Length: 449 [text/plain] Saving to: `lcg-CA.repo' 100%[====================================================================>] 449 --.-K/s in 0s 2011-02-10 10:26:10 (61.2 MB/s) - `lcg-CA.repo' saved [449/449][root] #mv lcg-CA.repo /etc/yum.repos.d/[root] #yum install lcg-CALoaded plugins: allowdowngrade, changelog, kernel-module CA | 951 B 00:00 CA/primary | 15 kB 00:00 CA ...
You will need a server certificate for the host on which your
dCache is running and a user certificate. The host certificate
needs to be copied to the directory /etc/grid-security/ on your server
and converted to hostcert.pem and
hostkey.pem as described in Using X.509
Certificates. Your user certificate is usually located in
.globus. If it is not
there you should copy it from your browser to .globus and convert the
*.p12 file to
usercert.pem and
userkey.pem.
Example:
If you have the clients installed on the machine on which your dCache is running you will need to add a user to that machine in order to be able to execute the voms-proxy-init command and execute voms-proxy-init as this user.
[root] #useradd johndoe
Change the password of the new user in order to be able to copy files to this account.
[root] #passwd johndoeChanging password for user johndoe. New UNIX password: Retype new UNIX password: passwd: all authentication tokens updated successfully.[root] #su johndoe[user] $cd[user] $mkdir .globus
Copy your key files from your local machine to the new user on the machine where the dCache is running.
[user] $scp .globus/user*.pem johndoe@<dcache.example.org>:.globus
Install glite-security-voms-clients (contained in the gLite-UI).
[root] #yum install glite-security-voms-clients
Generate a proxy certificate using the command voms-proxy-init.
Example:
[user] $voms-proxy-initEnter GRID pass phrase: Your identity: /C=DE/O=GermanGrid/OU=DESY/CN=John Doe Creating proxy .............................................. Done Your proxy is valid until Mon Mar 7 22:06:15 2011
With voms-proxy-init -voms
<yourVO> you can add VOMS
attributes to the proxy. A user’s roles (Fully Qualified
Attribute Names) are read from the certificate chain found within
the proxy. These attributes are signed by the user’s VOMS server
when the proxy is created. For the voms-proxy-init -voms
command you need to have the file
/etc/vomses which contains entries
about the VOMS servers like
Example:
"desy" "grid-voms.desy.de" "15104" "/C=DE/O=GermanGrid/OU=DESY/CN=host/grid-voms.desy.de" "desy" "24"
"atlas" "voms.cern.ch" "15001" "/DC=ch/DC=cern/OU=computers/CN=voms.cern.ch" "atlas" "24"
"dteam" "lcg-voms.cern.ch" "15004" "/DC=ch/DC=cern/OU=computers/CN=lcg-voms.cern.ch" "dteam" "24"
"dteam" "voms.cern.ch" "15004" "/DC=ch/DC=cern/OU=computers/CN=voms.cern.ch" "dteam" "24"
Now you can generate your voms proxy containing your VO.
Example:
[user] $voms-proxy-init -voms desyEnter GRID pass phrase: Your identity: /C=DE/O=GermanGrid/OU=DESY/CN=John Doe Creating temporary proxy ................................... Done Contacting grid-voms.desy.de:15104 [/C=DE/O=GermanGrid/OU=DESY/CN=host/grid-voms.desy.de] "desy" Done Creating proxy .................... Done Your proxy is valid until Thu Mar 31 21:49:06 2011
Authentication and authorization in dCache is done by the
gplazma service. Define this service in the layout file.
[gPlazmaDomain]
[gPlazmaDomain/gplazma]
In this tutorial we will use the gplazmalite-vorole-mapping
plugin. To this end you need to edit the
/etc/grid-security/grid-vorolemap and the
/etc/grid-security/storage-authzdb as well
as the
/etc/dcache/dcachesrm-gplazma.policy.
Example:
The /etc/grid-security/grid-vorolemap:
"/C=DE/O=GermanGrid/OU=DESY/CN=John Doe" "/desy" doegroup
The /etc/grid-security/storage-authzdb:
version 2.1

authorize  doegroup read-write 12345 1234 / / /
The /etc/dcache/dcachesrm-gplazma.policy:
# Switches
xacml-vo-mapping="OFF"
saml-vo-mapping="OFF"
kpwd="OFF"
grid-mapfile="OFF"
gplazmalite-vorole-mapping="ON"

# Priorities
xacml-vo-mapping-priority="5"
saml-vo-mapping-priority="2"
kpwd-priority="3"
grid-mapfile-priority="4"
gplazmalite-vorole-mapping-priority="1"
If you want to copy files into dCache with GSIdCap, SRM or
WebDAV with certificates you need to follow the instructions
in the section above.
To use GSIdCap you must run a GSIdCap door. This is
achieved by including the gsidcap service in your
layout file on the machine you wish to host the door.
[gsidcapDomain]
[gsidcapDomain/gsidcap]
In addition, you need to have libdcap-tunnel-gsi installed on your worker node, which is contained in the gLite-UI.
Note
As ScientificLinux 5 32bit is not supported by gLite there is no libdcap-tunnel-gsi for SL5 32bit.
[root] #yum install libdcap-tunnel-gsi
It is also available on the dCap downloads
page.
Example:
[root] #rpm -i http://www.dcache.org/repository/yum/sl5/x86_64/RPMS.stable//libdcap-tunnel-gsi-2.47.5-0.x86_64.rpm
The machine running the GSIdCap door needs to have a host
certificate and you need to have a valid user
certificate. In addition, you should have created a voms proxy as mentioned
above.
Now you can copy a file into your dCache using GSIdCap
[user] $dccp /bin/sh gsidcap://<dcache.example.org>:22128/data/world-writable/my-test-file3801512 bytes in 0 seconds
and copy it back
[user] $dccp gsidcap://<dcache.example.org>:22128/data/world-writable/my-test-file3 /tmp/mytestfile3.tmp801512 bytes in 0 seconds
To use the SRM you need to define the srm service
in your layout file.
[srmDomain]
[srmDomain/srm]
In addition, the user needs to install an SRM client for
example the dcache-srmclient, which
is contained in the gLite-UI, on the worker node and set
the PATH environment variable.
[root] #yum install dcache-srmclient
You can now copy a file into your dCache using the SRM,
[user] $srmcp -2 file:////bin/sh srm://<dcache.example.org>:8443/data/world-writable/my-test-file4
copy it back
[user] $srmcp -2 srm://<dcache.example.org>:8443/data/world-writable/my-test-file4 file:////tmp/mytestfile4.tmp
and delete it
[user] $srmrm -2 srm://<dcache.example.org>:8443/data/world-writable/my-test-file4
If the grid functionality is not required the file can be
deleted with the NFS mount of the Chimera namespace:
[user] $rm/data/world-writable/my-test-file4
To use WebDAV with certificates you change the entry in
/etc/dcache/layouts/mylayout.conf from
[webdavDomain]
[webdavDomain/webdav]
webdavAnonymousAccess=FULL
webdavRootPath=/data/world-writable
to
[webdavDomain]
[webdavDomain/webdav]
webdavAnonymousAccess=NONE
webdavRootPath=/data/world-writable
webdavProtocol=https
Then you will need to import the host certificate into the dCache keystore using the command
[root] #dcache import hostcert
and initialise your truststore by
[root] #dcache import cacerts
Now you need to restart the WebDAV domain
[root] #dcache restart webdavDomain
and access your files via
https://<dcache.example.org>:2880
with your browser.
Important
If the host certificate contains an extended key usage
extension, it must include the extended usage for server
authentication. Therefore you have to make sure that your
host certificate is either unrestricted or it is explicitly
allowed as a certificate for TLS Web Server
Authentication.
You can also choose to have secure and insecure access to your files at the same time. You might for example allow access without authentication for reading and access with authentication for reading and writing.
[webdavDomain]
[webdavDomain/webdav]
webdavRootPath=/data/world-writable
webdavAnonymousAccess=READONLY
port=2880
webdavProtocol=https
You can access your files via
https://<dcache.example.org>:2880
with your browser.
In this section we will have a look at the configuration and log files of dCache.
The dCache software is installed in various directories
according to the Filesystem Hierarchy Standard. All
configuration files can be found in /etc/dcache.
In the previous section we have already seen how a domain is restarted:
[root] #dcache restart <domainName>
Log files of domains are by default stored in
/var/log/dcache/<domainName>.log. We
strongly encourage to configure logrotate to rotate the dCache
log files to avoid filling up the log file system. This can
typically be achieved by creating the file
/etc/logrotate.d/dcache with the following
content:
/var/log/dcache/*.log {
    compress
    rotate 100
    missingok
    copytruncate
}
More details about domains and cells can be found in Chapter 5, The Cell Package.
The most central component of a dCache instance is the
PoolManager cell. It reads additional configuration
information from the file
/var/lib/dcache/config/poolmanager.conf at
start-up. However, it is not necessary to restart the domain
when changing the file. We will see an example of this below.
Similar to /var/lib/dcache/config/poolmanager.conf,
pools read their configuration from
<poolDir>/pool/setup
at startup.
This part contains descriptions of the components of dCache, their role, functionality within the framework. In short, all information necessary for configuring them.
Table of Contents
- 4. Chimera
- 5. The Cell Package
- 6. The
replicaService (Replica Manager) - 7. The
poolmanagerService - 8. The dCache Tertiary Storage System Interface
- Introduction
- Scope of this chapter
- Requirements for a Tertiary Storage System
- How dCache interacts with a Tertiary Storage System
- Details on the TSS-support
executable - Configuring pools to interact with a Tertiary Storage System
- How to Store-/Restore files via the Admin Interface
- How to monitor what’s going on
- Example of an
executableto simulate a tape backend
- 9. File Hopping
- 10. Authorization in dCache
- 11. dCache as xRootd-Server
- 12. dCache as
NFSv4.1Server - 13. dCache Storage Resource Manager
- 14. The
statisticsService - 15. The
billingService - 16. The
alarmsService - 17. dCache Webadmin Interface
- 18. ACLs in dCache
- 19. GLUE Info Provider
- 20. Stage Protection
Table of Contents
dCache is a distributed storage system, nevertheless it provides a single-rooted file system view. While dCache supports multiple namespace providers, Chimera is the recommended provider and is used by default.
The inner dCache components talk to the namespace via a module
called PnfsManager, which in turn communicates with the
Chimera database using a thin Java layer, which in turn
communicates directly with the Chimera database. Chimera
allows direct access to the namespace by providing an NFSv3 and
NFSv4.1 server. Clients can NFS-mount the namespace locally.
This offers the opportunity to use OS-level tools like
ls, mkdir, mv for Chimera. Direct
I/O-operations like cp and cat are possible with
the NFSv4.1 door.
The properties of Chimera are defined in
/usr/share/dcache/defaults/chimera.properties. For
customisation the files
/etc/dcache/layouts/mylayout.conf or
/etc/dcache/dcache.conf should be
modified (see the section called “Defining domains and services”).
Example:
This example shows an extract of the
/etc/dcache/layouts/mylayout.conf
file in order to run dCache with NFSv3.
[namespaceDomain]
[namespaceDomain/pnfsmanager]
[namespaceDomain/nfsv3]
Example:
If you want to run the NFSv4.1 server you need to add the
corresponding nfsv41 service to a domain in the
/etc/dcache/layouts/mylayout.conf
file and start this domain.
[namespaceDomain]
[namespaceDomain/pnfsmanager]
[namespaceDomain/nfsv41]
If you wish dCache to access your Chimera with a PostgreSQL user
other than chimera then you must specify the username and
password in /etc/dcache/dcache.conf.
chimera.db.user=myuser
chimera.db.password=secret
Important
Do not update configuration values in
/usr/share/dcache/defaults/chimera.properties,
since changes to this file will be overwritten by updates.
dCache does not need the Chimera filesystem to be mounted but
a mounted file system is convenient for administrative access.
This offers the opportunity to use OS-level tools like
ls and mkdir for
Chimera. However, direct I/O-operations like
cp are not possible, since the NFSv3 interface
provides the namespace part only. This section describes how to
start the Chimera NFSv3 server and mount the name space.
If you want to mount Chimera for easier administrative access,
you need to edit the /etc/exports file as
the Chimera NFS server uses it to manage exports. If this
file doesn’t exist it must be created. The typical
exports file looks like this:
/ localhost(rw)
/data
# or
# /data *.my.domain(rw)
As any RPC service Chimera NFS requires rpcbind service to run on the
host. Nevertheless rpcbind has to be configured to
accept requests from Chimera NFS.
On RHEL6 based systems you need to add
RPCBIND_ARGS="-i"
into /etc/sysconfig/rpcbind and restart
rpcbind. Check your OS
manual for details.
[root] #service rpcbind restartStopping rpcbind: [ OK ] Starting rpcbind: [ OK ]
If your OS does not provide rpcbind
Chimera NFS can use an embedded rpcbind.
This requires to disable the portmap
service if it exists.
[root] #/etc/init.d/portmap stopStopping portmap: portmap
and restart the domain in which the NFS server is running.
Example:
[root] #dcache restart namespaceDomain
Now you can mount Chimera by
[root] #mount localhost:/ /mnt
and create the root of the Chimera namespace which you can call
data:
[root] #mkdir -p /mnt/data
If you don’t want to mount chimera you can create the root of the Chimera namespace by
[root] #/usr/bin/chimera-cli Mkdir /data
You can now add directory tags. For more information on tags see the section called “Directory Tags”.
[root] #echo "chimera" | /usr/bin/chimera-cli Writetag /data sGroup[root] #echo "StoreName sql" | /usr/bin/chimera-cli Writetag /data OSMTemplate
If you plan to use dCap with a mounted file system instead of
the URL-syntax (e.g. dccp
/data/file1
/tmp/file1), you need to mount the root of
Chimera locally (remote mounts are not allowed yet). This will
allow us to establish wormhole files so dCap clients can
discover the dCap doors.
[root] #mount localhost:/ /mnt[root] #mkdir /mnt/admin/etc/config/dCache[root] #touch /mnt/admin/etc/config/dCache/dcache.conf[root] #touch /mnt/admin/etc/config/dCache/'.(fset)(dcache.conf)(io)(on)'[root] #echo "<door host>:<port>" > /mnt/admin/etc/config/dCache/dcache.conf
The default values for ports can be found in Chapter 29, dCache Default Port Values (for dCap the default port is
22125) and in the file
/usr/share/dcache/defaults/dcache.properties. They
can be altered in
/etc/dcache/dcache.conf
Create the directory in which the users are going to store their data and change to this directory.
[root] #mkdir -p /mnt/data[root] #cd /mnt/data
Now you can copy a file into your dCache
[root] #dccp /bin/sh test-file735004 bytes (718 kiB) in 0 seconds
and copy the data back using the dccp command.
[root] #dccp test-file /tmp/testfile735004 bytes (718 kiB) in 0 seconds
The file has been transferred succesfully.
Now remove the file from the dCache.
[root] #rm test-file
When the configuration is complete you can unmount Chimera:
[root] #umount /mnt
Note
Please note that whenever you need to change the configuration,
you have to remount the root localhost:/ to a
temporary location like /mnt.
Many configuration parameters of Chimera and the
application specific meta data is accessed by reading, writing, or
creating files of the form
.(<command>)(<para>).
For example, the following prints the ChimeraID of the file
/data/some/dir/file.dat:
[user] $cat /data/any/sub/directory/'.(id)(file.dat)'0004000000000000002320B8[user] $
From the point of view of the NFS protocol, the file
.(id)(file.dat) in the directory /data/some/dir/ is read. However,
Chimera interprets it as the command id with
the parameter file.dat executed in the
directory /data/some/dir/. The quotes are
important, because the shell would otherwise try to interpret the
parentheses.
Some of these command files have a second parameter in a third
pair of parentheses. Note, that files of the form
.(<command>)(<para>)
are not really files. They are not shown when listing directories
with ls. However, the command files are listed
when they appear in the argument list of ls as
in
[user] $ls -l '-rw-r--r-- 11 root root 7 Aug 6 2010 .(tag)(sGroup).(tag)(sGroup)'
Only a subset of file operations are allowed on these special command files. Any other operation will result in an appropriate error. Beware, that files with names of this form might accidentally be created by typos. They will then be shown when listing the directory.
Each file in Chimera has a unique 18 byte long ID. It is referred to as ChimeraID or as pnfsID. This is comparable to the inode number in other filesystems. The ID used for a file will never be reused, even if the file is deleted. dCache uses the ID for all internal references to a file.
Example:
The ID of the file
example.org/data/examplefile can be
obtained by reading the command-file
.(id)(examplefile) in the directory of
the file.
[user] $cat /example.org/data/'.(id)(examplefile)'0000917F4A82369F4BA98E38DBC5687A031D
A file in Chimera can be referred to by the ID for most operations.
Example:
The name of a file can be obtained from the ID
with the command nameof as follows:
[user] $cd /example.org/data/[user] $cat '.(nameof)(0000917F4A82369F4BA98E38DBC5687A031D)'examplefile
And the ID of the directory it resides in is obtained by:
[user] $cat '.(parent)(0000917F4A82369F4BA98E38DBC5687A031D)'0000595ABA40B31A469C87754CD79E0C08F2
This way, the complete path of a file may be obtained starting from the ID.
In the Chimera namespace, each directory can have a number of tags. These directory tags may be used within dCache to control the file placement policy in the pools (see the section called “The Pool Selection Mechanism”). They might also be used by a tertiary storage system for similar purposes (e.g. controlling the set of tapes used for the files in the directory).
Note
Directory tags are not needed to control the behaviour of dCache. dCache works well without directory tags.
You can create tags with
[user] $echo "<content>" | /usr/bin/chimera-cli writetag <directory> <tagName>
list tags with
[user] $/usr/bin/chimera-cli lstag <directory>
and read tags with
[user] $/usr/bin/chimera-cli readtag <directory> <tagName>
Example:
Create tags for the directory data with
[user] $echo "myGroup" | /usr/bin/chimera-cli writetag /data sGroup[user] $echo "StoreName myStore" | /usr/bin/chimera-cli writetag /data OSMTemplate
list the existing tags with
[user] $/usr/bin/chimera-cli lstag /dataTotal: 2 OSMTemplate sGroup
and their content with
[user] $/usr/bin/chimera-cli readtag /data OSMTemplateStoreName myStore[user] $/usr/bin/chimera-cli readtag /data sGroupmyGroup
If the namespace is mounted, change to the directory for which the tag should be set and create a tag with
[user] $cd <directory>[user] $echo '<content1>' > '.(tag)(<tagName1>)'[user] $echo '<content2>' > '.(tag)(<tagName2>)'
Then the existing tags may be listed with
[user] $cat '.(tag)(<tagname1>) .(tag)(<tagname2>).(tags)()'
and the content of a tag can be read with
[user] $cat '<content1>.(tag)(<tagname1>)'[user] $cat '<content2>.(tag)(<tagName2>)'
Example:
Create tags for the directory data with
[user] $cd data[user] $echo 'StoreName myStore' > '.(tag)(OSMTemplate)'[user] $echo 'myGroup' > '.(tag)(sGroup)'
list the existing tags with
[user] $cat '.(tag)(OSMTemplate) .(tag)(sGroup).(tags)()'
and their content with
[user] $cat 'StoreName myStore.(tag)(OSMTemplate)'[user] $cat 'myGroup.(tag)(sGroup)'
A nice trick to list all tags with their contents is
[user] $grep "" $(cat ".(tags)()").(tag)(OSMTemplate):StoreName myStore .(tag)(sGroup):myGroup
When creating or changing directory tags by writing to the command file as in
[user] $echo '<content>' > '.(tag)(<tagName>)'
one has to take care not to treat the command files in the same way as regular files, because tags are different from files in the following aspects:
The <tagName> is limited to 62 characters and the <content> to 512 bytes. Writing more to the command file, will be silently ignored.
If a tag which does not exist in a directory is created by writing to it, it is called a primary tag.
Tags are inherited from the parent directory by a newly created directory. Changing a primary tag in one directory will change the tags inherited from it in the same way. Creating a new primary tag in a directory will not create an inherited tag in its subdirectories.
Moving a directory within the Chimera namespace will not change the inheritance. Therefore, a directory does not necessarily inherit tags from its parent directory. Removing an inherited tag does not have any effect.
Empty tags are ignored.
The following directory tags appear in the dCache context:
- OSMTemplate
Must contain a line of the form “
StoreName<storeName>” and specifies the name of the store that is used by dCache to construct the storage class if the HSM Type isosm.- HSMType
The
HSMTypetag is normally determined from the other existing tags. E.g., if the tagOSMTemplateexists,HSMType=osmis assumed. With this tag it can be set explicitly. A class implementing that HSM type has to exist. Currently the only implementations areosmandenstore.- sGroup
The storage group is also used to construct the storage class if the
HSMTypeisosm.- cacheClass
The cache class is only used to control on which pools the files in a directory may be stored, while the storage class (constructed from the two above tags) might also be used by the HSM. The cache class is only needed if the above two tags are already fixed by HSM usage and more flexibility is needed.
- hsmInstance
If not set, the
hsmInstancetag will be the same as theHSMTypetag. Setting this tag will only change the name as used in the storage class and in the pool commands.
The storage class is a
string of the form
<StoreName>:<StorageGroup>@<hsm-type>,
where <StoreName> is given by the
OSMTemplate tag,
<StorageGroup> by the
sGroup tag and
<hsm-type> by the
HSMType tag. As mentioned above the
HSMType tag is assumed to be
osm if the tag OSMTemplate
exists.
In the examples above two tags have been created.
Example:
[user] $/usr/bin/chimera-cli lstag /dataTotal: 2 OSMTemplate sGroup
As the tag OSMTemplate was created the tag
HSMType is assumed to be osm.
The storage class of the files which are copied into the
directory /data after
the tags have been set will be
myStore:myGroup@osm.
If directory tags are used to control the behaviour of dCache and/or a tertiary storage system, it is a good idea to plan the directory structure in advance, thereby considering the necessary tags and how they should be set up. Moving directories should be done with great care or even not at all. Inherited tags can only be created by creating a new directory.
Example:
Assume that data of two experiments,
experiment-a and
experiment-b is written into a namespace
tree with subdirectories /data/experiment-a and /data/experiment-b. As some pools
of the dCache are financed by
experiment-a and others by
experiment-b they probably do not like it
if they are also used by the other group. To avoid this the
directories of experiment-a and
experiment-b can be tagged.
[user] $echo "StoreName exp-a" | /usr/bin/chimera-cli writetag /data/experiment-a OSMTemplate[user] $echo "StoreName exp-b" | /usr/bin/chimera-cli writetag /data/experiment-b OSMTemplate
Data from experiment-a taken in 2010 shall
be written into the directory /data/experiment-a/2010 and data
from experiment-a taken in 2011 shall be
written into /data/experiment-a/2011. Data
from experiment-b shall be written into
/data/experiment-b. Tag
the directories correspondingly.
[user] $echo "run2010" | /usr/bin/chimera-cli writetag /data/experiment-a/2010 sGroup[user] $echo "run2011" | /usr/bin/chimera-cli writetag /data/experiment-a/2011 sGroup[user] $echo "alldata" | /usr/bin/chimera-cli writetag /data/experiment-b sGroup
List the content of the tags by
[user] $/usr/bin/chimera-cli readtag /data/experiment-a/2010 OSMTemplateStoreName exp-a[user] $/usr/bin/chimera-cli readtag /data/experiment-a/2010 sGrouprun2010[user] $/usr/bin/chimera-cli readtag /data/experiment-a/2011 OSMTemplateStoreName exp-a[user] $/usr/bin/chimera-cli readtag /data/experiment-a/2011 sGrouprun2011[user] $/usr/bin/chimera-cli readtag /data/experiment-b/2011 OSMTemplateStoreName exp-b[user] $/usr/bin/chimera-cli readtag /data/experiment-b/2011 sGroupalldata
As the tag OSMTemplate was created the
HSMType is assumed to be
osm.
The storage classes of the files which are copied into these directories after the tags have been set will be
exp-a:run2010@osmfor the files in/data/experiment-a/2010exp-a:run2011@osmfor the files in/data/experiment-a/2011exp-b:alldata@osmfor the files in/data/experiment-b
To see how storage classes are used for pool selection have a look at the example ’Reserving Pools for Storage and Cache Classes’ in the PoolManager chapter.
There are more tags used by dCache if the
HSMType is enstore.
All of dCache makes use of the cell package. It is a framework for a distributed and scalable server system in Java. The dCache system is divided into cells which communicate with each other via messages. Several cells run simultaneously in one domain.
Each domain runs in a separate Java virtual machine and each
cell is run as a separate thread therein. Domain names have to be unique.
The domains communicate with each other via TCP using connections that are
established at start-up. The topology is controlled by the location manager
service. In the standard configuration, all domains connect with the
dCacheDomain, which routes all messages to the appropriate domains. This
forms a star topology.
Only for message communication
The TCP communication controlled by the location manager service is for
the short control messages sent between cells. Any transfer of the data
stored within dCache does not use these connections; instead, dedicated
TCP connections are established as needed.
A single node provides the location-manager service. For a single-host dCache
instance, this is localhost;
for multi-host dCache instances, the hostname of the node providing this service
must be configured using the serviceLocatorHost property.
The domain that hosts the location manager service is also configurable. By default,
the service runs within the dCacheDomain domain; however, this may be changed by
setting the broker.domain property. The port that
the location manager listens on is also configurable, using the
serviceLocatorPort property; however, most sites may leave this
property unaltered and use the default value.
Within this framework, cells send messages to other cells
addressing them in the form
<cellName>@<domainName>.
This way, cells can communicate without knowledge about the host
they run on. Some cells are well known, i.e. they
can be addressed just by their name without
@<domainName>. Evidently,
this can only work properly if the name of the cell is unique
throughout the whole system. If two well known cells with the same name are present, the
system will behave in an undefined way. Therefore it is wise to
take care when starting, naming, or renaming the well known
cells. In particular this is true for pools, which are well known cells.
A domain is started with a shell script
bin/dcache start <domainName>.
The routing manager and location manager cells are started in
each domain and are part of the underlying cell package
structure. Each domain will contain at least one cell in
addition to them.
Table of Contents
The replica service (which is also referred to as Replica
Manager) controls the number of replicas of a file on the pools.
If no tertiary storage
system is connected to a dCache instance (i.e., it
is configured as a large file
store), there might be only one copy of each file on
disk. (At least the precious
replica.) If a higher security and/or availability is
required, the resilience feature of dCache can be used: If
running in the default configuration, the replica service
will make sure that the number of replicas of a file will be at
least 2 and not more than 3. If only one replica is present it
will be copied to another pool by a pool to pool transfer. If four or more
replicas exist, some of them will be deleted.
The standard configuration assumes that the database server is
installed on the same machine as the replica service
— usually the admin node of the dCache instance. If
this is not the case you need to set the property
replicaManagerDatabaseHost.
To create and configure the database
replicas used by the replica
service in the database server do:
[root] #createdb -U srmdcache replicas[root] #psql -U srmdcache -d replicas -f /usr/share/dcache/replica/psql_install_replicas.sql
To activate the replica service you need to
Enable the
replicaservice in a layout file.[<someDomain>] ... [<someDomain>/replica]
Configure the service in the
/etc/dcache/dcache.conffile on the node with thedCacheDomainand on the node on which thepnfsmanageris running.replicaManager=yes
Note
It will not work properly if you defined the
replicaservice in one of the layout files and set this property tonoon the node with thedCacheDomainor on the node on which thepnfsmanageris running.Define a pool group for the resilient pools if necessary.
Start the
replicaservice.
In the default configuration, all pools of the dCache instance
which have been created with the command dcache pool
create will be managed. These pools are in the pool
group named default which does exist by
default. The replica service will keep the number of
replicas between 2 and 3 (including). At each restart of the
replica service the pool configuration in the database will
be recreated.
Example:
This is a simple example to get started with. All your pools
are assumed to be in the pool group
default.
In your layout file in the directory
/etc/dcache/layoutsdefine thereplicaservice.[dCacheDomain] ... [replicaDomain] [replicaDomain/replica]
In the file
/etc/dcache/dcache.confset the value for the propertyreplicaManagertoyesand theresilientGroupNametodefault.replicaManager=yes resilientGroupName=default
The pool group
defaultexists by default and does not need to be defined.To start the
replicaservice restart dCache.[root] #dcache restart
For more complex installations of dCache you might want to define a pool group for the resilient pools.
Define the resilient pool group in the
/var/lib/dcache/config/poolmanager.conf file on the host running
the poolmanager service. Only pools defined in the resilient
pool group will be managed by the replica service.
Example:
Login to the admin interface and cd to the PoolManager.
Define a poolgroup for resilient pools and add pools to that
poolgroup.
(local) admin >cd PoolManager(PoolManager) admin >psu create pgroup ResilientPools(PoolManager) admin >psu create pool pool3(PoolManager) admin >psu create pool pool4(PoolManager) admin >psu addto pgroup ResilientPools pool3(PoolManager) admin >psu addto pgroup ResilientPools pool4(PoolManager) admin >save
By default the pool group named
ResilientPools is used for replication.
To use another pool group defined in
/var/lib/dcache/config/poolmanager.conf for replication,
please specify the group name in the
etc/dcache.conf file.
resilientGroupName=<NameOfResilientPoolGroup>.
When a file is transfered into dCache its replica is copied into one of the pools. Since this is the only replica and normally the required range is higher (e.g., by default at least 2 and at most 3), this file will be replicated to other pools.
When some pools go down, the replica count for the files in these pools may fall below the valid range and these files will be replicated. Replicas of the file with replica count below the valid range and which need replication are called deficient replicas.
Later on some of the failed pools can come up and bring online more valid replicas. If there are too many replicas for some file these extra replicas are called redundant replicas and they will be “reduced”. Extra replicas will be deleted from pools.
The replica service counts the number of replicas for
each file in the pools which can be used online (see Pool States
below) and keeps the number of replicas within the valid range
(replicaMin, replicaMax).
The possible states of a pool are online,
down, offline,
offline-prepare and
drainoff. They can be set by the admin
through the admin interface. (See the section called “Commands for the admin interface”.)

- online
Normal operation.
Replicas in this state are readable and can be counted. Files can be written (copied) to this pool.
- down
A pool can be
downbecause- the admin stopped the domain in which the pool was running.
- the admin set the state value via the admin interface.
- the pool crashed
To confirm that it is safe to turn pool down there is the command ls unique in the admin interface to check number of files which can be locked in this pool. (See the section called “Commands for the admin interface”.)
Replicas in pools which are
downare not counted, so when a pool crashes the number ofonlinereplicas for some files is reduced. The crash of a pool (pool departure) may trigger replication of multiple files.On startup, the pool comes briefly to the
onlinestate, and then it goesdownto do pool “Inventory” to cleanup files which broke when the pool crashed during transfer. When the pool comes online again, thereplicaservice will update the list of replicas in the pool and store it in the database.Pool recovery (arrival) may trigger massive deletion of file replicas, not necessarily in this pool.
- offline
The admin can set the pool state to be
offline. This state was introduced to avoid unnecessary massive replication if the operator wants to bring the pool down briefly without triggering massive replication.Replicas in this pool are counted, therefore it does not matter for replication purpose if an
offlinepool goes down or up.When a pool comes
onlinefrom anofflinestate replicas in the pool will be inventoried to make sure we know the real list of replicas in the pool.- offline-prepare
This is a transient state betweeen
onlineandoffline.The admin will set the pool state to be
offline-prepareif he wants to change the pool state and does not want to trigger massive replication.Unique files will be evacuated — at least one replica for each unique file will be copied out. It is unlikely that a file will be locked out when a single pool goes down as normally a few replicas are online. But when several pools go down or set drainoff or offline file lockout might happen.
Now the admin can set the pool state
offlineand thendownand no file replication will be triggered.- drainoff
This is a transient state betweeen
onlineanddown.The admin will set the pool state to be
drainoffif he needs to set a pool or a set of pools permanently out of operation and wants to make sure that there are no replicas “locked out”.Unique files will be evacuated — at least one replica for each unique file will be copied out. It is unlikely that a file will be locked out when a single pool goes down as normally a few replicas are online. But when several pools go down or set drainoff or offline file lockout might happen.
Now the admin can set the pool state down. Files from other pools might be replicated now, depending on the values of
replicaMinandreplicaMax.
When the replica service starts it cleans up the
database. Then it waits for some time to give a chance to most
of the pools in the system to connect. Otherwise unnecessary
massive replication would start. Currently this is implemented
by some delay to start adjustments to give the pools a chance
to connect.
Normally (during Cold Start) all information in the database
is cleaned up and recreated again by polling pools which are
online shortly after some minimum delay
after the replica service starts. The replica
service starts to track the pools’ state (pool up/down
messages and polling list of online pools) and updates the
list of replicas in the pools which came online. This
process lasts for about 10-15 minutes to make sure all pools
came up online and/or got connected. Pools which once get
connected to the replica service are in online or
down state.
It can be annoying to wait for some large period of time until all known “good” pools get connected. There is a “Hot Restart” option to accelerate the restart of the system after the crash of the head node.
On Hot Restart the replica service retrieves
information about the pools’ states before the crash from
the database and saves the pools’ states to some internal
structure. When a pool gets connected the replica
service checks the old pool state and registers the old
pool’s state in the database again if the state was
offline,
offline-prepare or
drainoff state. The replica
service also checks if the pool was
online before the crash. When all pools
which were online get connected once, the
replica service supposes it recovered its old
configuration and the replica service starts
adjustments. If some pools went down during the connection
process they were already accounted and adjustment would
take care of it.
Example:
Suppose we have ten pools in the system, where eight pools
were online and two were
offline before a crash. The
replica service does not care about the two
offline pools to get connected to start
adjustments. For the other eight pools which were
online, suppose one pool gets connected
and then it goes down while the other pools try to
connect. The replica service considers this pool in
known state, and when the other seven pools get connected
it can start adjustments and does not wait any more.
If the system was in equilibrium state before the crash,
the replica service may find some deficient
replicas because of the crashed pool and start replication
right away.
For security reasons you might want to spread your replicas
such that they are not on the same host, or in the same
building or even in the same town. To configure this you need
to set the tag.hostname label for your
pools and check the properties
replicaCheckPoolHost and
replicaEnableSameHostReplica.
Example:
We assume that some pools of your dCache are in Hamburg and some are in Berlin. In the layout files where the respective pools are defined you can set
[poolDomain]
[poolDomain/pool1]
name=pool1
path=/srv/dcache/p1
maxDiskSpace=500G
waitForFiles=${path}/data
tag.hostname=Hamburg
and
[poolDomain]
[poolDomain/pool2]
name=pool2
path=/srv/dcache/p2
maxDiskSpace=500G
waitForFiles=${path}/data
tag.hostname=Berlin
By default the property
replicaCheckPoolHost is
true and
replicaEnableSameHostReplica is
false. This means that the
tag.hostname will be checked and the
replication to a pool with the same
tag.hostname is not allowed.
A hybrid dCache operates on a
combination of pools (maybe connected to tape) which are not
in a resilient pool group and the set of resilient pools. The
replica service takes care only of the subset of pools
configured in the pool group for resilient pools and ignores
all other pools.
Note
If a file in a resilient pool is marked precious and the pool were connected to a tape system, then it would be flushed to tape. Therefore, the pools in the resilient pool group are not allowed to be connected to tape.
If you are an advanced user, have proper privileges and you
know how to issue a command to the admin interface you may
connect to the ReplicaManager cell and issue the following
commands. You may find more commands in online help which are
for debug only — do not use them as they can stop
replica service operating properly.
- set pool <pool><state>
set pool state
- show pool <pool>
show pool state
- ls unique <pool>
Reports number of unique replicas in this pool.
- exclude <pnfsId>
exclude <pnfsId> from adjustments
- release <pnfsId>
removes transaction/
BADstatus for <pnfsId>- debug true | false
enable/disable DEBUG messages in the log file
- replica/cell.name
Default:
replicaManagerCell name of the
replicaservice- replicaManager
Default:
noSet this value to
yesif you want to use thereplicaservice.- resilientGroupName
Default:
ResilientPoolsIf you want to use another pool group for the resilient pools set this value to the name of the resilient pool group.
- replicaManagerDatabaseHost
Default:
localhostSet this value to the name of host of the
replicaservice database.- replicaDbName
Default:
replicasName of the replica database table.
- replicaDbUser
Default:
srmdcacheChange if the
replicasdatabase was created with a user other thansrmdcache.- replicaPasswordFile
Default: no password
- replicaDbJdbcDriver
Default:
org.postgresql.Driverreplicaservice was tested with PostgreSQL only.- replicaPoolWatchDogPeriod
Default:
600(10 min)Pools Watch Dog poll period. Poll the pools with this period to find if some pool went south without sending a notice (messages). Can not be too short because a pool can have a high load and not send pings for some time. Can not be less than pool ping period.
- replicaExcludedFilesExpirationTimeout
Default:
43200(12 hours)- replicaDelayDBStartTimeout
Default:
1200(20 min)On first start it might take some time for the pools to get connected. If replication started right away, it would lead to massive replications when not all pools were connected yet. Therefore the database init thread sleeps some time to give a chance to the pools to get connected.
- replicaAdjustStartTimeout
Default:
1200(20 min)Normally Adjuster waits for database init thread to finish. If by some abnormal reason it cannot find a database thread then it will sleep for this delay.
- replicaWaitReplicateTimeout
Default:
43200(12 hours)Timeout for pool-to-pool replica copy transfer.
- replicaWaitReduceTimeout
Default:
43200(12 hours)Timeout to delete replica from the pool.
- replicaDebug
Default:
falseDisable / enable debug messages in the log file.
- replicaMaxWorkers
Default:
6Number of worker threads to do the replication. The same number of worker threads is used for reduction. Must be more for larger systems but avoid situation when requests get queued in the pool.
- replicaMin
Default:
2Minimum number of replicas in pools which are
onlineoroffline.- replicaMax
Default:
3Maximum number of replicas in pools which are
onlineoroffline.- replicaCheckPoolHost
Default:
trueChecks
tag.hostnamewhich can be specified in the layout file for each pool.Set this property to
falseif you do not want to perform this check.- replicaEnableSameHostReplica
Default:
falseIf set to
trueyou allow files to be copied to a pool, which has the sametag.hostnameas the source pool.Note
The propertyreplicaCheckPoolHostneeds to be set totrueifreplicaEnableSameHostReplicais set to false.
Table of Contents
The heart of a dCache system is the poolmanager. When a user
performs an action on a file - reading or writing - a
transfer request is sent to the dCache
system. The poolmanager then decides how to handle this
request.
If a file the user wishes to read resides on one of the storage-pools within the dCache system, it will be transferred from that pool to the user. If it resides on several pools, the file will be retrieved from one of the pools determined by a configurable load balancing policy. If all pools the file is stored on are busy, a new copy of the file on an idle pool will be created and this pool will answer the request.
A new copy can either be created by a pool to pool transfer (p2p) or by fetching it from a connected tertiary storage system (sometimes called HSM - hierarchical storage manager). Fetching a file from a tertiary storage system is called staging. It is also performed if the file is not present on any of the pools in the dCache system. The pool manager has to decide on which pool the new copy will be created, i.e. staged or p2p-copied.
The behaviour of the poolmanager service is highly
configurable. In order to exploit the full potential of the
software it is essential to understand the mechanisms used and how
they are configured. The poolmanager service creates the
PoolManager cell, which is a unique cell in dCache and
consists of several sub-modules: The important ones are the
pool selection unit
(PSU) and the load balancing policy as defined
by the partition manager
(PM).
The poolmanager can be configured by either directly editing
the file /var/lib/dcache/config/poolmanager.conf
or via the Admin
Interface. Changes made via the Admin Interface will be
saved in the file
/var/lib/dcache/config/poolmanager.conf by the
save command. This file will be parsed,
whenever the dCache starts up. It is a simple text file
containing the corresponding Admin Interface commands. It can
therefore also be edited before the system is started. It can also
be loaded into a running system with the reload
command. In this chapter we will describe the commands allowed in
this file.
The PSU is responsible for finding the set of pools which can be used for a specific transfer-request. By telling the PSU which pools are permitted for which type of transfer-request, the administrator of the dCache system can adjust the system to any kind of scenario: Separate organizations served by separate pools, special pools for writing the data to a tertiary storage system, pools in a DMZ which serves only a certain kind of data (e.g., for the grid). This section explains the mechanism employed by the PSU and shows how to configure it with several examples.
The PSU generates a list of allowed storage-pools for each incoming transfer-request. The PSU configuration described below tells the PSU which combinations of transfer-request and storage-pool are allowed. Imagine a two-dimensional table with a row for each possible transfer-request and a column for each pool - each field in the table containing either “yes” or “no”. For an incoming transfer-request the PSU will return a list of all pools with “yes” in the corresponding row.
Instead of “yes” and “no” the table really contains a preference - a non-negative integer. However, the PSU configuration is easier to understand if this is ignored.
Actually maintaining such a table in memory (and as user in a configuration file) would be quite inefficient, because there are many possibilities for the transfer-requests. Instead, the PSU consults a set of rules in order to generate the list of allowed pools. Each such rule is called a link because it links a set of transfer-requests to a group of pools.
A link consists of a set of unit groups and a list of pools. If all the unit groups are matched, the pools belonging to the link are added to the list of allowable pools.
A link is defined in the file
/var/lib/dcache/config/poolmanager.conf by
psu create link <link> <unitgroup> psu set link <link> -readpref=<rpref> -writepref=<wpref> -cachepref=<cpref> -p2ppref=<ppref> psu add link <link> <poolgroup>
For the preference values see the section called “Preference Values for Type of Transfer”.
The main task is to understand how the unit groups in a link are defined. After we have dealt with that, the preference values will be discussed and a few examples will follow.
The four properties of a transfer request, which are relevant for the PSU, are the following:
- Location of the File
The location of the file in the file system is not used directly. Each file has the following two properties which can be set per directory:
Storage Class. The storage class is a string. It is used by a tertiary storage system to decide where to store the file (i.e. on which set of tapes) and dCache can use the storage class for a similar purpose (i.e. on which pools the file can be stored.). A detailed description of the syntax and how to set the storage class of a directory in the namespace is given in the section called “Storage Classes”.
Cache Class. The cache class is a string with essentially the same functionality as the storage class, except that it is not used by a tertiary storage system. It is used in cases, where the storage class does not provide enough flexibility. It should only be used, if an existing configuration using storage classes does not provide sufficient flexibility.
- IP Address
The IP address of the requesting host.
- Protocol / Type of Door
The protocol respectively the type of door used by the transfer.
- Type of Transfer
The type of transfer is either
read,write,p2prequest orcache.A request for reading a file which is not on a read pool will trigger a
p2prequest and a subsequentreadrequest. These will be treated as two separate requests.A request for reading a file which is not stored on disk, but has to be staged from a connected tertiary storage system will trigger a
cacherequest to fetch the file from the tertiary storage system and a subsequentreadrequest. These will be treated as two separate requests.
Each link contains one or more unit groups, all of which have to be matched by the transfer request. Each unit group in turn contains several units. The unit group is matched if at least one of the units is matched.
There are four types of units: network
(-net), protocol
(-protocol), storage class
(-store) and cache class
(-dcache) units. Each type imposes a
condition on the IP address, the protocol, the storage class
and the cache class respectively.
For each transfer at most one of each of the four unit types will match. If more than one unit of the same type could match the request then the most restrictive unit matches.
The unit that matches is selected from all units defined in dCache, not just those for a particular unit group. This means that, if a unit group has a unit that could match a request but this request also matches a more restrictive unit defined elsewhere then the less restrictive unit will not match.
- Network Unit
A network unit consists of an IP address and a net mask written as
<IP-address>/<net
		mask>
, say111.111.111.0/255.255.255.0. It is satisfied, if the request is coming from a host with IP address within the subnet given by the address/netmask pair.psu create ugroup <name-of-unitgroup> psu create unit
-net<IP-address>/<net mask> psu addto ugroup <name-of-unitgroup> <IP-address>/<net mask>- Protocol Unit
A protocol unit consists of the name of the protocol and the version number written as <protocol-name>/<version-number>, e.g.,
xrootd/3.psu create ugroup <name-of-unitgroup> psu create unit
-protocol<protocol-name>/<version-number> psu addto ugroup <name-of-unitgroup> <protocol-name>/<version-number>- Storage Class Unit
A storage class unit is given by a storage class. It is satisfied if the requested file has this storage class. Simple wild cards are allowed: for this it is important to know that a storage class must always contain exactly one
@-symbol as will be explained in the section called “Storage Classes”. In a storage class unit, either the part before the@-symbol or both parts may be replaced by a*-symbol; for example,*@osmand*@*are both valid storage class units whereassomething@*is invalid. The*-symbol represents a limited wildcard: any string that doesn’t contain an@-symbol will match.psu create ugroup <name-of-unitgroup> psu create unit
-store<StoreName>:<StorageGroup>@<type-of-storage-system> psu addto ugroup <name-of-unitgroup> <StoreName>:<StorageGroup>@<type-of-storage-system>- Cache Class Unit
A cache class unit is given by a cache class. It is satisfied, if the cache class of the requested file agrees with it.
psu create ugroup <name-of-unitgroup> psu create unit
-dcache<name-of-cache-class> psu addto ugroup <name-of-unitgroup> <name-of-cache-class>
The conditions for the type of transfer
are not specified with units. Instead, each link contains four
attributes -readpref,
-writepref,
-p2ppref and
-cachepref, which specify a
preference value for the respective types of transfer. If all
the unit groups in the link are matched, the corresponding
preference is assigned to each pool the link points to. Since
we are ignoring different preference values at the moment, a
preference of 0 stands for
no and a non-zero preference stands for
yes. A negative value for -p2ppref means, that the value for -p2ppref should equal the one for the -readpref.
Note
This explanation of the preference values can be skipped
at first reading. It will not be relevant, if all non-zero
preference values are the same. If you want to try
configuring the pool manager right now without bothering
about the preferences, you should only use
0 (for no) and, say,
10 (for yes) as
preferences. You can choose -p2ppref=-1 if it should match the value for -readpref. The first examples below are of this type.
If several different non-zero preference values are used, the PSU will not generate a single list but a set of lists, each containing pools with the same preference. The Pool Manager will use the list of pools with highest preference and select a pool according to the load balancing policy for the transfer. Only if all pools with the highest preference are offline, the next list will be considered by the Pool Manager. This can be used to configure a set of fall-back pools which are used if none of the other pools are available.
Pools can be grouped together to pool groups.
psu create pgroup <name-of-poolgroup>
psu create pool <name-of-pool>
psu addto pgroup <name-of-poolgroup> <name-of-pool>
Example:
Consider a host pool1 with two pools,
pool1_1 and pool1_2,
and a host pool2 with one pool
pool2_1. If you want to treat them in
the same way, you would create a pool group and put all of
them in it:
psu create pgroup normal-pools
psu create pool pool1_1
psu addto pgroup normal-pools pool1_1
psu create pool pool1_2
psu addto pgroup normal-pools pool1_2
psu create pool pool2_1
psu addto pgroup normal-pools pool2_1
If you later want to treat pool1_2
differently from the others, you would remove it from this
pool group and add it to a new one:
psu removefrom pgroup normal-pools pool1_2
psu create pgroup special-pools
psu addto pgroup special-pools pool1_2
In the following, we will assume that the necessary pool
groups already exist. All names ending with
-pools will denote pool
groups.
Note that a pool-node will register itself with the
PoolManager: The pool will be created within the PSU and
added to the pool group
default, if that
exists. This is why the dCache system will automatically use
any new pool-nodes in the standard configuration: All pools
are in default and can
therefore handle any request.
The storage class is a string of the form
<StoreName>:<StorageGroup>@<type-of-storage-system>,
where
<type-of-storage-system>
denotes the type of storage system in use, and
<StoreName>:<StorageGroup>
is a string describing the storage class in a syntax which
depends on the storage system. In general use
<type-of-storage-system>=osm.
Consider for example the following setup:
Example:
[root] #/usr/bin/chimera-cli lstag /data/experiment-aTotal: 2 OSMTemplate sGroup[root] #/usr/bin/chimera-cli readtag /data/experiment-a OSMTemplateStoreName myStore[root] #/usr/bin/chimera-cli readtag /data/experiment-a sGroupSTRING
This is the setup after a fresh installation and it will lead
to the storage class
myStore:STRING@osm. An adjustment to more
sensible values will look like
[root] #/usr/bin/chimera-cli writetag /data/experiment-a OSMTemplate "StoreName exp-a"[root] #/usr/bin/chimera-cli writetag /data/experiment-a sGroup "run2010"
and will result in the storage class
exp-a:run2010@osm for any data stored in
the /data/experiment-a
directory.
To summarize: The storage class depends on the directory the data is stored in and is configurable.
Storage classes might already be in use for the configuration of a tertiary storage system. In most cases they should be flexible enough to configure the PSU. However, in rare cases the existing configuration and convention for storage classes might not be flexible enough.
Consider for example a situation, where data produced by an
experiment always has the same storage class
exp-a:alldata@osm. This is good for the
tertiary storage system, since all data is supposed to go to
the same tape set sequentially. However, the data also
contains a relatively small amount of meta-data, which is
accessed much more often by analysis jobs than the rest of the
data. You would like to keep the meta-data on a dedicated set
of dCache pools. However, the storage class does not provide
means to accomplish that.
The cache class of a directory is set by the tag
cacheClass as follows:
Example:
[root] #/usr/bin/chimera-cli writetag /data/experiment-a cacheClass "metaData"
In this example the meta-data is stored in directories which are tagged in this way.
Check the existing tags of a directory and their content by:
[root] #/usr/bin/chimera-cli lstag /path/to/directoryTotal: numberOfTags tag1 tag2 ...[root] #/usr/bin/chimera-cli readtag /path/to/directory tag1contentOfTag1
Note
A new directory will inherit the tags from the parent directory. But updating a tag will not update the tags of any child directories.
Now we have everything we need to define a link.
psu create ugroup <name-of-unitgroup> psu create unit- <type><unit> psu addto ugroup <name-of-unitgroup> <unit> psu create pgroup <poolgroup> psu create pool <pool> psu addto pgroup <poolgroup> <pool> psu create link <link> <name-of-unitgroup> psu set link <link>-readpref=<10>-writepref=<0>-cachepref=<10>-p2ppref=<-1> psu add link <link> <poolgroup>
Find some examples for the configuration of the PSU below.
The dCache we are going to configure receives data from a running experiment, stores the data onto a tertiary storage system, and serves as a read cache for users who want to analyze the data. While the new data from the experiment should be stored on highly reliable and therefore expensive systems, the cache functionality may be provided by inexpensive hardware. It is therefore desirable to have a set of pools dedicated for writing the new data and a separate set for reading.
Example:
The simplest configuration for such a setup would consist of two links “write-link” and “read-link”. The configuration is as follows:
psu create pgroup read-pools psu create pool pool1 psu addto pgroup read-pools pool1 psu create pgroup write-pools psu create pool pool2 psu addto pgroup write-pools pool2 psu create unit-net0.0.0.0/0.0.0.0 psu create ugroup allnet-cond psu addto ugroup allnet-cond 0.0.0.0/0.0.0.0 psu create link read-link allnet-cond psu set link read-link-readpref=10-writepref=0-cachepref=10 psu add link read-link read-pools psu create link write-link allnet-cond psu set link write-link-readpref=0-writepref=10-cachepref=0 psu add link write-link write-pools
Why is the unit group allnet-cond
necessary? It is used as a condition which is always true in
both links. This is needed, because each link must contain
at least one unit group.
You might not want to give access to the pools for the whole network, as in the previous example (the section called “Separate Write and Read Pools”), though.
Example:
Assume, the experiment data is copied into the cache from
the hosts with IP 111.111.111.201,
111.111.111.202, and
111.111.111.203. As you might guess,
the subnet of the site is
111.111.111.0/255.255.255.0. Access
from outside should be denied. Then you would modify the
above configuration as follows:
psu create pgroup read-pools psu create pool pool1 psu addto pgroup read-pools pool1 psu create pgroup write-pools psu create pool pool2 psu addto pgroup write-pools pool2 psu create unit-store*@* psu create unit-net111.111.111.0/255.255.255.0 psu create unit-net111.111.111.201/255.255.255.255 psu create unit-net111.111.111.202/255.255.255.255 psu create unit-net111.111.111.203/255.255.255.255 psu create ugroup write-cond psu addto ugroup write-cond 111.111.111.201/255.255.255.255 psu addto ugroup write-cond 111.111.111.202/255.255.255.255 psu addto ugroup write-cond 111.111.111.203/255.255.255.255 psu create ugroup read-cond psu addto ugroup read-cond 111.111.111.0/255.255.255.0 psu addto ugroup read-cond 111.111.111.201/255.255.255.255 psu addto ugroup read-cond 111.111.111.202/255.255.255.255 psu addto ugroup read-cond 111.111.111.203/255.255.255.255 psu create link read-link read-cond psu set link read-link-readpref=10-writepref=0-cachepref=10 psu add link read-link read-pools psu create link write-link write-cond psu set link write-link-readpref=0-writepref=10-cachepref=0 psu add link write-link write-pools
Important
For a given transfer exactly zero or one storage class
unit, cache class unit, net unit and protocol unit will
match. As always the most restrictive one will match, the
IP 111.111.111.201 will match the
111.111.111.201/255.255.255.255 unit
and not the 111.111.111.0/255.255.255.0
unit. Therefore if you only add
111.111.111.0/255.255.255.0 to the unit
group “read-cond”, the transfer request
coming from the IP 111.111.111.201 will
only be allowed to write and not to read. The same is true
for transfer requests from 111.111.111.202 and
111.111.111.203.
If pools are financed by one experimental group, they probably do not like it if they are also used by another group. The best way to restrict data belonging to one experiment to a set of pools is with the help of storage class conditions. If more flexibility is needed, cache class conditions can be used for the same purpose.
Example:
Assume, data of experiment A obtained in 2010 is written
into subdirectories in the namespace tree which are tagged
with the storage class
exp-a:run2010@osm, and
similarly for the other years. (How this is done is
described in the section called “Storage Classes”.)
Experiment B uses the storage class
exp-b:alldata@osm for
all its data. Especially important data is tagged with
the cache class
important. (This is
described in the section called “Cache Class”.) A suitable
setup would be
psu create pgroup exp-a-pools psu create pool pool1 psu addto pgroup exp-a-pools pool1 psu create pgroup exp-b-pools psu create pool pool2 psu addto pgroup exp-b-pools pool2 psu create pgroup exp-b-imp-pools psu create pool pool3 psu addto pgroup exp-b-imp-pools pool3 psu create unit-net111.111.111.0/255.255.255.0 psu create ugroup allnet-cond psu addto ugroup allnet-cond 111.111.111.0/255.255.255.0 psu create ugroup exp-a-cond psu create unit -store exp-a:run2011@osm psu addto ugroup exp-a-cond exp-a:run2011@osm psu create unit -store exp-a:run2010@osm psu addto ugroup exp-a-cond exp-a:run2010@osm psu create link exp-a-link allnet-cond exp-a-cond psu set link exp-a-link-readpref=10-writepref=10-cachepref=10 psu add link exp-a-link exp-a-pools psu create ugroup exp-b-cond psu create unit-storeexp-b:alldata@osm psu addto ugroup exp-b-cond exp-b:alldata@osm psu create ugroup imp-cond psu create unit-dcacheimportant psu addto ugroup imp-cond important psu create link exp-b-link allnet-cond exp-b-cond psu set link exp-b-link-readpref=10-writepref=10-cachepref=10 psu add link exp-b-link exp-b-pools psu create link exp-b-imp-link allnet-cond exp-b-cond imp-cond psu set link exp-b-imp-link-readpref=20-writepref=20-cachepref=20 psu add link exp-b-link exp-b-imp-pools
Data tagged with cache class
“important” will always be
written and read from pools in the pool group
exp-b-imp-pools, except when all pools
in this group cannot be reached. Then the pools in
exp-a-pools will be used.
Note again that these will never be used otherwise. Not
even, if all pools in exp-b-imp-pools
are very busy and some pools in
exp-a-pools have nothing to do and lots
of free space.
The central IT department might also want to set up a few pools, which are used as fall-back, if none of the pools of the experiments are functioning. These will also be used for internal testing. The following would have to be added to the previous setup:
Example:
psu create pgroup it-pools psu create pool pool_it psu addto pgroup it-pools pool_it psu create link fallback-link allnet-cond psu set link fallback-link-readpref=5-writepref=5-cachepref=5 psu add link fallback-link it-pools
Note again that these will only be used, if none of the
experiments pools can be reached, or if the storage class
is not of the form exp-a:run2009@osm,
exp-a:run2010@osm, or
exp-b:alldata@osm. If the administrator
fails to create the unit
exp-a:run2005@osm and add it to the
unit group exp-a-cond, the fall-back
pools will be used eventually.
The partition manager defines one or more load balancing policies. Whereas the PSU produces a prioritized set of candidate pools using a collection of rules defined by the administrator, the load balancing policy determines the specific pool to use. It is also the load balancing policy that determines when to fall back to lesser prirority links, or when to trigger creation of additional copies of a file.
Since the load balancing policy and parameters are defined per partition, understanding the partition manager is essential to tuning load balancing. This does not imply that one has to partition the dCache instance. It is perfectly valid to use a single partition for the complete instance.
This section documents the use of the partition manager, how to create partitions, set parameters and how to associate links with partitions. In the following sections the available partition types and their configuration parameters are described.
There are various parameters that affect the load balancing policy. Some of them are generic and apply to any load balancing policy, but many are specific to a particular policy. To avoid limiting the complete dCache instance to a single configuration, the choice of load balancing policy and the various parameters apply to partitions of the instance. The load balancing algorithm and the available parameters is determined by the partition type.
Each PSU link can be associated with a different
partion and the policy and parameters of that partition will
be used to choose a pool from the set of candidate pools. The
only partition that exists without being explicitly created is
the partition called default. This
partition is used by all links that do not explicitly identify
a partition. Other partitions can be created or modified as
needed.
The default partition has a
hard-coded partition type called
classic. This type implements the one load
balancing policy that was available in dCache before version
2.0. The classic partition type is
described later. Other partitions have one of a number of
available types. The system is pluggable, meaning that third
party plugins can be loaded at runtime and add additional
partition types, thus providing the ultimate control over load
balancing in dCache. Documentation on how to develop plugins
is beyond the scope of this chapter.
To ease the management of partition parameters, a common
set of shared parameters can be defined outside all
partitions. Any parameter not explicitly set on a partition
inherits the value from the common set. If not defined in the
common set, a default value determined by the partition type
is used. Currently, the common set of parameters happens to be
the same as the parameters of the default
partition, however this is only due to compatibility
constraints and may change in future versions.
For each partition you can choose the load balancing policy. You do this by chosing the type of the partition.
Currently four different partition types are supported:
classic:-
This is the pool selection algorithm used in the versions
of dCache prior to version
2.0. See the section called “Classic Partitions” for a detailed description. random:- This pool selection algorithm selects a pool randomly from the set of available pools.
lru:- This pool selection algorithm selects the pool that has not been used the longest.
wass:- An experimental selection algorithm that select pools randomly weighted by available space, while incorporating age and amount of garbage collectible files and information about load. Will be refined in future versions and may one day become the default.
Commands related to dCache partitioning:
pm typesLists available partition types. New partition types can be added through plugins.
pm create[-type=<partitionType>] <partitionName>Creates a new partition. If no partition type is specified, then a
classicpartition is created.pm set[<partitionName>] -<parameterName> =<value>|offSets a parameter <parameterName> to a new value.
If <partitionName> is omitted, the common shared set of parameters is updated. The value is used by any partition for which the parameter is not explicitly set.
If a parameter is set to
offthen this parameter is no longer defined and is inherited from the common shared set of parameters, or a partition type specific default value is used if the parameter is not defined in the common set.pm ls[-l] [<partitionName>]Lists a single or all partitions, including the type of each partition. If a partition name or the
-loption are used, then the partition parameters are shown too. Inherited and default values are identified as such.pm destroy<partitionName>Removes a partition from dCache. Any links configured to use this partition will fall back to the
defaultpartition.
A partition, so far, is just a set of parameters which
may or may not differ from the default set. To let a partition
relate to a part of the dCache, links are used. Each link
may be assigned to exactly one partition. If not set, or the
assigned partition doesn’t exist, the link defaults to the
default partition.
psu set link [<linkName>] -section=<partitionName> [<other-options>...]
Whenever this link is chosen for pool selection, the associated parameters of the assigned partition will become active for further processing.
Warning
Depending on the way links are setup it may very
well happen that more than just one link is triggered for
a particular dCache request. This is not illegal but
leads to an ambiguity in selecting an appropriate dCache
partition. If only one of the selected links has a
partition assigned, this partition is chosen. Otherwise,
if different links point to different partitions, the
result is indeterminate. This issue is not yet solved and
we recommend to clean up the poolmanager configuration
to eliminate links with the same preferences for the same
type of requests.
In the Web Interface you can find a web page listing partitions and more information. You will find a page summarizing the partition status of the system. This is essentially the output of the command pm ls -l.
Example:
For your dCache on dcache.example.org the address is
http://dcache.example.org:2288/poolInfo/parameterHandler/set/matrix/*
For the subsequent examples we assume a basic poolmanager
setup :
Example:
#
# define the units
#
psu create unit -protocol   */*
psu create unit -protocol   xrootd/*
psu create unit -net        0.0.0.0/0.0.0.0
psu create unit -net        131.169.0.0/255.255.0.0
psu create unit -store      *@*
#
#  define unit groups
#
psu create ugroup  any-protocol
psu create ugroup  any-store
psu create ugroup  world-net
psu create ugroup  xrootd
#
psu addto ugroup any-protocol */*
psu addto ugroup any-store    *@*
psu addto ugroup world-net    0.0.0.0/0.0.0.0
psu addto ugroup desy-net     131.169.0.0/255.255.0.0
psu addto ugroup xrootd       xrootd/*
#
#  define the pools
#
psu create pool pool1
psu create pool pool2
psu create pool pool3
psu create pool pool4

#
#  define the pool groups
#
psu create pgroup default-pools
psu create pgroup special-pools
#
psu addto pgroup default-pools pool1
psu addto pgroup default-pools pool2
#
psu addto pgroup special-pools pool3
psu addto pgroup special-pools pool4
#
For a special set of pools, where we only allow the xrootd
protocol, we don’t want the datasets to be replicated on high
load while for the rest of the pools we allow replication on
hot spot detection.
Example:
#
pm create xrootd-section
#
pm set default        -p2p=0.4
pm set xrootd-section -p2p=0.0
#
psu create link default-link any-protocol any-store world-net
psu add    link default-link default-pools
psu set    link default-link -readpref=10 -cachepref=10 -writepref=0
#
psu create link xrootd-link xrootd any-store world-net
psu add    link xrootd-link special-pools
psu set    link xrootd-link -readpref=10 -cachepref=10 -writepref=0
psu set    link xrootd-link -section=xrootd-section
#
For a set of pools we select pools following the default setting of cpu and space related cost factors. For incoming traffic from outside, though, we select the same pools, but in a randomly distributed fashion. Please note that this is not really a physical partitioning of the dCache system, but rather a virtual one, applied to the same set of pools.
Example:
#
pm create incoming-section
#
pm set default          -cpucostfactor=0.2 -spacecostfactor=1.0
pm set incoming-section -cpucostfactor=0.0 -spacecostfactor=0.0
#
psu create link default-link any-protocol any-store desy-net
psu add    link default-link default-pools
psu set    link default-link -readpref=10 -cachepref=10 -writepref=10
#
psu create link default-link any-protocol any-store world-net
psu add    link default-link default-pools
psu set    link default-link -readpref=10 -cachepref=10 -writepref=0
#
psu create link incoming-link any-protocol any-store world-net
psu add    link incoming-link default-pools
psu set    link incoming-link -readpref=10 -cachepref=10 -writepref=10
psu set    link incoming-link -section=incoming-section
#
The classic partition type implements
the load balancing policy known from dCache releases before
version 2.0. This partition type is still the default. This
section describes this load balancing policy and the available
configuration parameters.
Example:
To create a classic partition use the command: pm create -type=classic <partitionName>
From the allowable pools as determined by the pool selection unit, the pool manager determines the pool used for storing or reading a file by calculating a cost value for each pool. The pool with the lowest cost is used.
If a client requests to read a file which is stored on more than one allowable pool, the performance costs are calculated for these pools. In short, this cost value describes how much the pool is currently occupied with transfers.
If a pool has to be selected for storing a file, which is either written by a client or restored from a tape backend, this performance cost is combined with a space cost value to a total cost value for the decision. The space cost describes how much it “hurts” to free space on the pool for the file.
The cost module is responsible for calculating the cost values for all pools. The pools regularly send all necessary information about space usage and request queue lengths to the cost module. It can be regarded as a cache for all this information. This way it is not necessary to send “get cost” requests to the pools for each client request. The cost module interpolates the expected costs until a new precise information package is coming from the pools. This mechanism prevents clumping of requests.
Calculating the cost for a data transfer is done in two steps. First, the cost module merges all information about space and transfer queues of the pools to calculate the performance and space costs separately. Second, in the case of a write or stage request, these two numbers are merged to build the total cost for each pool. The first step is isolated within a separate loadable class. The second step is done by the partition.
The load of a pool is determined by comparing the current number of active and waiting transfers to the maximum number of concurrent transfers allowed. This is done separately for each of the transfer types (store, restore, pool-to-pool client, pool-to-pool server, and client request) with the following equation:
perfCost(per Type) = ( activeTransfers + waitingTransfers ) / maxAllowed .
The maximum number of concurrent transfers (maxAllowed) can be configured with the commands st set max active (store), rh set max active (restore), mover set max active (client request), mover set max active -queue=p2p (pool-to-pool server), and pp set max active (pool-to-pool client).
Then the average is taken for each mover type where maxAllowed is not zero. For a pool where store, restore and client transfers are allowed, e.g.,
perfCost(total) = ( perfCost(store) + perfCost(restore) + perfCost(client) ) / 3 ,
and for a read only pool:
perfCost(total) = ( perfCost(restore) + perfCost(client) ) / 2 .
For a well balanced system, the performance cost should not exceed 1.0.
In this section only the new scheme for calculating the space cost will be described. Be aware, that the old scheme will be used if the breakeven parameter of a pool is larger or equal 1.0.
The cost value used for determining a pool for storing a file depends either on the free space on the pool or on the age of the least recently used (LRU) file, which whould have to be deleted.
The space cost is calculated as follows:
| If | freeSpace > gapPara | then | spaceCost = 3 * newFileSize / freeSpace | ||
| If | freeSpace <= gapPara | and | lruAge < 60 | then | spaceCost = 1 + costForMinute |
| If | freeSpace <= gapPara | and | lruAge >= 60 | then | spaceCost = 1 + costForMinute * 60 / lruAge |
where the variable names have the following meanings:
- freeSpace
The free space left on the pool
- newFileSize
The size of the file to be written to one of the pools, and at least 50MB.
- lruAge
The age of the least recently used file on the pool.
- gapPara
The gap parameter. Default is 4 GiB. The size of free space below which it will be assumed that the pool is full and consequently the least recently used file has to be removed. If, on the other hand, the free space is greater than
gapPara, it will be expensive to store a file on the pool which exceeds the free space.It can be set per pool with the set gap command. This has to be done in the pool cell and not in the pool manager cell. Nevertheless it only influences the cost calculation scheme within the pool manager and not the bahaviour of the pool itself.
- costForMinute
A parameter which fixes the space cost of a one-minute-old LRU file to (1 + costForMinute). It can be set with the set breakeven, where
costForMinute = breakeven * 7 * 24 * 60.
I.e. the the space cost of a one-week-old LRU file will be (1 + breakeven). Note again, that all this only applies if breakeven < 1.0
The prescription above can be stated a little differently as follows:
| If | freeSpace > gapPara | then | spaceCost = 3 * newFileSize / freeSpace |
| If | freeSpace <= gapPara | then | spaceCost = 1 + breakeven * 7 * 24 * 60 * 60 / lruAge , |
where newFileSize is at least 50MB and
lruAge at least one minute.
As the last version of the formula suggests, a pool can be in two states: Either freeSpace > gapPara or freeSpace <= gapPara - either there is free space left to store files without deleting cached files or there isn’t.
Therefore, gapPara should be
around the size of the smallest files which
frequently might be written to the pool. If files
smaller than gapPara appear
very seldom or never, the pool might get stuck in
the first of the two cases with a high cost.
If the LRU file is smaller than the new file, other files might have to be deleted. If these are much younger than the LRU file, this space cost calculation scheme might not lead to a selection of the optimal pool. However, in pratice this happens very seldomly and this scheme turns out to be very efficient.
The total cost is a linear combination of the
performance
and space
cost.
I.e.
totalCost = ccf * perfCost + scf * spaceCost ,
where ccf and scf are
configurable with the command set pool decision.
E.g.,
(PoolManager) admin >set pool decision-spacecostfactor=3-cpucostfactor=1
will give the space cost three times the weight of the performance cost.
Classic partitions have a large number of tunable parameters. These parameters are set using the pm set command.
Example:
To set the space cost factor on the
default partition to
0.3, use the following
command:
pm set default -spacecostfactor=0.3
| Command | Meaning | Type |
|---|---|---|
|
|
Sets the
The default value is | float |
|
|
Sets the cpu cost factor for the partition.
The default value is | float |
|
|
The concept of the idle value
will be turned on if
<idle-value> >
A pool is idle if its performance cost is smaller than the <idle-value>. Otherwise it is not idle. If one or more pools that satisfy the read request are idle then only one of them is chosen for a particular file irrespective of total cost. I.e. if the same file is requested more than once it will always be taken from the same pool. This allowes the copies on the other pools to age and be garbage collected.
The default value is | float |
|
|
Sets the static replication threshold for the partition.
If the performance cost on the best pool exceeds
<p2p-value> and the value for
<slope>
=
The default value is | float |
|
|
Sets the alert value for the partition. If the best pool’s performance cost exceeds the p2p value and the alert value then no pool to pool copy is triggered and a message will be logged stating that no pool to pool copy will be made.
The default value is | float |
|
|
Sets the panic cost cut level for the partition. If the performance cost of the best pool exceeds the panic cost cut level the request will fail.
The default value is | float |
|
|
Sets the fallback cost cut level for the partition.
If the best pool’s performance cost exceeds the
fallback cost cut level then a pool of the next
level will be chosen. This
means for example that instead of choosing a pool with
The default value is | float |
|
|
Sets the dynamic replication threshold value for the partition.
If <slope>>
If the performance cost on the best pool exceeds this threshold then this pool is called hot.
The default value is | float |
|
|
This value can be specified if an HSM is attached to the dCache.
If a partition has no HSM connected, then this
option is overridden. This means that no matter which
value is set for
By setting <value> =
If <value> =
As a side effect of setting <value> =
The default value is | boolean |
|
|
Determines whether pool to pool replication is allowed if the best pool for a read request is hot.
The default value is | boolean |
|
|
If the best pool is hot and the requested file will be
copied either from the hot pool or from tape to
another pool, then the requested file will be read
from the pool where it just had been copied to if
<value> =
The default value is | boolean |
|
|
Set the stage allowed value to
As a side effect, setting the value for
The default value is | boolean |
|
|
If the best pool is hot, p2p-oncost is disabled and an HSM is connected to a pool then this parameter determines whether to stage the requested file to a different pool.
The default value is | boolean |
|
|
Sets the maximal number of replicas of one file. If the maximum is reached no more replicas will be created.
The default value is | integer |
The PoolManager supports a type of objects called
link groups. These link groups are
used by the SRM
SpaceManager to make reservations against
space. Each link group corresponds to a number of dCache
pools in the following way: A link group is a collection of
links and each link
points to a set of pools. Each link group knows about the
size of its available space, which is the sum of all sizes
of available space in all the pools included in this link
group.
To create a new link group login to the Admin Interface and
cd to the PoolManager.
(local) admin >cd PoolManager(PoolManager) admin >psu create linkGroup <linkgroup>(PoolManager) admin >psu addto linkGroup <linkgroup> <link>(PoolManager) admin >save
With save the changes will be saved to
the file
/var/lib/dcache/config/poolmanager.conf.
Note
You can also edit the file
/var/lib/dcache/config/poolmanager.conf
to create a new link group. Please make sure that it
already exists. Otherwise you will have to create it
first via the Admin Interface by
(PoolManager) admin >save
Edit the file
/var/lib/dcache/config/poolmanager.conf
psu create linkGroup <linkgroup>
psu addto linkGroup <linkgroup> <link>
After editing this file you will have to restart the
domain which contains the PoolManager cell to apply
the changes.
Note
Administrators will have to take care, that no pool is present in more than one link group.
Properties of space
reservation. The dCache administrator can specify a
RetentionPolicy and
an AccessLatency for
the space reservation, where
RetentionPolicy describes the quality of
the storage service that will be provided for the data (files)
stored in this space reservation and
AccessLatency describes the availability of
this data.
A link group has five boolean properties called
replicaAllowed,
outputAllowed,
custodialAllowed,
onlineAllowed and
nearlineAllowed. The values of these
properties (true or
false) can be configured via the Admin
Interface or directly in the file
/var/lib/dcache/config/poolmanager.conf.
The link groups contained in a space reservation match the
RetentionPolicy and the
AccessLatency of the space reservation.
(PoolManager) admin >psu set linkGroup custodialAllowed <linkgroup> <true|false>(PoolManager) admin >psu set linkGroup outputAllowed <linkgroup> <true|false>(PoolManager) admin >psu set linkGroup replicaAllowed <linkgroup> <true|false>(PoolManager) admin >psu set linkGroup onlineAllowed <linkgroup> <true|false>(PoolManager) admin >psu set linkGroup nearlineAllowed <linkgroup> <true|false>
Moreover an attribute can be assigned to a link group.
(PoolManager) admin >psu set linkGroup attribute <linkgroup> <key>=<value>
Example:
(PoolManager) admin >psu set linkGroup attribute name-of-LinkGroup VO=dteam001(PoolManager) admin >psu set linkGroup attribute name-of-LinkGroup VO=cms001(PoolManager) admin >psu set linkGroup attribute name-of-LinkGroup HSM=osm
Note
Please note that that it is up to administrators that the link groups’ attributes are specified correctly.
For example dCache will not complain if the link group
that does not support tape backend will be declared as one
that supports custodial.
Table of Contents
- Introduction
- Scope of this chapter
- Requirements for a Tertiary Storage System
- How dCache interacts with a Tertiary Storage System
- Details on the TSS-support
executable - Configuring pools to interact with a Tertiary Storage System
- How to Store-/Restore files via the Admin Interface
- How to monitor what’s going on
- Example of an
executableto simulate a tape backend
One of the features dCache provides is the ability to migrate files from its disk repository to one or more connected Tertiary Storage Systems (TSS) and to move them back to disk when necessary. Although the interface between dCache and the TSS is kept simple, dCache assumes to interact with an intelligent TSS. dCache does not drive tape robots or tape drives by itself. More detailed requirements to the storage system are described in one of the subsequent paragraphs.
This document describes how to enable a standard dCache installation to interact with a Tertiary Storage System. In this description we assume that
- every dCache disk pool is connected to only one TSS instance.
- all dCache disk pools are connected to the same TSS instance.
- the dCache instance has not yet been populated with data, or only with a negligible amount of files.
In general, not all pools need to be configured to interact with the same Tertiary Storage System or with a storage system at all. Furthermore pools can be configured to have more than one Tertiary Storage System attached, but all those cases are not in the scope of the document.
dCache can only drive intelligent Tertiary Storage
Systems. This essentially means that tape robot and tape drive
operations must be done by the TSS itself and that there is
some simple way to abstract the file PUT,
GET and REMOVE operation.
Most migrating storage systems provide a regular POSIX file system interface. Based on rules, data is migrated from primary to tertiary storage (mostly tape systems). Examples for migrating storage systems are:
Some tape systems provide a simple PUT,
GET, REMOVE
interface. Typically, a copy-like application writes a disk
file into the TSS and returns an identifier which uniquely
identifies the written file within the Tertiary Storage
System. The identifier is sufficient to get the file back to
disk or to remove the file from the TSS. Examples are:
Whenever dCache decides to copy a file from disk to
tertiary storage a user-provided executable which can be either
a script or a binary is automatically started on the pool where
the file is located. That executable is expected to write the
file into the Backend Storage System and to return a URI,
uniquely identifying the file within that storage system. The
format of the URI as well as the arguments to the executable,
are described later in this document. The unique part of the URI
can either be provided by the storage element, in return of the
STORE FILE operation, or can be taken from dCache. A
non-error return code from the executable lets dCache assume
that the file has been successfully stored and, depending on the
properties of the file, dCache can decide to remove the disk
copy if space is running short on that pool. On a non-zero
return from the executable, the file doesn’t change its state
and the operation is retried or an error flag is set on the
file, depending on the error return code from
the executable.
If dCache needs to restore a file to disk the same
executable is launched with a different set of arguments,
including the URI, provided when the file was written to
tape. It is in the responsibility of the executable to fetch
the file back from tape based on the provided URI and to return
0 if the FETCH FILE operation was successful
or non-zero otherwise. In case of a failure the pool retries
the operation or dCache decides to fetch the file from tape
using a different pool.
This part explains the syntax of calling the executable that
supports STORE FILE, FETCH
FILE and REMOVE FILE
operations.
put <pnfsID> <filename> -si=<storage-information> [<other-options>...]
get <pnfsID> <filename> -si=<storage-information> -uri=<storage-uri> [<other-options>...]
remove -uri=<storage-uri> [<other-options>...]
- put / get / remove:
these keywords indicate the operation to be performed.
- put: copy file from disk to TSS.
- get: copy file back from TSS to disk.
- remove: remove the file from TSS.
- <pnfsID>: The internal identifier (i-node) of the file within dCache. The <pnfsID> is unique within a single dCache instance and globally unique with a very high probability.
- <filename>: is the full path of the local file to be copied to the TSS (for put) and respectively into which the file from the TSS should be copied (for get).
- <storage-information>: the storage information of the file, as explained below.
- <storage-uri>:
the URI, which was returned by the
executable, after the file was written to tertiary storage. In order to get the file back from the TSS the information of the URI is preferred over the information in the <storage-information>. - <other-options>:
-<key> =
<value> pairs taken from the TSS
configuration commands of the pool 'setup' file. One of the
options, always provided is the option -command=<full
path of this
executable>.
The <storage-information> is a string in the format
-si=size=<bytes>;new=<true/false>;stored=<true/false>;sClass=<StorageClass>;\ cClass0<CacheClass>;hsm=<StorageType>;<key>=<value>;[<key>=<value>;[...]]
Example:
-si=size=1048576000;new=true;stored=false;sClass=desy:cms-sc3;cClass=-;hsm=osm;Host=desy;
Mandatory storage information’s keys
- <size>: Size of the file in bytes
- <new>: False if file already in the dCache; True otherwise
- <stored>: True if file already stored in the TSS; False otherwise
- <sClass>: HSM depended, is used by the
poolmanagerfor pool attraction. - <cClass>: Parent directory tag
(cacheClass). Used by the
poolmanagerfor pool attraction. May be '-'. - <hsm>: Storage manager name (enstore/osm). Can be overwritten by the parent directory tag (hsmType).
OSM specific storage information’s keys
- <group>: The storage group of the file to be stored as specified in the ".(tag)(sGroup)" tag of the parent directory of the file to be stored.
- <store>: The store name of the file to be stored as specified in the ".(tag)(OSMTemplate)" tag of the parent directory of the file to be stored.
- <bfid>: Bitfile ID (get and remove only) (e.g. 000451243.2542452542.25424524)
Enstore specific storage information’s keys
- <group>: The storage group (e.g. cdf, cms ...)
- <family>: The file family (e.g. sgi2test, h6nxl8, ...)
- <bfid>: Bitfile ID (get only) (e.g. B0MS105746894100000)
- <volume>: Tape Volume (get only) (e.g. IA6912)
- <location>: Location on tape (get only) (e.g. : 0000_000000000_0000117)
There might be more key values pairs which are used by the
dCache internally and which should not affect the
behaviour of the executable.
The <storage-uri> is formatted as follows:
hsmType://hsmInstance/?store=<storename>&group=<groupname>&bfid=<bfid>
- <hsmType>: The type of the Tertiary Storage System
- <hsmInstance>: The name of the instance
- <storename> and
<groupname> : The store and group
name of the file as provided by the arguments to this
executable. - <bfid>: The unique identifier needed to restore or remove the file if necessary.
Example:
A storage-uri:
osm://osm/?store=sql&group=chimera&bfid=3434.0.994.1188400818542| Return Code | Meaning | Behaviour for PUT FILE | Behaviour for GET FILE |
|---|---|---|---|
| 30 <= rc < 40 | User defined | Deactivates request |
Reports problem to poolmanager
|
| 41 | No space left on device | Pool retries |
Disables pool and reports problem to poolmanager
|
| 42 | Disk read I/O error | Pool retries |
Disables pool and reports problem to poolmanager
|
| 43 | Disk write I/O error | Pool retries |
Disables pool and reports problem to poolmanager
|
| other | - | Pool retries |
Reports problem to poolmanager
|
Whenever a disk file needs to be copied to a Tertiary Storage
System dCache automatically launches an executable on the
pool containing the file to be copied. Exactly one instance
of the executable is started for each file. Multiple
instances of the executable may run concurrently for
different files. The maximum number of concurrent instances of
the executablesexecutable can be configured in the ’setup’
file of the pool as described in the section called “The pool ’setup’ file”.
The following arguments are given to the executable of a
STORE FILE operation on startup.
put <pnfsID> <filename> -si=<storage-information> <more options>
Details on the meaning of certain arguments are described in the section called “Summary of command line options”.
With the arguments provided the executable is supposed to
copy the file into the Tertiary Storage System. The
executable must not terminate before the transfer of the
file was either successful or failed.
Success must be indicated by a 0 return of
the executable. All non-zero values are interpreted as a
failure which means, dCache assumes that the file has not
been copied to tape.
In case of a 0 return code the executable
has to return a valid storage URI to dCache in formate:
hsmType://hsmInstance/?store=<storename>&group=<groupname>&bfid=<bfid>Details on the meaning of certain parameters are described above.
The <bfid> can either be provided by
the TSS as result of the STORE FILE
operation or the pnfsID may be used. The
latter assumes that the file has to be stored with exactly
that pnfsID within the TSS. Whatever URI
is chosen, it must allow to uniquely identify the file within
the Tertiary Storage System.
Note
Only the URI must be printed to stdout by the
executable. Additional information printed either before
or after the URI will result in an error. stderr can be used
for additional debug information or error messages.
Whenever a disk file needs to be restored from a Tertiary
Storage System dCache automatically launches an
executable on the pool containing the file to be
copied. Exactly one instance of the executable is started
for each file. Multiple instances of the executable may run
concurrently for different files. The maximum number of
concurrent instances of the executable per pool as well as
the full path of the executable can be configured in the
’setup’ file of the pool as described in the section called “The pool ’setup’ file”.
The following arguments are given to the executable of a
FETCH FILE operation on startup:
get <pnfsID> <filename> -si=<storage-information> -uri=<storage-uri> <more options>
Details on the meaning of certain arguments are described in the section called “Summary of command line options”. For return codes see the section called “Summary of return codes”.
Whenever a file is removed from the dCache namespace (file
system) a process inside dCache makes sure that all copies
of the file are removed from all internal and external
media. The pool which is connected to the TSS which stores
the file is activating the executable with
the following command line options:
remove -uri=<storage-uri> <more options>
Details on the meaning of certain arguments are described in the section called “Summary of command line options”. For return codes see the section called “Summary of return codes”.
The executable is supposed to remove the
file from the TSS and report a zero return code. If a
non-zero error code is returned, the dCache will call the
script again at a later point in time.
The executable interacting with the Tertiary
Storage System (TSS), as described in the chapter above, has
to be provided to dCache on all pools connected to the
TSS. The executable, either a script or a
binary, has to be made “executable” for the user,
dCache is running as, on that host.
The following files have to be modified to allow dCache to interact with the TSS.
-
The
/var/lib/dcache/config/poolmanager.conffile (one per system) - The pool layout file (one per pool host)
- The pool 'setup' file (one per pool)
- The namespaceDomain layout file (one per system)
After the layout files and the various ’setup’ files have been corrected, the following domains have to be restarted :
- pool services
- dCacheDomain
- namespaceDomain
To be able to read a file from the tape in case the cached file has been deleted from all pools, enable the restore-option. The best way to do this is to log in to the Admin Interface and run the following commands:
[example.dcache.org](local) admin >cdPoolManager[example.dcache.org](PoolManager) admin >pm set -stage-allowed=yes [example.dcache.org](PoolManager) admin >save
A restart of the dCacheDomain is not necessary in this case.
Alternatively, if the file
/var/lib/dcache/config/poolmanager.conf already
exists then you can add the entry
pm set -stage allowed=yes
and restart the dCacheDomain.
Warning
Do not create the file/var/lib/dcache/config/poolmanager.conf
with this single entry! This will result in an error.
The dCache layout file must be modified for each pool node
connected to a TSS. If your pool nodes have been
configured correctly to work without TSS, you will find
the entry lfs=precious in the layout file
(that is located in /etc/dcache/layouts and in
the file /etc/dcache/dcache.conf
respectively) for each pool service. This entry is a
disk-only-option and has to be removed for each pool which
should be connected to a TSS. This will default the
lfs parameter to hsm
which is exactly what we need.
The pool ’setup’ file is the file
$poolHomeDir/$poolName/setup. It mainly
defines 3 details related to TSS connectivity.
-
Pointer to the
executablewhich is launched on storing and fetching files. -
The maximum number of concurrent
STORE FILErequests allowed per pool. -
The maximum number of concurrent
FETCH FILErequests allowed per pool.
Define the executable and Set the maximum number of
concurrent PUT and GET operations:
hsm set <hsmType> [<hsmInstanceName>] [-command=</path/to/executable>] [-key=<value>]

#
#  PUT operations
# set the maximum number of active PUT operations >= 1
#
st set max active <numberOfConcurrentPUTS>

#
# GET operations
# set the maximum number of active GET operations >= 1
#
rh set max active <numberOfConcurrentGETs>
- <hsmType>: the type ot the TSS system. Must be set to “osm” for basic setups.
- <hsmInstanceName>: the instance name of the TSS system. Must be set to “osm” for basic setups.
- </path/to/executable>: the
full path to the
executablewhich should be launched for each TSS operation.
Setting the maximum number of concurrent
PUT and GET
operations.
Both numbers must be non zero to allow the pool to perform transfers.
Example:
We provide a script
to simulate a connection to a TSS. To use this script
place it in the directory /usr/share/dcache/lib, and create
a directory to simulate the base of the TSS.
[root] #mkdir -p /hsmTape/data
Login to the Admin Interface to change the entry of the pool ’setup’ file for a pool named pool_1.
(local) admin >cd pool_1(pool_1) admin >hsm set osm osm(pool_1) admin >hsm set osm -command=/usr/share/dcache/lib/hsmscript.sh(pool_1) admin >hsm set osm -hsmBase=/hsmTape(pool_1) admin >st set max active 5(pool_1) admin >rh set max active 5(pool_1) admin >save
In order to allow dCache to remove files from attached TSSes, the “cleaner.hsm = enabled” must be added immediately underneath the [namespaceDomain/cleaner] service declaration:
[namespaceDomain]
 ... other services ...
[namespaceDomain/cleaner]
cleaner.hsm = enabled
.. more ...
After restarting the necessary dCache domains, pools, already containing files, will start transferring them into the TSS as those files only have a disk copy so far. The number of transfers is determined by the configuration in the pool ’setup’ file as described above in the section called “The pool ’setup’ file”.
In order to see the state of files within a pool, login into the pool in the admin interface and run the command rep ls.
[example.dcache.org] (<poolname>) admin > rep lsThe output will have the following format:
PNFSID <MODE-BITS(LOCK-TIME)[OPEN-COUNT]> SIZE si={STORAGE-CLASS}-
PNFSID: The
pnfsID of the file -
MODE-BITS:
CPCScsRDXEL ||||||||||| ||||||||||+-- (L) File is locked (currently in use) |||||||||+--- (E) File is in error state ||||||||+---- (X) File is pinned (aka "sticky") |||||||+----- (D) File is in process of being destroyed ||||||+------ (R) File is in process of being removed |||||+------- (s) File sends data to back end store ||||+-------- (c) File sends data to client (
dCap,FTP...) |||+--------- (S) File receives data from back end store ||+---------- (C) File receives data from client (dCap,FTP) |+----------- (P) File is precious, i.e., it is only on disk +------------ (C) File is on tape and only cached on disk. -
LOCK-TIME: The number of milli-seconds this file will still
be locked. Please note that this is an internal lock and not
the pin-time (
SRM). - OPEN-COUNT: Number of clients currently reading this file.
- SIZE: File size
- STORAGE-CLASS: The storage class of this file.
Example:
[example.dcache.org] (pool_1) admin > rep ls
00008F276A952099472FAD619548F47EF972 <-P---------L(0)[0]> 291910 si={dteam:STATIC}
00002A9282C2D7A147C68A327208173B81A6 <-P---------L(0)[0]> 2011264 si={dteam:STATIC}
0000EE298D5BF6BB4867968B88AE16BA86B0 <C----------L(0)[0]> 1976 si={dteam:STATIC}
In order to flush a file to the tape run the
command flush pnfsid.
[example.dcache.org] (<poolname>) admin > flush pnfsid <pnfsid>Example:
[example.dcache.org] (pool_1) admin > flush pnfsid 00002A9282C2D7A147C68A327208173B81A6
Flush Initiated
A file that has been flushed to tape gets the flag ’C’.
Example:
[example.dcache.org] (pool_1) admin > rep ls
00008F276A952099472FAD619548F47EF972 <-P---------L(0)[0]> 291910 si={dteam:STATIC}
00002A9282C2D7A147C68A327208173B81A6 <C----------L(0)[0]> 2011264 si={dteam:STATIC}
0000EE298D5BF6BB4867968B88AE16BA86B0 <C----------L(0)[0]> 1976 si={dteam:STATIC}
To remove such a file from the repository run the command rep rm.
[example.dcache.org] (<poolname>) admin > rep rm <pnfsid>Example:
[example.dcache.org] (pool_1) admin > rep rm  00002A9282C2D7A147C68A327208173B81A6
Removed 00002A9282C2D7A147C68A327208173B81A6
In this case the file will be restored when requested.
To restore a file from the tape you can
simply request it by initializing a reading transfer or you can
fetch it by running the command rh
restore.
[example.dcache.org] (<poolname>) admin > rh restore [-block] <pnfsid>Example:
[example.dcache.org] (pool_1) admin > rh restore 00002A9282C2D7A147C68A327208173B81A6
Fetch request queued
This section briefly describes the commands and mechanisms to
monitor the TSS PUT, GET and REMOVE operations. dCache
provides a configurable logging facility and a Command Line
Admin Interface to query and manipulate transfer and waiting
queues.
By default dCache is configured to only log information if something unexpected happens. However, to get familiar with Tertiary Storage System interactions you might be interested in more details. This section provides advice on how to obtain this kind of information.
Since you provide the executable, interfacing dCache and
the TSS, it is in your responsibility to ensure sufficient
logging information to be able to trace possible problems
with either dCache or the TSS. Each request should be
printed with the full set of parameters it receives,
together with a timestamp. Furthermore information returned
to dCache should be reported.
In dCache, each domain (e.g. dCacheDomain,
<pool>Domain etc) prints logging information into its own
log file named after the domain. The location of those log
files it typically the /var/log or /var/log/dCache directory
depending on the individual configuration. In the default
logging setup only errors are reported. This behavior can be
changed by either modifying
/etc/dcache/logback.xml or using
the dCache CLI to increase the log level of particular
components as described below.
If you intend to increase the log level of all components on
a particular host you would need to change the
/etc/dcache/logback.xml file as
described below. dCache components need to be restarted to
activate the changes.
<threshold>
     <appender>stdout</appender>
     <logger>root</logger>
     <level>warn</level>
   </threshold>
needs to be changed to
<threshold>
     <appender>stdout</appender>
     <logger>root</logger>
     <level>info</level>
   </threshold>
Important
The change might result in a significant increase in log messages. So don’t forget to change back before starting production operation. The next section describes how to change the log level in a running system.
Example:
Login into the dCache Command Line Admin Interface and
increase the log level of a particular service, for
instance for the poolmanager service:
[example.dcache.org](local) admin >cd PoolManager [example.dcache.org](PoolManager) admin >log set stdout ROOT INFO [example.dcache.org](PoolManager) admin >log ls stdout: ROOT=INFO dmg.cells.nucleus=WARN* logger.org.dcache.cells.messages=ERROR* .....
The dCache Command Line Admin Interface gives access to information describing the process of storing and fetching files to and from the TSS, as there are:
-
The Pool Manager Restore Queue. A
list of all requests which have been issued to all pools
for a
FETCH FILEoperation from the TSS (rc ls) -
The Pool Collector Queue. A list of
files, per pool and storage group, which will be scheduled
for a
STORE FILEoperation as soon as the configured trigger criteria match. -
The Pool
STORE FILEQueue. A list of files per pool, scheduled for theSTORE FILEoperation. A configurable amount of requests within this queue are active, which is equivalent to the number of concurrent store processes, the rest is inactive, waiting to become active. -
The Pool
FETCH FILEQueue. A list of files per pool, scheduled for theFETCH FILEoperation. A configurable amount of requests within this queue are active, which is equivalent to the number of concurrent fetch processes, the rest is inactive, waiting to become active.
For evaluation purposes, the pinboard of each component can be used to track down dCache behavior. The pinboard only keeps the most recent 200 lines of log information but reports not only errors but informational messages as well.
Example:
Check the pinboard of a service, here the poolmanager service.
[example.dcache.org](local) admin >cd PoolManager [example.dcache.org](PoolManager) admin >show pinboard 100 08.30.45 [Thread-7] [pool_1 PoolManagerPoolUp] sendPoolStatusRelay: ... 08.30.59 [writeHandler] [NFSv41-dcachetogo PoolMgrSelectWritePool ... ....
Example:
The PoolManager Restore Queue.
Remove the file test.root with the
pnfs-ID 00002A9282C2D7A147C68A327208173B81A6.
[example.dcache.org] (pool_1) admin > rep rm 00002A9282C2D7A147C68A327208173B81A6
Request the file test.root
[user] $ dccp dcap://example.dcache.org:/data/test.root test.root
Check the PoolManager Restore Queue:
[example.dcache.org](local) admin >cd PoolManager [example.dcache.org](PoolManager) admin >rc ls 0000AB1260F474554142BA976D0ADAF78C6C@0.0.0.0/0.0.0.0-*/* m=1 r=0 [pool_1] [Staging 08.15 17:52:16] {0,}
Example:
The Pool Collector Queue.
[example.dcache.org](local) admin >cd pool_1 [example.dcache.org](pool_1) admin >queue ls -l queue Name: chimera:alpha Class@Hsm: chimera:alpha@osm Expiration rest/defined: -39 / 0 seconds Pending rest/defined: 1 / 0 Size rest/defined: 877480 / 0 Active Store Procs. : 0 00001BC6D76570A74534969FD72220C31D5D [example.dcache.org](pool_1) admin >flush ls Class Active Error Last/min Requests Failed dteam:STATIC@osm 0 0 0 1 0
Example:
The pool STORE FILE Queue.
[example.dcache.org](local) admin >cd pool_1 [example.dcache.org](pool_1) admin >st ls 0000EC3A4BFCA8E14755AE4E3B5639B155F9 1 Fri Aug 12 15:35:58 CEST 2011
Example:
The pool FETCH FILE Queue.
[example.dcache.org](local) admin >cd pool_1 [example.dcache.org](pool_1) admin >rh ls 0000B56B7AFE71C14BDA9426BBF1384CA4B0 0 Fri Aug 12 15:38:33 CEST 2011
To check the repository on the pools run the command rep ls that is described in the beginning of the section called “How to Store-/Restore files via the Admin Interface”.
Example:
#!/bin/sh
#
#set -x
#
logFile=/tmp/hsm.log
#
################################################################
#
#  Some helper functions
#
##.........................................
#
# print usage
#
usage() {
   echo "Usage : put|get <pnfsId> <filePath> [-si=<storageInfo>] [-key[=value] ...]" 1>&2
}
##.........................................
#
#
printout() {
#---------
   echo "$pnfsid : $1" >>${logFile}
   return 0
}
##.........................................
#
#  print error into log file and to stdout.
#
printerror() {
#---------

   if [ -z "$pnfsid" ] ; then
#      pp="000000000000000000000000000000000000"
      pp="------------------------------------"
   else
      pp=$pnfsid
   fi

   echo "$pp : (E) : $*" >>${logFile}
   echo "$pp : $*" 1>&2

}
##.........................................
#
#  find a key in the storage info
#
findKeyInStorageInfo() {
#-------------------

   result=`echo $si  | awk  -v hallo=$1 -F\; '{ for(i=1;i<=NF;i++){ split($i,a,"=") ; if( a[1] == hallo )print a[2]} }'`
   if [ -z "$result" ] ; then return 1 ; fi
   echo $result
   exit 0

}
##.........................................
#
#  find a key in the storage info
#
printStorageInfo() {
#-------------------
   printout "storageinfo.StoreName : $storeName"
   printout "storageinfo.store : $store"
   printout "storageinfo.group : $group"
   printout "storageinfo.hsm   : $hsmName"
   printout "storageinfo.accessLatency   : $accessLatency"
   printout "storageinfo.retentionPolicy : $retentionPolicy"
   return 0
}
##.........................................
#
#  assign storage info the keywords
#
assignStorageInfo() {
#-------------------

    store=`findKeyInStorageInfo "store"`
    group=`findKeyInStorageInfo "group"`
    storeName=`findKeyInStorageInfo "StoreName"`
    hsmName=`findKeyInStorageInfo "hsm"`
    accessLatency=`findKeyInStorageInfo "accessLatency"`
    retentionPolicy=`findKeyInStorageInfo "retentionPolicy"`
    return 0
}
##.........................................
#
# split the arguments into the options -<key>=<value> and the
# positional arguments.
#
splitArguments() {
#----------------
#
  args=""
  while [ $# -gt 0 ] ; do
    if expr "$1" : "-.*" >/dev/null ; then
       a=`expr "$1" : "-\(.*\)" 2>/dev/null`
       key=`echo "$a" | awk -F= '{print $1}' 2>/dev/null`
         value=`echo "$a" | awk -F= '{for(i=2;i<NF;i++)x=x $i "=" ; x=x $NF ; print x }' 2>/dev/null`
       if [ -z "$value" ] ; then a="${key}=" ; fi
       eval "${key}=\"${value}\""
       a="export ${key}"
       eval "$a"
    else
       args="${args} $1"
    fi
    shift 1
  done
  if [ ! -z "$args" ] ; then
     set `echo "$args" | awk '{ for(i=1;i<=NF;i++)print $i }'`
  fi
  return 0
}
#
#
##.........................................
#
splitUri() {
#----------------
#
  uri_hsmName=`expr "$1" : "\(.*\)\:.*"`
  uri_hsmInstance=`expr "$1" : ".*\:\/\/\(.*\)\/.*"`
  uri_store=`expr "$1" : ".*\/\?store=\(.*\)&group.*"`
  uri_group=`expr "$1" : ".*group=\(.*\)&bfid.*"`
  uri_bfid=`expr "$1" : ".*bfid=\(.*\)"`
#
  if [  \( -z "${uri_store}" \) -o \( -z "${uri_group}" \) -o \(  -z "${uri_bfid}" \) \
     -o \( -z "${uri_hsmName}" \) -o \( -z "${uri_hsmInstance}" \) ] ; then
     printerror "Illegal URI formal : $1"
     return 1
  fi
  return 0

}
#########################################################
#
echo "--------- $* `date`" >>${logFile}
#
#########################################################
#
createEnvironment() {

   if [ -z "${hsmBase}" ] ; then
      printerror "hsmBase not set, can't continue"
      return 1
   fi
   BASE=${hsmBase}/data
   if [ ! -d ${BASE} ] ; then
      printerror "${BASE} is not a directory or doesn't exist"
      return 1
   fi
}
##
#----------------------------------------------------------
doTheGetFile() {

   splitUri $1
   [ $? -ne 0 ] && return 1

   createEnvironment
   [ $? -ne 0 ] && return 1

   pnfsdir=${BASE}/$uri_hsmName/${uri_store}/${uri_group}
   pnfsfile=${pnfsdir}/$pnfsid

   cp $pnfsfile $filename 2>/dev/null
   if [ $? -ne 0 ] ; then
      printerror "Couldn't copy file $pnfsfile to $filename"
      return 1
   fi

   return 0
}
##
#----------------------------------------------------------
doTheStoreFile() {

   splitUri $1
   [ $? -ne 0 ] && return 1

   createEnvironment
   [ $? -ne 0 ] && return 1

   pnfsdir=${BASE}/$hsmName/${store}/${group}
   mkdir -p ${pnfsdir} 2>/dev/null
   if [ $? -ne 0 ] ; then
      printerror "Couldn't create $pnfsdir"
      return 1
   fi
   pnfsfile=${pnfsdir}/$pnfsid

   cp $filename $pnfsfile 2>/dev/null
   if [ $? -ne 0 ] ; then
      printerror "Couldn't copy file $filename to $pnfsfile"
      return 1
   fi

   return 0

}
##
#----------------------------------------------------------
doTheRemoveFile() {

   splitUri $1
   [ $? -ne 0 ] && return 1

   createEnvironment
   [ $? -ne 0 ] && return 1

   pnfsdir=${BASE}/$uri_hsmName/${uri_store}/${uri_group}
   pnfsfile=${pnfsdir}/$uri_bfid

   rm $pnfsfile 2>/dev/null
   if [ $? -ne 0 ] ; then
      printerror "Couldn't remove file $pnfsfile"
      return 1
   fi

   return 0
}
#########################################################
#
#  split arguments
#
  args=""
  while [ $# -gt 0 ] ; do
    if expr "$1" : "-.*" >/dev/null ; then
       a=`expr "$1" : "-\(.*\)" 2>/dev/null`
       key=`echo "$a" | awk -F= '{print $1}' 2>/dev/null`
         value=`echo "$a" | awk -F= '{for(i=2;i<NF;i++)x=x $i "=" ; x=x $NF ; print x }' 2>/dev/null`
       if [ -z "$value" ] ; then a="${key}=" ; fi
       eval "${key}=\"${value}\""
       a="export ${key}"
       eval "$a"
    else
       args="${args} $1"
    fi
    shift 1
  done
  if [ ! -z "$args" ] ; then
     set `echo "$args" | awk '{ for(i=1;i<=NF;i++)print $i }'`
  fi
#
#
if [ $# -lt 1 ] ; then
    printerror "Not enough arguments : ... put/get/remove ..."
    exit 1
fi
#
command=$1
pnfsid=$2
#
# !!!!!!  Hides a bug in the dCache HSM remove
#
if [ "$command" = "remove" ] ; then pnfsid="000000000000000000000000000000000000" ; fi
#
#
printout "Request for $command started `date`"
#
################################################################
#
if [ "$command" = "put" ] ; then
#
################################################################
#
  filename=$3
#
  if [ -z "$si" ] ; then
     printerror "StorageInfo (si) not found in put command"
     exit 5
  fi
#
  assignStorageInfo
#
  printStorageInfo
#
  if [ \( -z "${store}" \) -o \( -z "${group}" \) -o \( -z "${hsmName}" \) ] ; then
     printerror "Didn't get enough information to flush : hsmName = $hsmName store=$store group=$group pnfsid=$pnfsid "
     exit 3
  fi
#
  uri="$hsmName://$hsmName/?store=${store}&group=${group}&bfid=${pnfsid}"

  printout "Created identifier : $uri"

  doTheStoreFile $uri
  rc=$?
  if [ $rc -eq 0 ] ; then echo $uri ; fi

  printout "Request 'put' finished at `date` with return code $rc"
  exit $rc
#
#
################################################################
#
elif [ "$command" = "get"  ] ; then
#
################################################################
#
  filename=$3
  if [ -z "$uri" ] ; then
     printerror "Uri not found in arguments"
     exit 3
  fi
#
  printout "Got identifier : $uri"
#
  doTheGetFile $uri
  rc=$?
  printout "Request 'get' finished at `date` with return code $rc"
  exit $rc
#
################################################################
#
elif [ "$command" = "remove" ] ; then
#
################################################################
#
   if [ -z "$uri" ] ; then
      printerror "Illegal Argument error : URI not specified"
      exit 4
   fi
#
   printout "Remove uri = $uri"
   doTheRemoveFile $uri
   rc=$?
#
   printout "Request 'remove' finished at `date` with return code $rc"
   exit $rc
#
else
#
   printerror "Expected command : put/get/remove , found : $command"
   exit 1
#
fiTable of Contents
File hopping is a collective term in dCache, summarizing the possibility of having files being transferred between dCache pools triggered by a variety of conditions. The most prominent examples are:
If a file is requested by a client but the file resides on a pool from which this client, by configuration, is not allowed to read data, the dataset is transferred to an “allowed” pool first.
If a pool encounters a steady high load, the system may, if configured, decide to replicate files to other pools to achieve an equal load distribution.
HSM restore operations may be split into two steps. The first one reads data from tertiary storage to an “HSM connected” pool and the second step takes care that the file is replicated to a general read pool. Under some conditions this separation of HSM and non-HSM pools might become necessary for performance reasons.
If a dataset has been written into dCache it might become necessary to have this file replicated instantly. The reasons can be, to either have a second, safe copy, or to make sure that clients don’t access the file for reading on the write pools.
File Hopping on arrival is a term, denoting the possibility of initiating a pool to pool transfer as the result of a file successfully arriving on a pool from some external client. Files restored from HSM or arriving on a pool as the result of a pool to pool transfer will not yet be forwarded.
Forwarding of incoming files can be enabled by setting the replicateOnArrival property in the /etc/dcache/dcache.conf file or per pool in the layout file. It can be set to on, PoolManager or HoppingManager, where on does the same as PoolManager.
The pool is requested to send a replicateFile message to either the PoolManager or to the HoppingManager, if available. The different approaches are briefly described below and in more detail in the subsequent sections.
The
replicateFilemessage is sent to thePoolManager. This happens for all files arriving at that pool from outside (no restore or p2p). No intermediateHoppingManageris needed. The restrictions areAll files are replicated. No pre-selection, e.g. on the storage class can be done.
The mode of the replicated file is determined by the destination pool and cannot be overwritten. See the section called “File mode of replicated files”
The
replicateFilemessage is sent to theHoppingManager. TheHoppingManagercan be configured to replicate certain storage classes only and to set the mode of the replicated file according to rules. The file mode of the source file cannot be modified.
The mode of a replicated file can either be determined by
settings in the destination pool or by the HoppingManager. It
can be cached or precious.
If the
PoolManageris used for replication, the mode of the replicated file is determined by the destination pool. The default setting iscached.If a
HoppingManageris used for file replication, the mode of the replicated file is determined by theHoppingManagerrule responsible for this particular replication. If the destination mode is set tokeepin the rule, the mode of the destination pool determines the final mode of the replicated file.
To enable replication on arrival by the PoolManager set the
property replicateOnArrival to
on for the particular pool
[<exampleDomain>]
[<exampleDomain>/pool]
...
replicateOnArrival=on
or for several pools in the /etc/dcache/dcache.conf file.
...
replicateOnArrival=on
File hopping configuration instructs a pool to send a
replicateFile request to the
PoolManager as the result of a file arriving on that pool
from some external client. All arriving files will be treated
the same. The PoolManager will process this transfer
request by trying to find a matching link (Please find
detailed information at Chapter 7, The poolmanager Service.
It is possible to configure the PoolManager such that files
are replicated from this pool to a special set of destination
pools.
Example:
Assume that we want to have all files, arriving on pool
ocean to be immediately replicated to a
subset of read pools. This subset of pools is described by the
poolgroup ocean-copies. No other pool is
member of the poolgroup ocean-copies.
Other than that, files arriving at the pool
mountain should be replicated to all read
pools from which farm nodes on the 131.169.10.0/24 subnet are
allowed to read.
The layout file defining the pools ocean
and mountain should read like this:
[exampleDomain]
[exampleDomain/pool]

name=ocean
path=/path/to/pool-ocean
waitForFiles=${path}/data
replicateOnArrival=on

name=mountain
path=/path/to/pool-mountain
waitForFiles=${path}/data
replicateOnArrival=on
In the layout file it is defined that all files arriving on
the pools ocean or
mountain should be replicated
immediately. The following
PoolManager.conf file contains
instructions for the PoolManager how to replicate these
files. Files arriving at the ocean pool
will be replicated to the ocean-copies
subset of the read pools and files arriving at the pool
mountain will be replicated to all read
pools from which farm nodes on the 131.169.10.0/24 subnet are
allowed to read.
#
# define the units
#
psu create unit -protocol   */*
psu create unit -net        0.0.0.0/0.0.0.0
psu create unit -net        131.169.10.0/255.255.255.0
# create the faked net unit
psu create unit -net        192.1.1.1/255.255.255.255
psu create unit -store      *@*
psu create unit -store      ocean:raw@osm
#
#
#  define unit groups
#
psu create ugroup  any-protocol
psu create ugroup  any-store
psu create ugroup  ocean-copy-store
psu create ugroup farm-network
psu create ugroup ocean-copy-network
#
psu addto ugroup any-protocol */*
psu addto ugroup any-store    *@*
psu addto ugroup ocean-copy-store ocean:raw@osm
psu addto ugroup farm-network  131.169.10.0/255.255.255.0
psu addto ugroup ocean-copy-network  192.1.1.1/255.255.255.255
psu addto ugroup allnet-cond 0.0.0.0/0.0.0.0
psu addto ugroup allnet-cond 131.169.10.0/255.255.255.0
psu addto ugroup allnet-cond 192.1.1.1/255.255.255.255
#
#
#  define the write-pools
#
psu create pool ocean
psu create pool mountain
#
#
#  define the write-pools poolgroup
#
psu create pgroup write-pools
psu addto pgroup write-pools ocean
psu addto pgroup write-pools mountain
#
#
#  define the write-pools-link, add write pools and set transfer preferences
#
psu create link write-pools-link any-store any-protocol allnet-cond
psu addto link write-pools-link write-pools
psu set link farm-read-link -readpref=0 -writepref=10 -cachepref=0 -p2ppref=-1
#
#
#  define the read-pools
#
psu create pool read-pool-1
psu create pool read-pool-2
psu create pool read-pool-3
psu create pool read-pool-4
#
#
#  define the farm-read-pools poolgroup and add pool members
#
psu create pgroup farm-read-pools
psu addto pgroup farm-read-pools read-pool-1
psu addto pgroup farm-read-pools read-pool-2
psu addto pgroup farm-read-pools read-pool-3
psu addto pgroup farm-read-pools read-pool-4
#
#
#  define the ocean-copy-pools poolgroup and add a pool
#
psu create pgroup ocean-copy-pools
psu addto pgroup ocean-copy-pools  read-pool-1
#
#
# define the farm-read-link, add farm-read-pools and set transfer preferences
#
psu create link farm-read-link any-store any-protocol farm-network
psu addto link farm-read-link farm-read-pools
psu set link farm-read-link -readpref=10 -writepref=0 -cachepref=10 -p2ppref=-1
#
#
# define the ocean-copy-link, add ocean-copy-pools and set transfer preferences
#
psu create link ocean-copy-link ocean-copy-store any-protocol ocean-copy-network
psu addto link ocean-copy-link ocean-copy-pools
psu set link ocean-copy-link -readpref=10 -writepref=0 -cachepref=10 -p2ppref=-1
#
#
While 131.169.10.1
is a legal IP address e.g. of one of your farm nodes, the
192.1.1.1 IP
address must not exist anywhere at your site.
With the HoppingManager you have several configuration options
for file hopping on arrival, e.g.:
-
With the
HoppingManageryou can define a rule such that only the files with a specific storage class should be replicated. - You can specify the protocol the replicated files can be accessed with.
- You can specify from which ip-adresses it should be possible to access the files.
Add the hopping service to a domain in your layout
file and restart the domain.
[<DomainName>]
[<DomainName>/hopping]
Initially no rules are configured for the
HoppingManager. You may add rules by either edit the
/var/lib/dcache/HoppingManager.conf and
restart the hopping service, or use the admin
interface and save the modifications by the
save command into the
HoppingManager.conf
To enable replication on arrival by the HoppingManager set
the property replicateOnArrival to
HoppingManager for the particular pool
[<exampleDomain>]
[<exampleDomain>/pool]
...
replicateOnArrival=HoppingManager
or for several pools in the /etc/dcache/dcache.conf file.
...
replicateOnArrival=HoppingManager
The
HoppingManageressentially receivesreplicateFilemessages from pools, configured to support file hopping, and either discards or modifies and forwards them to thePoolManager, depending on rules described below.The
HoppingManagerdecides on the action to perform, based on a set of configurable rules. Each rule has a name. Rules are checked in alphabetic order concerning their names.A rule it triggered if the storage class matches the storage class pattern assigned to that rule. If a rule is triggered, it is processed and no further rule checking is performed. If no rule is found for this request the file is not replicated.
If for whatever reason, a file cannot be replicated, NO RETRY is being performed.
Processing a triggered rule can be :
The message is discarded. No replication is done for this particular storage class.
The rule modifies the
replicateFilemessage, before it is forwarded to thePoolManager.An ip-number of a farm-node of the farm that should be allowed to read the file can be added to the
replicateFilemessage.The mode of the replicated file can be specified. This can either be
precious,cachedorkeep.keepmeans that the pool mode of the source pool determines the replicated file mode.The requested protocol can be specified.
         define hop OPTIONS <name> <pattern> precious|cached|keep
            OPTIONS
              -destination=<cellDestination> # default : PoolManager
              -overwrite
              -continue
              -source=write|restore|*   #  !!!! for experts only      StorageInfoOptions
              -host=<destinationHostIp>
              -protType=dCap|ftp...
              -protMinor=<minorProtocolVersion>
-protMajor=<majorProtocolVersion> - name
- This is the name of the hopping rule. Rules are checked in alphabetic order concerning their names.
- pattern
patternis a storage class pattern. If the incoming storage class matches this pattern, this rule is processed.- precious|cached|keep
precious|cached|keepdetermines the mode of the replicated file. Withkeepthe mode of the file will be determined by the mode of the destination pool.- -destination
This defines which
cellto use for the pool to pool transfer. By default this is thePoolManagerand this should not be changed.- -overwrite
In case, a rule with the same name already exists, it is overwritten.
- -continue
If a rule has been triggered and the corresponding action has been performed, no other rules are checked. If the
continueoption is specified, rule checking continues. This is for debugging purposes only.- -source
-sourcedefines the event on the pool which has triggered the hopping. Possible values arerestoreandwrite.restoremeans that the rule should be triggered if the file was restored from a tape andwritemeans that it should be triggered if the file was written by a client.- -host
Choose the id of a node of the farm of worker-nodes that should be allowed to access the file. Configure the
poolmanagerrespectively.- -protType, -protMajor, -protMinor
Specify the protocol which should be used to access the replicated files.
In order to instruct a particular pool to send a
replicateFile message to the
hopping service, you need to add the line
replicateOnArrival=HoppingManager to the
layout file.
Example:
[exampleDomain]
[exampleDomain/pool]

name=write-pool
path=/path/to/write-pool-exp-a
waitForFiles=${path}/data
replicateOnArrival=HoppingManager
...
Assume that all files of experiment-a will be written to an
expensive write pool and subsequently flushed to tape. Now
some of these files need to be accessed without delay. The
files that need fast acceess possibility will be given the
storage class exp-a:need-fast-access@osm.
In this example we will configure the file hopping such that a
user who wants to access a file that has the above storage
info with the NFSv4.1 protocol will be able to do so.
Define a rule for hopping in the
/var/lib/dcache/config/HoppingManager.conf
file.
define hop nfs-hop exp-a:need-fast-access@osm cached -protType=nfs -protMajor=4 -protMinor=1
This assumes that the storage class of the file is
exp-a:nfs@osm. The mode of the file, which
was precious on the write pool will have to
be changed to cached on the read pool.
The corresponding
/var/lib/dcache/config/poolmanager.conf
file could read like this:
#
# define the units
#
psu create unit -protocol   */*
psu create unit -net        0.0.0.0/0.0.0.0
psu create unit -store      exp-a:need-fast-access@osm
#
#
#  define unit groups
#
psu create ugroup  any-protocol
psu create ugroup  exp-a-copy-store
psu create ugroup allnet-cond
#
psu addto ugroup any-protocol */*
psu addto ugroup exp-a-copy-store    exp-a:need-fast-access@osm
psu addto ugroup allnet-cond 0.0.0.0/0.0.0.0
#
#
#  define the write-pool
#
psu create pool write-pool
#
#
#  define the read-pool
#
psu create pool read-pool
#
#
#  define the exp-a-read-pools poolgroup and add a pool
#
psu create pgroup exp-a-read-pools
psu addto pgroup exp-a-read-pools read-pool
#
#
#  define the exp-a-write-pools poolgroup and add a pool
#
psu create pgroup exp-a-write-pools
psu addto pgroup exp-a-write-pools write-pool
#
#
# define the exp-a-read-link, add exp-a-read-pools and set transfer preferences
#
psu create link exp-a-read-link exp-a-copy-store any-protocol allnet-cond
psu addto link exp-a-read-link exp-a-read-pools
psu set link exp-a-read-link -readpref=10 -writepref=0 -cachepref=10 -p2ppref=-1
#
#
# define the exp-a-write-link, add exp-a-write-pools and set transfer preferences
#
psu create link exp-a-write-link exp-a-copy-store any-protocol allnet-cond
psu addto link exp-a-write-link exp-a-write-pools
psu set link exp-a-write-link -readpref=0 -writepref=10 -cachepref=0 -p2ppref=-1
#
#
#
Table of Contents
To limit access to data, dCache comes with an authentication and
authorization interface called gPlazma2.
gPlazma is an acronym for Grid-aware PLuggable AuthorZation
Management. Earlier versions of dCache worked with gPlazma1 which
has now been completely removed from dCache. So if you are
upgrading, you have to reconfigure gPlazma if you used gPlazma1
until now.
Though it is possible to allow anonymous access to dCache it is usually
desirable to authenticate users. The user then has to connect to one of
the different doors (e.g., GridFTP doordCap doorX.509 certificates, but dCache also supports other methods
like username/password and kerberos authentication.
The door collects the credential information from the user and sends a
login request to the configured authorization service (i.e., gPlazma)
Within gPlazma the configured plug-ins try to verify the users identity
and determine his access rights. From this a response is created that is
then sent back to the door and added to the entity representing the user in
dCache. This entity is called subject. While for
authentication usually more global services (e.g., ARGUS) may be
used, the mapping to site specific UIDs has to be configured on a per
site basis.
gPlazma2 is configured by the PAM-style configuration file
/etc/dcache/gplazma.conf.
Each line of the file is either a comment (i.e., starts with #,
is empty, or defines a plugin. Plugin defining lines start with the
plugin stack type (one of auth, map, account, session identity),
followed by a PAM-style modifier (one of optional, sufficient,
required, requisite), the plugin name and an optional list of
key-value pairs of parameters. During the login process they will be executed
in the order auth, map, account and session. The identity plugins
are not used during login, but later on to map from UID+GID back to user
names (e.g., for NFS). Within these groups they are used in the order they
are specified.
auth|map|account|session|identity optional|required|requisite|sufficient <plug-in> ["<key>=<value>" ...]
A complete configuration file will look something like this:
Example:
# Some comment
auth    optional  x509
auth    optional  voms
map     requisite vorolemap
map     requisite authzdb authzdb=/etc/grid-security/authzdb
session requisite authzdb
Login Phases
authauth-plug-ins are used to read the users public and private credentials and ask some authority, if those are valid for accessing the system.mapmap-plug-ins map the user information obtained in theauthstep to UID and GIDs. This may also be done in several steps (e.g., thevorolemapplug-in maps the users DN+FQAN to a username which is then mapped to UID/GIDs by theauthzdbplug-in.accountaccount-plug-ins verify the validity of a possibly mapped identity of the user and may reject the login depending on information gathered within the map step.sessionsessionplug-ins usually enrich the session with additional attributes like the user’s home directory.identityidentityplug-ins are responsible for mapping UID and GID to user names and vice versa during the work with dCache.
The meaning of the modifiers follow the PAM specification:
Modifiers
optionalThe success or failure of this plug-in is only important if it is the only plug-in in the stack associated with this type.
sufficientSuccess of such a plug-in is enough to satisfy the authentication requirements of the stack of plug-ins (if a prior required plug-in has failed the success of this one is ignored). A failure of this plug-in is not deemed as fatal for the login attempt. If the plug-in succeeds
gPlazma2immediately proceeds with the next plug-in type or returns control to the door if this was the last stack.requiredFailure of such a plug-in will ultimately lead to
gPlazma2returning failure but only after the remaining plug-ins for this type have been invoked.requisiteLike
required, however, in the case that such a plug-in returns a failure, control is directly returned to the door.
gPlazma2 functionality is configured by combining different types
of plug-ins to work together in a way that matches your requirements.
For this purpose there are five different types of plug-ins. These types
correspond to the keywords auth, map, account, session and
identity as described in the previous section. The plug-ins can be
configured via properties that may be set in
dcache.conf, the layout-file or in
gplazma.conf.
The kpwd plug-in authorizes users by username and password, by pairs
of DN and FQAN and by Kerberos principals.
Properties
gplazma.kpwd.filePath to
dcache.kpwdDefault:
/etc/dcache/dcache.kpwd
The voms plug-in is an auth plug-in. It can be used to verify X.509
credentials. It takes the certificates and checks their validity
by testing them against the trusted CAs. The verified certificates
are then stored and passed on to the other plug-ins in the stack.
Properties
gplazma.vomsdir.caPath to ca certificates
Default:
/etc/grid-security/certificatesgplazma.vomsdir.dirPath to
vomsdirDefault:
/etc/grid-security/vomsdir
The X.509 plug-in is a auth plug-in that extracts X.509
certificate chains from the credentials of a user to be used by
other plug-ins.
As a map plug-in it maps usernames to UID and GID. And as a
session plug-in it adds root and home path information to the
session based on the user’s username.
Properties
gplazma.kpwd.filePath to
dcache.kpwdDefault:
/etc/dcache/dcache.kpwd
The authzdb plug-in takes a username and maps it to UID+GID using
the storage-authzdb file.
Properties
gplazma.authzdb.filePath to
storage-authzdbDefault:
/etc/grid-security/storage-authzdb
The gridmap plug-in maps GLOBUS identities and Kerberos identities
to usernames.
Properties
gplazma.gridmap.filePath to
grid-mapfileDefault:
/etc/grid-security/grid-mapfile
The voms plug-in maps pairs of DN and FQAN to usernames via a
vorolemap
file.
Properties
gplazma.vorolemap.filePath to
grid-vorolemap/etc/grid-security/grid-vorolemap
The krb5 plug-in maps a kerberos principal to a username by removing
the domain part from the principal.
Example:
user@KRB-DOMAIN.EXAMPLE.ORG to user
The nsswitch plug-in uses the system’s nsswitch
configuration to provide mapping.
Typically nsswitch plug-in will be combined with vorolemap plug-in,
gridmap plug-in or krb5 plug-in:
Example:
# Map grid users to local accounts
auth    optional  x509 #1
auth    optional  voms #2
map     requisite vorolemap #3
map     requisite nsswitch #4
session requisite nsswitch #5
In this example following is happening: extract user’s DN (1), extract and verify VOMS attributes (2), map DN+Role to a local account (3), extract uid and gids for a local account (4) and, finally, extract users home directory (5).
The nis plug-in uses an existing NIS service to map username+password
to a username.
Properties
gplazma.nis.serverNISserver hostDefault:
nisserv.domain.comgplazma.nis.domainNISdomainDefault:
domain.com
The result of nis plug-in can be used by other plug-ins:
Example:
# Map grid or kerberos users to local accounts
auth    optional  x509 #1
auth    optional  voms #2
map     requisite vorolemap #3
map     optional  krb5 #4
map     optional  nis #5
session requisite nis #6
In this example two access methods are considered: grid based and
kerberos based. If user comes with grid certificate and VOMS role:
extract user’s DN (1), extract and verify VOMS attributes (2),
map DN+Role to a local account (3). If user comes with Kerberos
ticket: extract local account (4). After this point in both cases
we talk to NIS to get uid and gids for a local account (5) and,
finally, adding users home directory (6).
The argus plug-in bans users by their DN. It talks to your site’s
ARGUS system (see
https://twiki.cern.ch/twiki/bin/view/EGEE/AuthorizationFramework
) to check for banned users.
Properties
gplazma.argus.hostcertPath to host certificate
Default:
/etc/grid-security/hostcert.pemgplazma.argus.hostkeyPath to host key
Default:
/etc/grid-security/hostkey.pemgplazma.argus.hostkey.passwordPassword for host key
Default:
gplazma.argus.caPath to CA certificates
Default:
/etc/grid-security/certificatesgplazma.argus.endpointURL of PEP service
Default:
https://localhost:8154/authz
The kpwd plug-in adds root and home path information to the session,
based on the username.
Properties
gplazma.kpwd.filePath to
dcache.kpwdDefault:
/etc/dcache/dcache.kpwd
The authzdb plug-in adds root and home path information to the session,
based and username using the storage-authzdb
file.
Properties
gplazma.authzdb.filePath to
storage-authzdbDefault:
/etc/grid-security/storage-authzdb
The nsswitch plug-in adds root and home path information to the
session, based on the username using your system’s
nsswitch service.
Typically nsswitch plug-in will be combined with vorolemap plug-in,
gridmap plug-in or krb5 plug-in:
Example:
# Map grid users to local accounts
auth    optional  x509 #1
auth    optional  voms #2
map     requisite vorolemap #3
map     requisite nsswitch #4
session requisite nsswitch #5
In this example following is happening: extract user’s DN (1), extract and verify VOMS attributes (2), map DN+Role to a local account (3), extract uid and gids for a local account (4) and, finally, extract users home directory (5).
The nis plug-in adds root and home path information to the session,
based on the username using your site’s NIS service.
Properties
gplazma.nis.serverNISserver hostDefault:
nisserv.domain.comgplazma.nis.domainNISdomainDefault:
domain.com
The result of nis plug-in can be used by other plug-ins:
Example:
# Map grid or kerberos users to local accounts
auth    optional  x509 #1
auth    optional  voms #2
map     requisite vorolemap #3
map     optional  krb5 #4
map     optional  nis #5
session requisite nis #6
In this example two access methods are considered: grid based and
kerberos based. If user comes with grid certificate and VOMS role:
extract user’s DN (1), extract and verify VOMS attributes (2),
map DN+Role to a local account (3). If user comes with Kerberos
ticket: extract local account (4). After this point in both cases
we talk to NIS to get uid and gids for a local account (5) and,
finally, adding users home directory (6).
The nsswitch plug-in provides forward and reverse mapping for NFSv4.1
using your system’s nsswitch service.
The nis plug-in forward and reverse mapping for NFSv4.1 using your
site’s NIS service.
Properties
gplazma.nis.serverNISserver hostDefault:
nisserv.domain.comgplazma.nis.domainNISdomainDefault:
domain.com
Most plug-ins of gPlazma support X.509 certificates for
authentication and authorisation. X.509 certificates are used to identify
entities (e.g., persons, hosts) in the Internet. The certificates contain
a DN (Distinguished Name) that uniquely describes the entity. To give
the certificate credibility it is issued by a CA (Certificate Authority)
which checks the identity upon request of the certificate (e.g., by
checking the persons id). For the use of X.509 certificates with dCache
your users will have to request a certificate from a CA you trust and you
need host certificates for every host of your dCache instance.
To be able to locally verify the validity of the certificates, you need to store the CA certificates on your system. Most operating systems come with a number of commercial CA certificates, but for the Grid you will need the certificates of the Grid CAs. For this, CERN packages a number of CA certificates. These are deployed by most grid sites. By deploying these certificates, you state that you trust the CA’s procedure for the identification of individuals and you agree to act promptly if there are any security issues.
To install the CERN CA certificates follow the following steps:
[root] #cd /etc/yum.repos.d/[root] #wget http://grid-deployment.web.cern.ch/grid-deployment/glite/repos/3.2/lcg-CA.repo[root] #yum install lcg-CA
This will create the directory /etc/grid-security/certificates
which contains the Grid CA certificates.
Certificates which have been revoked are collected in certificate revocation lists (CRLs). To get the CRLs install the fetch-crl command as described below.
[root] #yum install fetch-crl[root] #/usr/sbin/fetch-crl
fetch-crl adds X.509 CRLs to /etc/grid-security/certificates.
It is recommended to set up a cron job to periodically update the CRLs.
If you do not have a valid grid user certificate yet, you have to
request one from your CA. Follow the instructions from your CA on how to
get a certificate. After your request was accepted you will get a URL
pointing to your new certificate. Install it into your browser to be
able to access grid resources with it. Once you have the certificate
in your browser, make a backup and name it
userCertificate.p12. Copy the user certificate to
the directory ~/.globus/ on your
worker node and convert it to usercert.pem and
userkey.pem as described below.
[user] $openssl pkcs12 -clcerts -nokeys -in <userCertificate>.p12 -out usercert.pemEnter Import Password: MAC verified OK
During the backup your browser asked you for a password to encrypt the certificate. Enter this password here when asked for a password. This will create your user certificate.
[user] $openssl pkcs12 -nocerts -in <userCertificate>.p12 -out userkey.pemEnter Import Password: MAC verified OK Enter PEM pass phrase:
In this step you need to again enter the backup password. When asked for the PEM pass phrase choose a secure password. If you want to use your key without having to type in the pass phrase every time, you can remove it by executing the following command.
[root] #openssl rsa -in userkey.pem -out userkey.pemEnter pass phrase for userkey.pem: writing RSA key
Now change the file permissions to make the key only readable by you and the certificate world readable and only writable by you.
[root] #chmod 400 userkey.pem[root] #chmod 644 usercert.pem
To request a host certificate for your server host, follow again the instructions of your CA.
The conversion to hostcert.pem and
hostkey.pem works analogous to the user
certificate. For the hostkey you have to remove the pass phrase. How to
do this is also explained in the previous section. Finally copy the
host*.pem files to
/etc/grid-security/ as root and
change the file permissions in favour of the user running the grid
application.
For very large groups of people, it is often more convenient to
authorise people based on their membership of some group. To identify
that they are a member of some group, the certificate owner can create a
new short-lived X.509 certificate that includes their membership of
various groups. This short-lived certificate is called a
proxy-certificate and, if the membership information comes from a VOMS
server, it is often referred to as a VOMS-proxy.
[root] #cd /etc/yum.repos.d/[root] #wget http://grid-deployment.web.cern.ch/grid-deployment/glite/repos/3.2/glite-UI.repo[root] #yum install glite-security-voms-clients
To create a VOMS proxy for your user certificate you need to execute the voms-proxy-init as a user.
Example:
[user] $export PATH=/opt/glite/bin/:$PATH[user] $voms-proxy-initEnter GRID pass phrase: Your identity: /C=DE/O=GermanGrid/OU=DESY/CN=John Doe Creating proxy ........................................................................Done Your proxy is valid until Mon Mar 7 22:06:15 2011
You can certify your membership of a VO by using the command
voms-proxy-init -voms
<yourVO>. This is useful as in
dCache authorization can be done by VO (see the section called “Authorizing a VO”). To be able to use
the extension -voms
<yourVO> you need to be able
to access VOMS servers. To this end you need the the VOMS server’s
and the CA’s DN. Create a file
/etc/grid-security/vomsdir/<VO>/<hostname>.lsc
per VOMS server containing on the 1st line the VOMS server’s DN and
on the 2nd line, the corresponding CA’s DN. The name of this file
should be the fully qualified hostname followed by an
.lsc extension and the file must appear in a
subdirectory /etc/grid-security/vomsdir/<VO>
for each VO that is supported by that VOMS server and by the
site.
At http://operations-portal.egi.eu/vo you can search for a VO and find this information.
Example:
For example, the file /etc/grid-security/vomsdir/desy/grid-voms.desy.de.lsc contains:
/C=DE/O=GermanGrid/OU=DESY/CN=host/grid-voms.desy.de
/C=DE/O=GermanGrid/CN=GridKa-CA
where the first entry is the DN of the DESY VOMS server and the second entry is the DN of the CA which signed the DESY VOMS server’s certificate.
In addition, you need to have a file
/opt/glite/etc/vomses containing your VO’s
VOMS server.
Example:
For DESY the file /opt/glite/etc/vomses should
contain the entry
"desy" "grid-voms.desy.de" "15104" "/C=DE/O=GermanGrid/OU=DESY/CN=host/grid-voms.desy.de" "desy" "24"
The first entry “desy” is the real name or a nickname of your VO. “grid-voms.desy.de” is the hostname of the VOMS server. The number “15104” is the port number the server is listening on. The forth entry is the DN of the server’s VOMS certificate. The fifth entry, “desy”, is the VO name and the last entry is the globus version number which is not used anymore and can be omitted.
Example:
Use the command voms-proxy-init -voms to create a VOMS proxy with VO “desy”.
[user] $voms-proxy-init -voms desyEnter GRID pass phrase: Your identity: /C=DE/O=GermanGrid/OU=DESY/CN=John Doe Creating temporary proxy ....................................................... Done Contacting grid-voms.desy.de:15104 [/C=DE/O=GermanGrid/OU=DESY/CN=host/grid-voms.desy.de] "desy" Done Creating proxy .................................... Done Your proxy is valid until Mon Mar 7 23:52:13 2011
View the information about your VOMS proxy with voms-proxy-info
[user] $voms-proxy-infosubject : /C=DE/O=GermanGrid/OU=DESY/CN=John Doe/CN=proxy issuer : /C=DE/O=GermanGrid/OU=DESY/CN=John Doe identity : /C=DE/O=GermanGrid/OU=DESY/CN=John Doe type : proxy strength : 1024 bits path : /tmp/x509up_u500 timeleft : 11:28:02
The last line tells you how much longer your proxy will be valid.
If your proxy is expired you will get
[user] $voms-proxy-infosubject : /C=DE/O=GermanGrid/OU=DESY/CN=John Doe/CN=proxy issuer : /C=DE/O=GermanGrid/OU=DESY/CN=John Doe identity : /C=DE/O=GermanGrid/OU=DESY/CN=John Doe type : proxy strength : 1024 bits path : /tmp/x509up_u500 timeleft : 0:00:00
The command voms-proxy-info -all gives you information about the proxy and about the VO.
[user] $voms-proxy-info -allsubject : /C=DE/O=GermanGrid/OU=DESY/CN=John Doe/CN=proxy issuer : /C=DE/O=GermanGrid/OU=DESY/CN=John Doe identity : /C=DE/O=GermanGrid/OU=DESY/CN=John Doe type : proxy strength : 1024 bits path : /tmp/x509up_u500 timeleft : 11:24:57 === VO desy extension information === VO : desy subject : /C=DE/O=GermanGrid/OU=DESY/CN=John Doe issuer : /C=DE/O=GermanGrid/OU=DESY/CN=host/grid-voms.desy.de attribute : /desy/Role=NULL/Capability=NULL attribute : /desy/test/Role=NULL/Capability=NULL timeleft : 11:24:57 uri : grid-voms.desy.de:15104
Use the command voms-proxy-destroy to destroy your VOMS proxy.
[user] $voms-proxy-destroy[user] $voms-proxy-infoCouldn't find a valid proxy.
In this section we explain the format of the the
storage-authzdb, kpwd and
vorolemap files. They are used by the authzdb plug-in,
vorolemap plug-in,and kpwd plug-in.
In gPlazma, except for the kpwd plug-in, authorization is a
two-step process. First, a username is obtained from a mapping of the
user’s DN or his DN and role, then a mapping of username to UID
and GID with optional additional session parameters like the root
path is performed. For the second mapping usually the file called
storage-authzdb is used.
The default location of the storage-authzdb is
/etc/grid-security. Before the
mapping entries there has to be a line specifying the version of the
used file format.
Example:
version 2.1
dCache supports versions 2.1 and to some extend 2.2.
Except for empty lines and comments (lines start with #)
the configuration lines have the following format:
authorize <username> (read-only|read-write) <UID> <GID>[,<GID>]* <homedir> <rootdir>
For legacy reasons there may be a third path entry which is ignored by dCache. The username here has to be the name the user has been mapped to in the first step (e.g., by his DN).
Example:
authorize john read-write 1001 100 / /data/experiments /
In this example user <john> will be mapped to
UID 1001 and GID 100 with read access on the directory /data/experiments. You may choose to
set the user’s root directory to /.
Example:
authorize adm read-write 1000 100 / / /
In this case the user <adm> will be granted read/write access in any path, given that the file system permissions in Chimera also allow the transfer.
The first path is nearly always left as “/”, but it may be used as a
home directory in interactive session, as a subdirectory of the root
path. Upon login, the second path is used as the user’s root, and a
“cd” is performed to the first path. The first path is
always defined as being relative to the second path.
Multiple GIDs can be assigned by using comma-separated values for the GID file, as in
Example:
authorize john read-write 1001 100,101,200 / / /
The lines of the storage-authzdb file are similar
to the “login” lines of the
dcache.kpwd file. If you already have a
dcache.kwpd file, you can easily create
storage-authzdb by taking the lines from your
dcache.kpwd file that start with the word
login, for example,
Example:
login john read-write 1001 100 / /data/experiments /
and replace the word login with
authorize. The following line does this for you.
[root] # sed "s/^ *login/authorize/" dcache.kpwd|grep "^authorize" > storage-authzdb
The second is the storage-authzdb used in other
plug-ins. See the above documentation on storage-authdb
for how to create the file.
The file is similar in format to the grid-mapfile,
however there is an additional field following the DN (Certificate
Subject), containing the FQAN (Fully Qualified Attribute Name).
"/C=DE/O=GermanGrid/OU=DESY/CN=John Doe" "/some-vo" doegroup
"/C=DE/DC=GermanGrid/O=DESY/CN=John Doe" "/some-vo/Role=NULL" doegroup
"/C=DE/DC=GermanGrid/O=DESY/CN=John Doe" "/some-vo/Role=NULL/Capability=NULL" doegroup
Therefore each line has three fields: the user’s DN, the user’s FQAN, and the username that the DN and FQAN combination are to be mapped to.
The FQAN is sometimes semantically referred to as the “role”. The same user can be mapped to different usernames depending on what their FQAN is. The FQAN is determined by how the user creates their proxy, for example, using voms-proxy-init . The FQAN contains the user’s Group, Role (optional), and Capability (optional). The latter two may be set to the string “NULL”, in which case they will be ignored by the plug-in. Therefore the three lines in the example above are equivalent.
Example:
If a user is authorized in multiple roles, for example
"/DC=org/DC=doegrids/OU=People/CN=John Doe" "/some-vo/sub-grp" vo_sub_grp_user
"/DC=org/DC=doegrids/OU=People/CN=John Doe" "/some-vo/sub-grp/Role=user" vouser
"/DC=org/DC=doegrids/OU=People/CN=John Doe" "/some-vo/sub-grp/Role=admin" voadmin
"/DC=org/DC=doegrids/OU=People/CN=John Doe" "/some-vo/sub-grp/Role=prod" voprod
he will get the username corresponding to the FQAN found in the proxy that the user creates for use by the client software. If the user actually creates several roles in his proxy, authorization (and subsequent check of path and file system permissions) will be attempted for each role in the order that they are found in the proxy.
In a GridFTP URL, the user may also explicitly request a username.
gsiftp://doeprod@ftp-door.example.org:2811/testfile1
in which case other roles will be disregarded.
Instead of individual DNs, it is allowed to use * or
"*" as the first field, such as
Example:
"*" "/desy/Role=production/" desyprod
In that case, any DN with the corresponding role will match. It
should be noted that a match is first attempted with the explicit DN.
Therefore if both DN and "*" matches can be made,
the DN match will take precedence. This is true for the revocation
matches as well (see below).
Thus a user with subject /C=DE/O=GermanGrid/OU=DESY/CN=John
Doe and role /desy/Role=production will
be mapped to username desyprod via the above
storage-authzdb line with "*"
for the DN, except if there is also a line such as
"/C=DE/O=GermanGrid/OU=DESY/CN=John Doe" "/desy/Role=production" desyprod2
in which case the username will be desyprod2.
To create a revocation entry, add a line with a dash
(-) as the username, such as
"/C=DE/O=GermanGrid/OU=DESY/CN=John Doe" "/desy/production" -
or modify the username of the entry if it already exists. The behaviour is undefined if there are two entries which differ only by username.
Since DN is matched first, if a user would be authorized by his VO
membership through a "*" entry, but is matched
according to his DN to a revocation entry, authorization would be
denied. Likewise if a whole VO were denied in a revocation entry, but
some user in that VO could be mapped to a username through his DN,
then authorization would be granted.
Example:
Suppose that there are users in production roles that are expected to
write into the storage system data which will be read by other users.
In that case, to protect the data the non-production users would be
given read-only access. Here in /etc/grid-security/grid-vorolemap
the production role maps to username cmsprod, and
the role which reads the data maps to cmsuser.
"*" "/cms/uscms/Role=cmsprod" cmsprod "*" "/cms/uscms/Role=cmsuser" cmsuser
The read-write privilege is controlled by the third field in the lines
of /etc/grid-security/storage-authzdb
authorize cmsprod  read-write  9811 5063 / /data /
authorize cmsuser  read-only  10001 6800 / /data /
Example:
Another use case is when users are to have their own directories
within the storage system. This can be arranged within the
gPlazma configuration files by mapping each user’s DN to a
unique username and then mapping each username to a unique root path.
As an example, lines from /etc/grid-security/grid-vorolemap
would therefore be written
"/DC=org/DC=doegrids/OU=People/CN=Selby Booth" "/cms" cms821
"/DC=org/DC=doegrids/OU=People/CN=Kenja Kassi" "/cms" cms822
"/DC=org/DC=doegrids/OU=People/CN=Ameil Fauss" "/cms" cms823
and the corresponding lines from
/etc/grid-security/storage-authzdb would be
authorize cms821 read-write 10821 7000 / /data/cms821 /
authorize cms822 read-write 10822 7000 / /data/cms822 /
authorize cms823 read-write 10823 7000 / /data/cms823 /
The section in the gPlazma policy file for the kpwd plug-in
specifies the location of the dcache.kpwd
file, for example
Example:
# dcache.kpwd
kpwdPath="/etc/dcache/dcache.kpwd"
To maintain only one such file, make sure that this is the same
location as defined in
/usr/share/dcache/defaults/dcache.properties.
Use /usr/share/dcache/examples/gplazma/dcache.kpwd
to create this file.
To be able to alter entries in the dcache.kpwd file
conveniantly the dcache script offers support for doing this.
Example:
[user] $dcache kpwd dcuseradd testuser -u 12345 -g 1000 -h / -r / -f / -w read-write -p passwordadds this to the kpwd file:
passwd testuser ae39aec3 read-write 12345 1000 / /
There are many more commands for altering the kpwd-file, see the dcache-script help for further commands available.
Two file locations are defined in the policy file for this plug-in:
# grid-mapfile
gridMapFilePath="/etc/grid-security/grid-mapfile"
storageAuthzPath="/etc/grid-security/storage-authzdb"
The grid-mapfile is the same as that used in other
applications. It can be created in various ways, either by connecting
directly to VOMS or GUMS servers, or by hand.
Each line contains two fields: a DN (Certificate Subject) in quotes, and the username it is to be mapped to.
Example:
"/C=DE/O=GermanGrid/OU=DESY/CN=John Doe" johndoe
When using the gridmap plug-in, the
storage-authzdb file must also be configured.
See the section called “storage-authzdb” for details.
dCache has many parameters that can be used to configure the systems
behaviour. You can find all these parameters well documented and together
with their default values in the properties files in
/usr/share/dcache/defaults/. To use
non-default values, you have to set the new values in
/etc/dcache/dcache.conf or in the layout file.
Do not change the defaults in the properties files! After changing a
parameter you have to restart the concerned cells.
Refer to the file gplazma.properties for a full list
of properties for gPlazma One commonly used property is
gPlazmaNumberOfSimultaneousRequests, which is used to
set the maximum number of concurrent requests to gPlazma. The default
value is 30.
Setting the value for
gPlazmaNumberOfSimultaneousRequests too high may
result in large spikes of CPU activity and the potential to run out of
memory. Setting the number too low results in potentially slow login
activity.
This section describes how to activate the Username/Password access for
WebDAV. It uses dcache.kwpd file as an example
format for storing Username/Password information. First make sure
gPlazma2 is enabled in the /etc/dcache/dcache.conf
or in the layout file.
Example:
Check your WebDAV settings: enable the HTTP access, disallow the
anonymous access, disable requesting and requiring the client
authentication and activate basic authentication.
webdavProtocol=http
webdavAnonymousAccess=NONE
webdavWantClientAuth=false
webdavNeedClientAuth=false
webdavBasicAuthentication=true
Adjust the /etc/dcache/gplazma.conf to use the
kpwd plug-in (for more information see also the section called “Plug-ins”).
It will look something like this:
auth optional kpwd
map requisite kpwd
session requisite kpwd
The /etc/dcache/dcache.kpwd file is the place
where you can specify the username/password record. It should contain
the username and the password hash, as well as UID, GID, access
mode and the home, root and fsroot directories:
# set passwd
passwd tanja 6a4cd089 read-write 500 100 / / /
The passwd-record could be automatically generated by the dCache kpwd-utility, for example:
[root] #dcache kpwd dcuseradd -u 500 -g 100 -h / -r / -f / -w read-write -p dickerelch tanja
Some file access examples:
curl -u tanja:dickerelch http://webdav-door.example.org:2880/pnfs/
wget --user=tanja --password=dickerelch http://webdav-door.example.org:2880/pnfs/
This section describes how to configure gplazma to enable webadmin in authenticated mode
with a grid certificate as well as with a username/password and how to give a user administrator access.
Example for the {dcache.paths.etc}/gplazma.conf file:
Example:
auth optional x509
auth optional kpwd
map requisite kpwd
session requisite kpwd
The following example will show how to set up the ${dcache.paths.etc}/dcache.kpwd file:
version 2.1

mapping "/C=DE/O=ExampleOrganisation/OU=EXAMPLE/CN=John Doe" john
# the following are the user auth records
login john read-write 1700 1000 / / /
/C=DE/O=ExampleOrganisation/OU=EXAMPLE/CN=John Doe

# set pwd
passwd john 8402480 read-write 1700 1000 / / /
This maps the DN of a grid certificate
subject=/C=DE/O=ExampleOrganisation/OU=EXAMPLE/CN=John Doe
to the user john and the
entry
login john read-write 1700 1000 / / /
  /C=DE/O=GermanGrid/OU=DESY/CN=John Doe
applies unix-like
values to john, most
important is the 1000, because it is the assigned
GID. This must match the value of the webadminAdminGid
configured in your webadmin. This is sufficient for login using a
certificate. The entry:
passwd john 8402480 read-write 1700 1000 / / /
enables username/password login, such as a valid login would be user
john with some password. The
password is encrypted with the kpwd-algorithm (also see the section called “The kpwd plug-in”) and then stored in the file. Again
the 1000 here is the assigned GID.
Table of Contents
This chapter explains how to configure dCache in order to access
it via the xrootd protocol, allowing xrootd-Clients like
ROOT’s TXNetfile and xrdcp to do file operations against a
dCache instance in a transparent manner. dCache implements
version 2.1.6 of xrootd protocol.
To allow file transfers in and out of dCache using xrootd, a
new xrootd doorxrootd requests. Compared to the native
xrootd server-implementation (produced by SLAC), the
xrootd doorredirector node.
To enable the xrootd door
..
[<domainName>/xrootd]
..
Example:
You can just add the following lines to the layout file:
..
[xrootd-${host.name}Domain]
[xrootd-${host.name}Domain/xrootd]
..
After a restart of the domain running the xrootd door
[root] #${dCacheHome}/bin/dcache restart xrootd-babelfishDomainStopping xrootd-babelfishDomain (pid=30246) 0 1 2 3 4 5 6 7 done Starting xrootd-babelfishDomain done
the xrootd door
The default port the xrootd door
Per door: Edit your instance’s layout file, for example
/etc/dcache/layouts/example.confand add the desired port for thexrootddoorxrootddoor.. [xrootd-${host.name}Domain] [xrootd-${host.name}Domain/xrootd] port = 1095 ..Globally: Edit
/etc/dcache/dcache.confand add the variablexrootdPortwith the desired value (a restart of the domain(s) running thexrootddoor.. xrootdPort=1095 ..
For controlling the TCP-portrange within which xrootd-movers
will start listening in the <pool>Domain, you can add the properties
net.lan.port.min and
net.lan.port.max to
/etc/dcache/dcache.conf and adapt them
according to your preferences. The default values can be viewed in
/usr/share/dcache/defaults/dcache.properties.
..
net.lan.port.min=30100
net.lan.port.max=30200
..
The subsequent paragraphs describe a quick guide on how to test
xrootd using the xrdcp and
ROOT clients.
A simple way to get files in and out of dCache via xrootd
is the command xrdcp. It is included in every xrootd and ROOT
distribution.
To transfer a single file in and out of dCache, just issue
[user] $xrdcp /bin/sh root://<xrootd-door.example.org>/pnfs/<example.org>/data/xrd_test[user] $xrdcp root://<xrootd-door.example.org>/pnfs/<example.org>/data/xrd_test /dev/null
This simple ROOT example shows how to write a randomly filled histogram to a file in dCache:
root [0] TH1F h("testhisto", "test", 100, -4, 4);
root [1] h->FillRandom("gaus", 10000);
root [2] TFile *f = new TXNetFile("root://<door_hostname>//pnfs/<example.org>/data/test.root","new");
061024 12:03:52 001 Xrd: Create: (C) 2004 SLAC INFN XrdClient 0.3
root [3] h->Write();
root [4] f->Write();
root [5] f->Close();
root [6] 061101 15:57:42 14991 Xrd: XrdClientSock::RecvRaw: Error reading from socket: Success
061101 15:57:42 14991 Xrd: XrdClientMessage::ReadRaw: Error reading header (8 bytes)
Closing remote xrootd files that live in dCache produces
this warning, but has absolutely no effect on subsequent ROOT
commands. It happens because dCache closes all TCP
connections after finishing a file transfer, while xrootd
expects to keep them open for later reuse.
To read it back into ROOT from dCache:
root [7] TFile *reopen = TXNetFile ("root://<door_hostname>//pnfs/<example.org>/data/test.root","read");
root [8] reopen->ls();
TXNetFile** //pnfs/<example.org>/data/test.root
TXNetFile* //pnfs/<example.org>/data/test.root
KEY: TH1F testhisto;1 test
Per default dCache xrootd is restricted to read-only,
because plain xrootd is completely unauthenticated. A
typical error message on the clientside if the server is
read-only looks like:
[user] $xrdcp -d 1 /bin/sh root://ford.desy.de//pnfs/desy.de/data/xrd_test2Setting debug level 1 061024 18:43:05 001 Xrd: main: (C) 2004 SLAC INFN xrdcp 0.2 beta 061024 18:43:05 001 Xrd: Create: (C) 2004 SLAC INFN XrdClient kXR_ver002+kXR_asyncap 061024 18:43:05 001 Xrd: ShowUrls: The converted URLs count is 1 061024 18:43:05 001 Xrd: ShowUrls: URL n.1: root://ford.desy.de:1094//pnfs/desy.de/data/asdfas. 061024 18:43:05 001 Xrd: Open: Access to server granted. 061024 18:43:05 001 Xrd: Open: Opening the remote file /pnfs/desy.de/data/asdfas 061024 18:43:05 001 Xrd: XrdClient::TryOpen: doitparallel=1 061024 18:43:05 001 Xrd: Open: File open in progress. 061024 18:43:06 5819 Xrd: SendGenCommand: Server declared: Permission denied. Access is read only.(error code: 3003) 061024 18:43:06 001 Xrd: Close: File not opened. Error accessing path/file for root://ford//pnfs/desy.de/data/asdfas
To enable read-write access, add the following line to
${dCacheHome}/etc/dcache.conf
.. xrootdIsReadOnly=false ..
and restart any domain(s) running a xrootd door
Please note that due to the unauthenticated nature of this
access mode, files can be written and read to/from any
subdirectory in the pnfs namespace (including the automatic
creation of parent directories). If there is no user
information at the time of request, new files/subdirectories
generated through xrootd will inherit UID/GID from its
parent directory. The user used for this can be configured via the
xrootdUser property.
To overcome the security issue of uncontrolled xrootd read and write
access mentioned in the previous section, it is possible to
restrict read and write access on a per-directory basis (including
subdirectories).
To activate this feature, a colon-seperated list containing
the full paths of authorized directories must be added
to /etc/dcache/dcache.conf. If both read and
write access should be authorized for certain directories, add the
following line to /etc/dcache/dcache.conf:
.. xrootdAllowedPaths=/pnfs/<example.org>/path1:/pnfs/<example.org>/path2 ..
If you want to split permissions depending on whether the operation is reading or writing, add the following lines instead:
.. xrootdAllowedReadPaths=/pnfs/<example.org>/rpath1:/pnfs/<example.org>/rpath2 xrootdAllowedWritePaths=/pnfs/<example.org>/wpath1:/pnfs/<example.org>/wpath2 ..
A restart of the xrootd door
The xrootd dCache implementation includes a generic
mechanism to plug in different authorization handlers. The only
plugin available so far implements token-based authorization
as suggested in http://people.web.psi.ch/feichtinger/doc/authz.pdf.
The first thing to do is to setup the keystore. The keystore
file basically specifies all RSA-keypairs used within the
authorization process and has exactly the same syntax as in
the native xrootd tokenauthorization implementation. In this
file, each line beginning with the keyword
KEY corresponds to a certain Virtual
Organisation (VO) and specifies the remote public (owned by
the file catalogue) and the local private key belonging to
that VO. A line containing the statement "KEY
VO:*" defines a default keypair that is used as a
fallback solution if no VO is specified in token-enhanced
xrootd requests. Lines not starting with the
KEY keyword are ignored. A template can be
found in
/usr/share/dcache/examples/xrootd/keystore.
The keys itself have to be converted into a certain format in order to be loaded into the authorization plugin. dCache expects both keys to be binary DER-encoded (Distinguished Encoding Rules for ASN.1). Furthermore the private key must be PKCS #8-compliant and the public key must follow the X.509-standard.
The following example demonstrates how to create and convert a keypair using OpenSSL:
Generate new RSA private key[root] #openssl genrsa -rand 12938467 -out key.pem 1024Create certificate request[root] #openssl req -new -inform PEM -key key.pem -outform PEM -out certreq.pemCreate certificate by self-signing certificate request[root] #openssl x509 -days 3650 -signkey key.pem -in certreq.pem -req -out cert.pemExtract public key from certificate[root] #openssl x509 -pubkey -in cert.pem -out pkey.pem[root] #openssl pkcs8 -in key.pem -topk8 -nocrypt -outform DER -out <new_private_key>[root] #openssl enc -base64 -d -in pkey.pem -out <new_public_key>
Only the last two lines are performing the actual conversion, therefore you can skip the previous lines in case you already have a keypair. Make sure that your keystore file correctly points to the converted keys.
To enable the plugin, it is necessary to add the following two lines to
the file
/etc/dcache/dcache.conf, so that
it looks like
.. xrootdAuthzPlugin=org.dcache.xrootd.security.plugins.tokenauthz.TokenAuthorizationFactory xrootdAuthzKeystore=<Path_to_your_Keystore> ..
After doing a restart of dCache, any requests without
an appropriate token should result in an error saying
"authorization check failed: No authorization token
found in open request, access denied.(error code:
3010)".
If both tokenbased authorization and read-only access are activated, the read-only restriction will dominate (local settings have precedence over remote file catalogue permissions).
The xrootd-implementation in dCache includes a pluggable
authentication framework. To control which authentication mechanism
is used by xrootd, add the xrootdAuthNPlugin
option to your dCache configuration and set it to the desired value.
Example:
For instance, to enable GSI authentication in xrootd, add the
following line to /etc/dcache/dcache.conf:
.. xrootdAuthNPlugin=gsi ..
When using GSI authentication, depending on your setup,
you may or may not want dCache to fail if the host
certificate chain can not be verified against trusted certificate
authorities. Whether dCache performs this check can be controlled
by setting the option grid.hostcert.verify:
.. grid.hostcert.verify=true ..
Authorization of the user information obtained
by strong authentication is performed by contacting the gPlazma
service. Please refer to Chapter 10, Authorization in dCache for instructions
about how to configure gPlazma.
Security consideration
In general GSI on xrootd is not secure. It does not provide
confidentiality and integrity guarantees and hence does not protect
against man-in-the-middle attacks.
The previously explained methods to restrict access via
xrootd can also be used together. The precedence
applied in that case is as following:
Note
The xrootd-door can be configured to use either token authorization
or strong authentication with gPlazma authorization.
A combination of both is currently not possible.
The permission check executed by the authorization plugin (if one is installed) is given the lowest priority, because it can controlled by a remote party. E.g. in the case of token based authorization, access control is determined by the file catalogue (global namespace).
The same argument holds for many strong authentication mechanisms - for
example, both the GSI protocol as well as the Kerberos protocols require
trust in remote authorities. However, this only affects user
authentication, while authorization decisions can
be adjusted by local site administrators by adapting the gPlazma
configuration.
To allow local site’s administrators to override remote
security settings, write access can be further restricted to
few directories (based on the local namespace, the
pnfs). Setting xrootd access to read-only has the highest
priority, overriding all other settings.
The xrootd-door has several other configuration properties. You can configure various timeout parameters,
the thread pool sizes on pools, queue buffer sizes on pools, the xrootd root path, the xrootd user
and the xrootd IO queue. Full descriptions on the effect of those can be found in
/usr/share/dcache/defaults/xrootd.properties.
Table of Contents
This chapter explains how to configure dCache in order to access
it via the NFSv4.1 protocol, allowing clients to mount dCache and perform
POSIX IO using standard NFSv4.1 clients.
Important
The pNFS mentioned in this chapter is
the protocol NFSv4.1/pNFS and not the namespace pnfs.
To allow file transfers in and out of dCache using NFSv4.1/pNFS, a
new NFSv4.1 doorNFS clients.
To enable the NFSv4.1 doornfsv41 within the domain that you want to run it by adding the
following line
.. [<domainName>/nfsv41] ..
Example:
You can just add the following lines to the layout file:
..
[nfs-${host.name}Domain]
[nfs-${host.name}Domain/nfsv41]
..
In addition to run an NFSv4.1 door/etc/exports file. The format of /etc/exports
is similar to the one which is provided by Linux:
# <path> [host [(options)]]
Where <options> is a comma separated combination of:
romatching clients can access this export only in read-only mode
rwmatching clients can access this export only in read-write mode
sec=krb5matching clients must access
NFSusing RPCSEC_GSS authentication. The Quality of Protection (QOP) is NONE, e.g., the data is neither encrypted nor signed when sent over the network. Nevertheless the RPC packets header still protected by checksum.sec=krb5imatching clients have to access
NFSusing RPCSEC_GSS authentication. The Quality of Protection (QOP) is INTEGRITY. The RPC requests and response are protected by checksum.sec=krb5pmatching clients have to access
NFSusing RPCSEC_GSS authentication. The Quality of Protection (QOP) is PRIVACY. The RPC requests and response are protected by encryption.
For example:
Example:
# /pnfs/dcache.org/data *.dcache.org (rw,sec=krb5i)
Notice, that security flavour used at mount time will be used for client - pool comminication as well.
Adding sec=krb5 into /etc/exports
is not sufficient to get kerberos authentication to work.
All clients, pool nodes and node running NFSv4.1 doorNFSv4.1 door/etc/krb5.keytab with nfs
service principal:
nfs/host.domain@<YOUR.REALM>
The /etc/dcache/dcache.conf on pool nodes and
node running NFSv4.1 door
nfs.rpcsec_gss=true
kerberos.realm=<YOUR.REALM>
kerberos.jaas.config=/etc/dcache/gss.conf
kerberos.key-distribution-center-list=your.kdc.server
The /etc/dcache/gss.conf on pool nodes and node
running NFSv4.1 door
com.sun.security.jgss.accept {
com.sun.security.auth.module.Krb5LoginModule required
doNotPrompt=true
useKeyTab=true
keyTab="${/}etc${/}krb5.keytab"
debug=false
storeKey=true
principal="nfs/host.domain@<YOUR.REALM>";
};
Now your NFS client can securely access dCache.
The NFSv4.1 uses utf8 based strings to represent user and group names. This
is the case even for non-kerberos based accesses. Nevertheless UNIX based
clients as well as dCache internally use numbers to represent uid and gids.
A special service, called idmapd,
takes care for principal-id mapping. On the client nodes the file
/etc/idmapd.conf is usually responsible
for consistent mapping on the client side. On the server side, in case of
dCache mapping done through gplazma2. The identity type
of plug-in required by id-mapping service. Please refer to Chapter 10, Authorization in dCache for instructions about how to configure gPlazma.
Note, that nfs4 domain on clients must match
nfs.domain value in dcache.conf.
To avoid big latencies and avoiding multiple queries for the same information, like
ownership of a files in a big directory, the results from gPlazma
are cached within NFSv4.1 doordcache.conf or layoutfile:
.. # maximal number of entries in the cache nfs.idmap.cache.size = 512 # cache entry maximal lifetime nfs.idmap.cache.timeout = 30 # time unit used for timeout. Valid values are: # SECONDS, MINUTES, HOURS and DAYS nfs.idmap.cache.timeout.unit = SECONDS ..
Table of Contents
Storage Resource Managers (SRMs) are
middleware components whose function is to provide dynamic space
allocation and file management on shared storage components on
the Grid. SRMs support protocol negotiation and a reliable
replication mechanism. The SRM
specification standardizes the interface, thus allowing
for a uniform access to heterogeneous storage elements.
The SRM utilizes the Grid Security Infrastructure (GSI) for
authentication. The SRM is a Web Service implementing a
published WSDL document. Please visit the
SRM Working Group
Page to see the SRM Version 1.1 and SRM Version 2.2
protocol specification documents.
The SRM protocol uses HTTP over GSI as a transport. The
dCache SRM implementation added HTTPS as a transport
layer option. The main benefits of using HTTPS rather than HTTP
over GSI is that HTTPS is a standard protocol and has
support for sessions, improving latency in case a client needs
to connect to the same server multiple times. The current
implementation does not offer a delegation service. Hence
srmCopy will not work with SRM over
HTTPS. A separate delegation service will be added in a later
release.
Like other services, the srm service can be enabled in
the layout file
/etc/dcache/layouts/<mylayout>
of your dCache installation. For an overview of the layout
file format, please see the section called “Defining domains and services”.
Example:
To enable SRM in a separate
<srm-${host.name}Domain> in
dCache, add the following lines to your layout file:
[<srm-${host.name}Domain>]
[<srm-${host.name}Domain>/srm]
The use of the srm service requires an authentication
setup, see Chapter 10, Authorization in dCache for a general
description or the section called “Authentication and Authorization in dCache” for an
example setup with X.509 certificates.
You can now copy a file into your dCache using the SRM,
Note
Please make sure to use latest srmcp client otherwise you
will need to specify -2 in order to use
the right version.
[user] $srmcp file:////bin/sh srm://<dcache.example.org>:<8443>/data/world-writable/srm-test-file
copy it back
[user] $srmcp srm://<dcache.example.org>:<8443>/data/world-writable/srm-test-file file:////tmp/srmtestfile.tmp
and delete it
[user] $srmrm srm://<dcache.example.org>:<8443>/data/world-writable/srm-test-file
The defaults for the following configuration parameters can be
found in the .properties files in the
directory /usr/share/dcache/defaults.
If you want to modify parameters, copy them to
/etc/dcache/dcache.conf or to your
layout file
/etc/dcache/layouts/<mylayout>
and update their value.
Example:
Change the value for srmDatabaseHost=localhost in
the layout file.
[<srm-${host.name}Domain>]
[<srm-${host.name}Domain>/srm]
srmDatabaseHost=hostname
In the file
/usr/share/dcache/defaults/srm.properties
you will find the default values
# ---- Database name srmDbName=dcache # ---- Database user name srmDbUser=srmdcache
The defaults for the configuration parameters for the
SRM service can be found in
/usr/share/dcache/defaults/dcache.properties.
srmCopyReqThreadPoolSize=250
remoteGsiftpMaxTransfers=${srmCopyReqThreadPoolSize}
If you want to modify these values make sure that both
srmCopyReqThreadPoolSize and
remoteGsiftpMaxTransfers are set to the
same values. The common value should be the roughly equal to
the maximum number of the SRM - to -SRM copies your system
can sustain.
Example:
So if you think about 3 gridftp transfers per pool and you have 30 pools then the number should be 3x30=90.
srmCopyReqThreadPoolSize=90 remoteGsiftpMaxTransfers=90
Example:
US-CMS T1 has:
srmCopyReqThreadPoolSize=2000 remoteGsiftpMaxTransfers=2000
Note
SRM might produce a lot of log entries, especially if
it runs in debug mode. It is recommended to make sure that
logs are redirected into a file on a large disk.
SRM version 2.2 introduced a concept of space
reservation. Space reservation guarantees that the requested
amount of storage space of a specified type is made
available by the storage system for a specified amount of
time.
The dCache administrator can make space reservations for
VOs (see the section called “SpaceManager configuration for Explicit Space Reservations”. Each space
reservation has an associated ID (or space token). VOs then
can copy directly into space tokens assigned to them by the
dcache administrator.
When a file is about to be transferred to a storage system, the space available in the space reservation is checked if it can accomodate the entire file. If yes, this chunk of space is marked as allocated, so that it can not be taken by another, concurrently transferred file. If the file is transferred successfully the allocated space becomes used space within the space reservation, else the allocated space is released back to the space reservation.
SRM space reservation can be assigned a non-unique
description which can be used to query the system for space
reservations with a given description.
dCache only manages write space, i.e. space on disk can be reserved only for write operations. Once files are migrated to tape, and if no copy is required on disk, space used by these files is returned back into space reservation. When files are read back from tape and cached on disk, they are not counted as part of any space.
The administrator can specify a
RetentionPolicy
and an
AccessLatency for
the space reservation.
RetentionPolicy describes the quality of
the storage service that will be provided for the data
(files) stored in this space reservation and
AccessLatency describes the availability
of this data. The specification requires that if a space
reservation is given, then the specified
RetentionPolicy or
AccessLatency must match those of the
space reservation.
The default values for the
RetentionPolicy and
AccessLatency can be changed in the file
/etc/dcache/dcache.conf.
RetentionPolicyThe values of
RetentionPolicyused in dCache areREPLICAandCUSTODIAL.REPLICAcorresponds to the lowest quality of the service, usually associated with storing a single copy of each file on the disk.CUSTODIALis the highest quality service, usually interpreted as storage of the data on tape.
Once a file is written into a given space reservation, it inherits the reservation’s
RetentionPolicy.If the space reservation request does not specify a retention policy we will assign
DefaultRetentionPolicya retention policy by default. The default value isCUSTODIAL.Edit the file
/etc/dcache/dcache.confto change the default value.Example:
Change the default value to
REPLICA.DefaultRetentionPolicy=REPLICA
AccessLatencyThe two values allowed for
AccessLatencyareNEARLINEandONLINE.NEARLINEmeans that data stored in this reservation is allowed to migrate to permanent media. Retrieving these data may result in delays associated with preparatory steps that the storage system has to perform to make these data available for the user I/O (e.g., staging data from tape to a disk cache).ONLINEmeans that data is readily available allowing for faster access.
In case of dCache
ONLINEmeans that there will always be a copy of the file on disk, whileNEARLINEdoes not provide such guarantee. As withRetentionPolicy, once a file is written into a given space reservation, it inherits the reservation’sAccessLatency.If a space reservation request does not specify an access latency we will assign
DefaultAccessLatencyForSpaceReservationan access latency by default. The default value isNEARLINE.Edit the file
/etc/dcache/dcache.confto change the default value.Example:
Change the default value to
ONLINE.DefaultAccessLatencyForSpaceReservation=ONLINE
Important
Please make sure to use capital letters forREPLICA, CUSTODIAL,
ONLINE and NEARLINE
otherwise you will receive an error message.
In order to enable the SRM SpaceManager you need to add
the spacemanager service to your layout file
[<srm-${host.name}Domain>]
[<srm-${host.name}Domain>/srm]
[<srm-${host.name}Domain>/spacemanager]
and add (uncomment) the following definition in the file
/etc/dcache/dcache.conf
srmSpaceManagerEnabled=true
Each SRM space reservation is made against the total
available disk space of a particular link group. If
dCache is configured correctly each byte of disk space,
that can be reserved, belongs to one and only one link
group. See the section called “SpaceManager configuration for Explicit Space Reservations” for a detailed
description.
Important
Make sure that no pool belongs to more than one pool group, no pool group belongs to more than one link and no link belongs to more than one link group.
If a space reservation is specified, the file will be stored in it (assuming the user has permission to do so in the name space).
Files written into a space made within a particular link group will end up on one of the pools belonging to this link group. The difference between the link group’s available space and the sum of all the current space reservation sizes is the available space in the link group.
The total space in dCache that can be reserved is the sum of the available spaces of all link groups.
dCache can perform implicit space reservations for
non-SRM transfers, SRM Version 1 transfers and
for SRM Version 2.2 data transfers that are not given
the space token explicitly. The parameter that enables
this behavior is
srmImplicitSpaceManagerEnabled, which
is described in the section called “SRM configuration for experts”.
If no implicit space reservation can be made, the transfer
will fail.
In case of SRM version 1.1 data transfers, when the
access latency and retention policy cannot be specified,
and in case of SRM V2.2 clients, when the access latency
and retention policy are not specified, the default values
will be used. First SRM will attempt to use the values
of AccessLatency and
RetentionPolicy tags from the directory
to which a file is being written. If the tags are present,
then the AccessLatency and
RetentionPolicy will be set on basis of
the system wide defaults, which are controlled by
DefaultRetentionPolicy and
DefaultAccessLatencyForSpaceReservation
variables in
/etc/dcache/dcache.conf.
You can check if the AccessLatency and
RetentionPolicy tags are present by
using the following commands:
[root] #/usr/bin/chimera-cli lstag /path/to/directoryTotal: numberOfTags tag1 tag2 .. AccessLatency RetentionPolicy
If the output contains the lines
AccessLatency and
RetentionPolicy then the tags are
already present and you can get the actual values of these
tags by executing the following commands, which are shown
together with example outputs:
Example:
[root] #/usr/bin/chimera-cli readtag /data/experiment-a AccessLatencyONLINE[root] #/usr/bin/chimera-cli readtag /data/experiment-a RetentionPolicyCUSTODIAL
The valid AccessLatency values are
ONLINE and NEARLINE,
valid RetentionPolicy values are
REPLICA and
CUSTODIAL.
To create/change the values of the tags, please execute :
[root] #/usr/bin/chimera-cli writetag /path/to/directory AccessLatency "<New AccessLatency>"[root] #/usr/bin/chimera-cli writetag /path/to/directory RetentionPolicy "<New RetentionPolicy>"
Note
Some clients also have default values, which are used when not explicitly specified by the user. I this case server side defaults will have no effect.
Note
If the implicit space reservation is not enabled the pools in the link groups will be excluded from consideration and only the remaining pools will be considered for storing the incoming data, and classical pool selection mechanism will be used.
SpaceManager is making reservations against free space
available in link
groups. The total free space in the given link
group is the sum of available spaces in all links. The
available space in each link is the sum of all sizes of
available space in all pools assinged to a given
link. Therefore for the space reservation to work correctly it
is essential that each pool belongs to one and only one link,
and each link belongs to only one link group. Link groups are
assigned several parameters that determine what kind of space
the link group corresponds to and who can make reservations
against this space.
Now that the SRM SpaceManager is activated you can make
a space reservation. As mentioned above you need link groups to
make a space reservation.
Login to the admin
interface and cd to the cell
SrmSpaceManager.
[user] $ssh -c blowfish -p 22223 -l admin headnode.example.org(local) admin >cd SrmSpaceManager
Type ls to get information about reservations and link groups.
(SrmSpaceManager) admin >lsReservations: total number of reservations: 0 total number of bytes reserved: 0 LinkGroups: total number of linkGroups: 0 total number of bytes reservable: 0 total number of bytes reserved : 0 last time all link groups were updated: Tue Sep 20 11:15:19 CEST 2011(1316510119634)
This output tells you that there are no reservations yet and no link groups. As there are no link groups no space can be reserved.
For a general introduction about link groups see the section called “Link Groups”.
Example:
In this example we will create a link group for the VO
desy. In order to do so we need to
have a pool, a pool group and a link. Moreover, we define
unit groups named any-store,
world-net and
any-protocol. (See the section called “Types of Units”.)
Define a pool in your layout file, add it to your pool
directory and restart the poolDomain.
[poolDomain] [poolDomain/pool] path=/srv/dcache/spacemanager-pool name=spacemanager-pool
[root] #mkdir -p /srv/dcache/spacemanager-pool[root] #/usr/bin/dcache restart
In the Admin Interface cd to the
PoolManager and create a pool group, a link and a link
group.
(SrmSpaceManager) admin >..(local) admin >cd PoolManager(PoolManager) admin >psu create pgroup spacemanager_poolGroup(PoolManager) admin >psu addto pgroup spacemanager_poolGroup spacemanager-pool(PoolManager) admin >psu removefrom pgroup default spacemanager-pool(PoolManager) admin >psu create link spacemanager_WriteLink any-store world-net any-protocol(PoolManager) admin >psu set link spacemanager_WriteLink -readpref=10 -writepref=10 -cachepref=0 -p2ppref=-1(PoolManager) admin >psu add link spacemanager_WriteLink spacemanager_poolGroup(PoolManager) admin >psu create linkGroup spacemanager_WriteLinkGroup(PoolManager) admin >psu set linkGroup custodialAllowed spacemanager_WriteLinkGroup true(PoolManager) admin >psu set linkGroup replicaAllowed spacemanager_WriteLinkGroup true(PoolManager) admin >psu set linkGroup nearlineAllowed spacemanager_WriteLinkGroup true(PoolManager) admin >psu set linkGroup onlineAllowed spacemanager_WriteLinkGroup true(PoolManager) admin >psu addto linkGroup spacemanager_WriteLinkGroup spacemanager_WriteLink(PoolManager) admin >save(PoolManager) admin >..
Check whether the link group is available.
(local) admin >cd SrmSpaceManager(SrmSpaceManager) admin >lsReservations: total number of reservations: 0 total number of bytes reserved: 0 LinkGroups: 0 Name:spacemanager_WriteLinkGroup FreeSpace:7278624768 ReservedSpace:0 AvailableSpace:7278624768 VOs: onlineAllowed:true nearlineAllowed:false replicaAllowed:true custodialAllowed:true UpdateTime:Mon Nov 28 12:12:51 CET 2011(1322478771030) total number of linkGroups: 1 total number of bytes reservable: 7278624768 total number of bytes reserved : 0 last time all link groups were updated: Mon Nov 28 12:12:51 CET 2011(1322478771030)
The link group
spacemanager_WriteLinkGroup was created
and has the id 0.
Now you need to edit the
LinkGroupAuthorization.conf file. This
file contains a list of the link groups and all the VOs and
the VO Roles that are permitted to make reservations in a
given link group.
Specify the location of the
LinkGroupAuthorization.conf file in the
/etc/dcache/dcache.conf file.
SpaceManagerLinkGroupAuthorizationFileName=/path/to/LinkGroupAuthorization.conf
The file LinkGroupAuthorization.conf
has following syntax:
LinkGroup <NameOfLinkGroup> followed by the list of the Fully Qualified Attribute Names (FQANs). Each FQAN on a separate line, followed by an empty line, which is used as a record separator, or by the end of the file.
FQAN is usually a string of the form
<VO>/Role=<VORole>. Both
<VO> and
<VORole> could be set to
*, in this case all VOs or VO Roles will
be allowed to make reservations in this link group. Any line
that starts with # is a comment and may appear anywhere.
#SpaceManagerLinkGroupAuthorizationFile LinkGroup <NameOfLinkGroup> /<VO>/Role=<VORole>
Note
You do not need to restart the srm or dCache
after changing the
LinkGroupAuthorization.conf file. The
changes will be applied automatically after a few minutes.
Use update link groups to be sure that
the LinkGroupAuthorization.conf file
and the link groups have been updated.
(SrmSpaceManager) admin >update link groupsupdate started
Example:
In the example above you created the link group
spacemanager_WriteLinkGroup. Now you
want to allow members of the VO desy
with the role production to make a
space reservation in this link group.
#SpaceManagerLinkGroupAuthorizationFile # this is comment and is ignored LinkGroup spacemanager_WriteLinkGroup # /desy/Role=production
Example:
In this more general example for a
SpaceManagerLinkGroupAuthorizationFile
members of the VO desy with role
test get the right to make a space
reservation in a link group called
desy-test-LinkGroup. Moreover, all
members of the VO desy get the right to
make a reservation in the link group called
desy-anyone-LinkGroup and anyone will
get the right to make a space reservation in the link
group called default-LinkGroup.
#SpaceManagerLinkGroupAuthorizationFile # this is comment and is ignored LinkGroup desy-test-LinkGroup /desy/Role=/test LinkGroup desy-anyone-LinkGroup /desy/Role=* LinkGroup default-LinkGroup # allow anyone :-) */Role=*
Example:
Now you can make a space reservation for the VO desy.
(SrmSpaceManager) admin >reserve -vog=/desy -vor=production -desc=DESY_TEST 5000000 10000110000 voGroup:/desy voRole:production retentionPolicy:CUSTODIAL accessLatency:NEARLINE linkGroupId:0 size:5000000 created:Fri Dec 09 12:43:48 CET 2011 lifetime:10000000ms expiration:Fri Dec 09 15:30:28 CET 2011 description:DESY_TEST state:RESERVED used:0 allocated:0
The id of the space token is 110000.
Check the status of the reservation by
(SrmSpaceManager) admin >lsReservations: 110000 voGroup:/desy voRole:production retentionPolicy:CUSTODIAL accessLatency:NEARLINE linkGroupId:0 size:5000000 created:Fri Dec 09 12:43:48 CET 2011 lifetime:10000000ms expiration:Fri Dec 09 15:30:28 CET 2011 description:DESY_TEST state:RESERVED used:0 allocated:0 total number of reservations: 1 total number of bytes reserved: 5000000 LinkGroups: 0 Name:spacemanager_WriteLinkGroup FreeSpace:23747563520 ReservedSpace:5000000 AvailableSpace:23742563520 VOs:{/desy:*} onlineAllowed:true nearlineAllowed:true replicaAllowed:true custodialAllowed:true UpdateTime:Fri Dec 09 12:49:29 CET 2011(1323431369046) total number of linkGroups: 1 total number of bytes reservable: 23742563520 total number of bytes reserved : 5000000 last time all link groups were updated: Fri Dec 09 12:49:29 CET 2011(1323431369046)
You can now copy a file into that space token.
[user] $srmcp file:////bin/sh srm://<dcache.example.org>:8443/data/world-writable/space-token-test-file -space_token=110000
Now you can check via the Webadmin Interface or the Web Interface that the
file has been copied to the pool
spacemanager-pool.
There are several parameters to be specified for a space reservation.
(SrmSpaceManager) admin >reserve [-vog=voGroup] [-vor=voRole] [-acclat=AccessLatency] \ [-retpol=RetentionPolicy] [-desc=Description] [-lgid=LinkGroupId] [-lg=LinkGroupName] \ <sizeInBytes> <lifetimeInSecs>
- [-vog=voGroup]
voGroupshould match the VO you specified in theLinkGroupAuthorization.conffile. If you do not want to make a space reservation for a certain VO then the entry in theLinkGroupAuthorization.confshould readLinkGroup NameOfLinkGroup */Role=*
- [-vor=voRole]
voRolecan be specified if it is used in theLinkGroupAuthorization.conffile.- [-acclat=AccessLatency]
AccessLatencyneeds to match one of the access latencies allowed for the link group.- [-retpol=RetentionPolicy]
RetentionPolicyneeds to match one of the retention policies allowed for the link group.- [-desc=Description]
You can chose a value to describe your space reservation.
- [-lgid=LinkGroupId]
You can either use the
LinkGroupIdto make a space reservation or- [-lg=LinkGroupName]
you use the
LinkGroupNameto make a space reservation.- <sizeInBytes>
The size of the space reservation should be specified in bytes.
- <lifetimeInSecs>
The life time of the space reservation should be specified in seconds. Choose
"-1"for a space reservation that will never expire (use quotes around the negativeone).
If a space reservation is not needet anymore it can be released with
(SrmSpaceManager) admin >release <spaceTokenId>
Example:
(SrmSpaceManager) admin >reserve -vog=/desy -vor=production -desc=DESY_TEST 5000000 600110042 voGroup:/desy voRole:production retentionPolicy:CUSTODIAL accessLatency:NEARLINE linkGroupId:0 size:5000000 created:Thu Dec 15 12:00:35 CET 2011 lifetime:600000ms expiration:Thu Dec 15 12:10:35 CET 2011 description:DESY_TEST state:RESERVED used:0 allocated:0(SrmSpaceManager) admin >release 110042110042 voGroup:/desy voRole:production retentionPolicy:CUSTODIAL accessLatency:NEARLINE linkGroupId:0 size:5000000 created:Thu Dec 15 12:00:35 CET 2011 lifetime:600000ms expiration:Thu Dec 15 12:10:35 CET 2011 description:DESY_TEST state:RELEASED used:0 allocated:0
You can see that the value for state has
changed from RESERVED to
RELEASED
A user who has been given the right to make a space reservation
can make a space reservation. To achieve this the right entry in
the LinkGroupAuthorization.conf file is
required.
In order to be able to take advantage of the virtual organization (VO) infrastructure and VO based authorization and VO based access control to the space in dCache, certain things need to be in place:
User needs to be registered with the VO.
User needs to use voms-proxy-init to create a VO proxy.
dCache needs to use
gPlazmawith modules that extract VO attributes from the user’s proxy. (See Chapter 10, Authorization in dCache, have a look atgplazmalite-vorole-mappingplugin and see the section called “Authentication and Authorization in dCache” for an example withgplazmalite-vorole-mapping.
Only if these 3 conditions are satisfied the VO based
authorization of the SpaceManager will work.
As mentioned above dCache space
reservation functionality access control is currently
performed at the level of the link groups. Access to making
reservations in each link group is controlled by the
SpaceManagerLinkGroupAuthorizationFile.
This file contains a list of the link groups and all the VOs and the VO Roles that are permitted to make reservations in a given link group.
When a SRM Space Reservation request is executed, its
parameters, such as reservation size, lifetime,
AccessLatencyand
RetentionPolicy as well as user’s VO
membership information is forwarded to the SRM
SpaceManager.
Once a space reservation is created, no access control is performed, any user can store the files in this space reservation, provided he or she knows the exact space token.
A user who is given the rights in the
SpaceManagerLinkGroupAuthorizationFile can
make a space reservation by
[user] $srm-reserve-space -retention_policy=<RetentionPolicy> -lifetime=<lifetimeInSecs> -desired_size=<sizeInBytes> -guaranteed_size=<sizeInBytes> srm://<example.org>:8443Space token =SpaceTokenId
and release it by
[user] $srm-release-space srm://<example.org>:8443 -space_token=SpaceTokenId
Note
Please note that it is obligatory to specify the retention policy while it is optional to specify the access latency.
Example:
[user] $srm-reserve-space -retention_policy=REPLICA -lifetime=300 -desired_size=5500000 -guaranteed_size=5500000 srm://srm.example.org:8443Space token =110044
The space reservation can be released by:
[user] $srm-release-space srm://srm.example.org:8443 -space_token=110044
If a client uses a regular grid proxy, created with
grid-proxy-init, and not a VO proxy, which
is created with the voms-proxy-init, when
it is communicating with SRM server in dCache, then the VO
attributes can not be extracted from its credential. In this
case the name of the user is extracted from the Distinguished
Name (DN) to use name mapping. For the purposes of the space
reservation the name of the user as mapped by gplazma
is used as its VO Group name, and the VO Role is left
empty. The entry in the
SpaceManagerLinkGroupAuthorizationFile
should be:
#LinkGroupAuthorizationFile # <userName>
Edit the file /etc/dcache/dcache.conf to enable space
reservation for non SRM transfers.
SpaceManagerReserveSpaceForNonSRMTransfers=true
If the spacemanager is enabled,
SpaceManagerReserveSpaceForNonSRMTransfers
is set to true, and if the transfer
request comes from a door, and there was no prior space
reservation made for this file, the SpaceManager will
try to reserve space before satisfying the request.
Possible values are true or
false and the default value is
false.
There are a few parameters in
/usr/share/dcache/defaults/*.properties
that you might find useful for nontrivial SRM deployment.
srmSpaceManagerEnabled tells if the space
management is activated in SRM.
Possible values are true and
false. Default is true.
Usage example:
srmSpaceManagerEnabled=true
srmImplicitSpaceManagerEnabled tells if
the space should be reserved for SRM Version 1 transfers and
for SRM Version 2 transfers that have no space token
specified. Will have effect only if srmSpaceManagerEnabled.
Possible values are true and
false. This is enabled by default. It has no
effect if srmSpaceManagerEnabled is set to
true.
Usage example:
srmImplicitSpaceManagerEnabled=true
overwriteEnabled tells SRM and
GridFTP servers if the overwrite is allowed. If enabled on
the SRM node, should be enabled on all GridFTP nodes.
Possible values are true and
false. Default is false.
Usage example:
overwriteEnabled=true
srmOverwriteByDefault Set this to
true if you want overwrite to be enabled
for SRM v1.1 interface as well as for SRM v2.2 interface
when client does not specify desired overwrite mode. This
option will be considered only if
overwriteEnabled is set to
true.
Possible values are true and
false. Default is false.
Usage example:
srmOverwriteByDefault=false
srmDatabaseHost tells SRM which
database host to connect to.
Default value is localhost.
Usage example:
srmDatabaseHost=database-host.example.org
spaceManagerDatabaseHost tells SpaceManager
which database host to connect to.
Default value is localhost.
Usage example:
spaceManagerDatabaseHost=database-host.example.org
pinManagerDbHost tells PinManager
which database host to connect to.
Default value is localhost.
Usage example:
pinManagerDbHost=database-host.example.org
srmDbName tells SRM which database
to connect to.
Default value is dcache.
Usage example:
srmDbName=dcache
srmDbUser tells SRM which database
user name to use when connecting to database. Do not change
unless you know what you are doing.
Default value is srmdcache.
Usage example:
srmDbUser=srmdcache
srmDbPassword tells SRM which
database password to use when connecting to database. The
default value is srmdcache.
Usage example:
srmDbPassword=NotVerySecret
srmPasswordFile tells SRM which
database password file to use when connecting to database. Do
not change unless you know what you are doing. It is
recommended that MD5 authentication method is used. To learn
about file format please see http://www.postgresql.org/docs/8.1/static/libpq-pgpass.html. To
learn more about authentication methods please visit http://www.postgresql.org/docs/8.1/static/encryption-options.html,
Please read "Encrypting Passwords Across A Network" section.
This option is not set by default.
Usage example:
srmPasswordFile=/root/.pgpass
srmRequestHistoryDatabaseEnabled enables
logging of the transition history of the SRM request in the
database. The request transitions can be examined through the
command line interface. Activation of this option might lead
to the increase of the database activity, so if the PostgreSQL
load generated by SRM is excessive, disable it.
Possible values are true and
false. Default is false.
Usage example:
srmRequestHistoryDatabaseEnabled=true
srmDbLogEnabled tells SRM to store
the information about the remote (copy, srmCopy) transfer
details in the database. Activation of this option might lead to
the increase of the database activity, so if the PostgreSQL load
generated by SRM is excessive, disable it.
Possible values are true and
false. Default is false.
Usage example:
srmDbLogEnabled=false
srmVersion is not used by SRM; it was
mentioned that this value is used by some publishing scripts.
Default is version1.
pnfsSrmPath tells SRM what the root
of all SRM paths is in pnfs. SRM will prepend path to all
the local SURL paths passed to it by SRM client. So if the
pnfsSrmPath is set to
/pnfs/fnal.gov/THISISTHEPNFSSRMPATH and
someone requests the read of
srm://srm.example.org:8443/file1, SRM will
translate the SURL path /file1 into
/pnfs/fnal.gov/THISISTHEPNFSSRMPATH/file1. Setting
this variable to something different from /
is equivalent of performing Unix chroot for
all SRM operations.
Default value is /.
Usage example:
pnfsSrmPath="/pnfs/fnal.gov/data/experiment"
parallelStreams specifies the number of the
parallel streams that SRM will use when performing third
party transfers between this system and remote GSI-FTP
servers, in response to SRM v1.1 copy or SRM V2.2 srmCopy
function. This will have no effect on srmPrepareToPut and
srmPrepareToGet command results and parameters of GridFTP
transfers driven by the SRM clients.
Default value is 10.
Usage example:
parallelStreams=20
srmBufferSize specifies the number of bytes
to use for the in memory buffers for performing third party
transfers between this system and remote GSI-FTP servers, in
response to SRM v1.1 copy or SRM V2.2 srmCopy
function. This will have no effect on srmPrepareToPut and
srmPrepareToGet command results and parameters of GridFTP
transfers driven by the SRM clients.
Default value is 1048576.
Usage example:
srmBufferSize=1048576
srmTcpBufferSize specifies the number of
bytes to use for the tcp buffers for performing third party
transfers between this system and remote GSI-FTP servers, in
response to SRM v1.1 copy or SRM V2.2 srmCopy
function. This will have no effect on srmPrepareToPut and
srmPrepareToGet command results and parameters of GridFTP
transfers driven by the SRM clients.
Default value is 1048576.
Usage example:
srmTcpBufferSize=1048576
srmAuthzCacheLifetime specifies the
duration that authorizations will be cached. Caching decreases
the volume of messages to the gPlazma cell or other
authorization mechanism. To turn off caching, set the value
to 0.
Default value is 120.
Usage example:
srmAuthzCacheLifetime=60
srmGetLifeTime,
srmPutLifeTime and
srmCopyLifeTime specify the lifetimes of
the srmPrepareToGet (srmBringOnline) srmPrepareToPut and
srmCopy requests lifetimes in millisecond. If the system is
unable to fulfill the requests before the request lifetimes
expire, the requests are automatically garbage collected.
Default value is 14400000 (4 hours)
Usage example:
srmGetLifeTime=14400000 srmPutLifeTime=14400000 srmCopyLifeTime=14400000
srmGetReqMaxReadyRequests and
srmPutReqMaxReadyRequests specify the
maximum number of the files for which the transfer URLs will
be computed and given to the users in response to SRM get
(srmPrepareToGet) and put (srmPrepareToPut) requests. The rest
of the files that are ready to be transfered are put on the
Ready queues, the maximum length of these
queues are controlled by
srmGetReqReadyQueueSize and
srmPutReqReadyQueueSize parameters. These
parameters should be set according to the capacity of the
system, and are usually greater than the maximum number of the
GridFTP transfers that this dCache instance GridFTP
doors can sustain.
Usage example:
srmGetReqReadyQueueSize=10000 srmGetReqMaxReadyRequests=2000 srmPutReqReadyQueueSize=10000 srmPutReqMaxReadyRequests=1000
srmCopyReqThreadPoolSize and
remoteGsiftpMaxTransfers.
srmCopyReqThreadPoolSize is used to specify how many parallel
srmCopy file copies to execute simultaneously. Once the
SRM contacted the remote SRM system, and obtained a Transfer
URL (usually GSI-FTP URL), it contacts a Copy Manager
module (usually RemoteGSIFTPTransferManager), and asks it to
perform a GridFTP transfer between the remote GridFTP server
and a dCache pool. The maximum number of simultaneous
transfers that RemoteGSIFTPTransferManager will support is
remoteGsiftpMaxTransfers, therefore it is important that
remoteGsiftpMaxTransfers is greater than or equal to
srmCopyReqThreadPoolSize.
Usage example:
srmCopyReqThreadPoolSize=250 remoteGsiftpMaxTransfers=260
srmCustomGetHostByAddr
srmCustomGetHostByAddr enables using the BNL developed
procedure for host by IP resolution if standard InetAddress
method failed.
Usage example:
srmCustomGetHostByAddr=true
RecursiveDirectoryCreation allows or
disallows automatic creation of directories via SRM,
allow=true, disallow=false.
Automatic directory creation is allowed by default.
Usage example:
RecursiveDirectoryCreation=true
This option allows you to control how often the SRM door will reload the
server’s host certificate from the filesystem. For the specified period,
the host certificate will be kept in memory. This speeds up the rate at
which the door can handle requests, but also causes it to be unaware of
changes to the host certificate (for instance in the case of renewal).
By changing this parameter you can control how long the host certificate is cached by the door and consequently how fast the door will be able to detect and reload a renewed host certificate.
Please note that the value of this parameter has to be specified in seconds.
Usage example:
hostCertificateRefreshPeriod=86400
The trustAnchorRefreshPeriod option is similar to
hostCertificateRefreshPeriod. It applies to the set
of CA certificates trusted by the SRM door for signing end-entity
certificates (along with some metadata, these form so called
trust anchors).
The trust anchors are needed to make a decision about
the trustworthiness of a certificate in X.509 client
authentication. The GSI security protocol used by SRM builds upon
X.509 client authentication.
By changing this parameter you can control how long the set of trust anchors remains cached by the door. Conversely, it also influences how often the door reloads the set of trusted certificates.
Please note that the value of this parameter has to be specified in seconds.
Tip
Trust-anchors usually change more often than the host certificate. Thus, it might be sensible to set the refresh period of the trust anchors lower than the refresh period of the host certificate.
Usage example:
trustAnchorRefreshPeriod=3600
We highly recommend to make sure that PostgreSQL database files are stored on a separate disk that is not used for anything else (not even PostgreSQL logging). BNL Atlas Tier 1 observed a great improvement in srm-database communication performance after they deployed PostgreSQL on a separate dedicated machine.
If SRM or srm monitoring is going to be installed on a
separate node, you need to add an entry in the file
/var/lib/pgsql/data/pg_hba.conf for this
node as well:
host all all <monitoring node> trust host all all <srm node> trust
The file postgresql.conf should contain the following:
#to enable network connection on the default port
max_connections = 100
port = 5432
...
shared_buffers = 114688
...
work_mem = 10240
...
#to enable autovacuuming
stats_row_level = on
autovacuum = on
autovacuum_vacuum_threshold = 500 # min # of tuple updates before
# vacuum
autovacuum_analyze_threshold = 250 # min # of tuple updates before
# analyze
autovacuum_vacuum_scale_factor = 0.2 # fraction of rel size before
# vacuum
autovacuum_analyze_scale_factor = 0.1 # fraction of rel size before
#
# setting vacuum_cost_delay might be useful to avoid
# autovacuum penalize general performance
# it is not set in US-CMS T1 at Fermilab
#
# In IN2P3 add_missing_from = on
# In Fermilab it is commented out
# - Free Space Map -
max_fsm_pages = 500000
# - Planner Cost Constants -
effective_cache_size = 16384 # typically 8KB each
dCache SRM is implemented as a Web Service running
in a Jetty servlet container and an
Axis Web Services
engine. The Jetty server is executed as a cell,
embedded in dCache and started automatically by the SRM service.
Other cells started automatically by SRM are
SpaceManager, PinManager and RemoteGSIFTPTransferManager.
Of these services only SRM and SpaceManager require special
configuration.
The SRM consists of the five categories of functions:
SRM version 2.2 introduces a concept of space
reservation. Space reservation guarantees that the requested
amount of storage space of a specified type is made
available by the storage system for a specified amount of
time.
We use three functions for space management:
srmReserveSpaceSrmGetSpaceMetadatasrmReleaseSpace
Space reservation is made using the
srmReserveSpace function. In case of
successful reservation, a unique name, called
space token is assigned to the
reservation. A space token can be used during the transfer
operations to tell the system to put the files being
manipulated or transferred into an associated space
reservation. A storage system ensures that the reserved
amount of the disk space is indeed available, thus providing
a guarantee that a client does not run out of space until
all space promised by the reservation has been used. When
files are deleted, the space is returned to the space
reservation.
dCache only manages write space, i.e. space on disk can be
reserved only for write operations. Once files are migrated
to tape, and if no copy is required on disk, space used by
these files is returned back into space reservation. When
files are read back from tape and cached on disk, they are
not counted as part of any space. SRM space reservation
can be assigned a non-unique description that can be used to
query the system for space reservations with a given
description.
Properties of
the SRM space reservations can be discovered using
the SrmGetSpaceMetadata function.
Space Reservations might be released with the function
srmReleaseSpace.
For a complete description of the available space management
functions please see the SRM
Version 2.2 Specification.
SRM defines a protocol named SRM, and introduces a way
to address the files stored in the SRM managed storage by
site URL (SURL of the format
srm://<host>:<port>/[<web service
path>?SFN=]<path>.
Example:
Examples of the SURLs a.k.a. SRM URLs are:
srm://fapl110.fnal.gov:8443/srm/managerv2?SFN=//pnfs/fnal.gov/data/test/file1 srm://fapl110.fnal.gov:8443/srm/managerv1?SFN=/pnfs/fnal.gov/data/test/file2 srm://srm.cern.ch:8443/castor/cern.ch/cms/store/cmsfile23
A transfer URL (TURL) encodes the file transport protocol in the URL.
Example:
gsiftp://gridftpdoor.fnal.gov:2811/data/test/file1
SRM version 2.2 provides three functions for performing
data transfers:
srmPrepareToGetsrmPrepareToPutsrmCopy
(in SRM version 1.1 these
functions were called get,
put and copy).
All three functions accept lists of SURLs as
parameters. All data transfer functions perform
file/directory access verification and
srmPrepareToPut and
srmCopy check if the receiving storage
element has sufficient space to store the files.
srmPrepareToGet prepares files for
read. These files are specified as a list of source SURLs,
which are stored in an SRM managed storage
element. srmPrepareToGet is used to
bring source files online and assigns transfer URLs
(TURLs) that are used for actual data transfer.
srmPrepareToPut prepares an SRM
managed storage element to receive data into the list of
destination SURLs. It prepares a list of TURLs where the
client can write data into.
Both functions support transfer protocol negotiation. A
client supplies a list of transfer protocols and the SRM
server computes the TURL using the first protocol from the list
that it supports. Function invocation on the Storage Element
depends on implementation and may range from simple SURL to
TURL translation to stage from tape to disk cache and
dynamic selection of transfer host and transfer protocol
depending on the protocol availability and current load on
each of the transfer server load.
The function srmCopy is used to copy
files between SRM managed storage elements. If both source
and target are local to the SRM, it performes a local
copy. There are two modes of remote copies:
PULL mode : The target
SRMinitiates ansrmCopyrequest. Upon the client\u0411\u2500\u2265ssrmCopyrequest, the targetSRMmakes a space at the target storage, executessrmPrepareToGeton the sourceSRM. When the TURL is ready at the sourceSRM, the targetSRMtransfers the file from the source TURL into the prepared target storage. After the file transfer completes,srmReleaseFilesis issued to the sourceSRM.PUSH mode : The source
SRMinitiates ansrmCopyrequest. Upon the client\u0411\u2500\u2265ssrmCopyrequest, the sourceSRMprepares a file to be transferred out to the targetSRM, executessrmPrepareToPuton the targetSRM. When the TURL is ready at the targetSRM, the sourceSRMtransfers the file from the prepared source into the prepared target TURL. After the file transfer completes,srmPutDoneis issued to the targetSRM.
When a specified target space token is provided, the files will be located in the space associated with the space token.
SRM Version 2.2 srmPrepareToPut and
srmCopy PULL mode transfers allow the
user to specify a space reservation token or a
RetentionPolicy and
AccessLatency. Any of these parameters
are optional, and it is up to the implementation to decide
what to do, if these properties are not specified. The
specification requires that if a space reservation is given,
then the specified AccessLatency or
RetentionPolicy must match those of
the space reservation.
The Data Transfer Functions are asynchronous, an initial
SRM call starts a request execution on the server side
and returns a request status that contains a unique
request token. The status of request is polled
periodically by SRM get request status functions. Once a
request is completed and the client receives the TURLs
the data transfers are initiated. When the transfers are
completed the client notifies the SRM server by
executing srmReleaseFiles in case of
srmPrepareToGet or
srmPutDone in case of
srmPrepareToPut. In case of
srmCopy, the system knows when the
transfers are completed and resources can be released, so
it requires no special function at the end.
Clients are free to cancel the requests at any time by
execution of srmAbortFiles or
srmAbortRequest.
The functions for checking the request status are:
srmStatusOfReserveSpaceRequestsrmStatusOfUpdateSpaceRequestsrmStatusOfChangeSpaceForFilesRequestsrmStatusOfChangeSpaceForFilesRequestsrmStatusOfBringOnlineRequestsrmStatusOfPutRequestsrmStatusOfCopyRequest
SRM Version 2.2, interface provides a complete set of
directory management functions. These are
srmLs,srmRmsrmMkDir,srmRmDirsrmMv
SRM Version 2.2 supports the following three file
permission functions:
srmGetPermissionsrmCheckPermissionandsrmSetPermission
dCache contains an implementation of these functions that allows setting and checking of Unix file permissions.
Table of Contents
The statistics service collects information on the amount
of data stored on all pools and the total data flow including
streams from and to tertiary storage systems.
Once per hour an ASCII file is produced, containing a table with information on the amount of used disk space and the data transferred starting midnight up to this point in time. Data is sorted per pool and storage class.
In addition to the hourly statistics, files are produced reporting on the daily, monthly and yearly dCache activities. An HTML tree is produced and updated once per hour allowing to navigate through the collected statistics information.
Define the statistics service in the domain, where the
httpd is running.
[httpdDomain] [httpdDomain/httpd] ... [httpdDomain/statistics]
The statistics service automatically creates a directory
tree, structured according to years, months and days.
Once per hour, a total.raw file is produced
underneath the active year,
month and day directories, containing the sum over
all pools and storage classes of the corresponding time
interval. The day directory
contains detailed statistics per hour and for the whole day.
/var/lib/dcache/statistics/YYYY/total.raw /var/lib/dcache/statistics/YYYY/MM/total.raw /var/lib/dcache/statistics/YYYY/MM/DD/total.raw /var/lib/dcache/statistics/YYYY/MM/DD/YYYY-MM-DD-day.raw /var/lib/dcache/statistics/YYYY/MM/DD/YYYY-MM-DD-HH.raw
In the same directory tree the HTML files are created for each day, month and year.
/var/lib/dcache/statistics/YYYY/index.html /var/lib/dcache/statistics/YYYY/MM/index.html /var/lib/dcache/statistics/YYYY/MM/DD/index.html
By default the path for the statistics data is /var/lib/dcache/statistics. You
can modify this path by setting the property
dcache.paths.statistics to a different value.
Point a web browser to your dCache webpage at
http://<head-node.example.org>:2288/. On
the bottom you find the link to Statistics.
The statistics data needs to be collected for a day before it will appear on the web page.
Note
You will get an error if you try to read the statistics web
page right after you enabled the statistics as the web
page has not yet been created.
Create data and the web page by logging in to the admin interface and running the commands create stat and create html.
(local) admin >cd PoolStatistics@<httpdDomain>(PoolStatistics@)<httpdDomain> admin >create stat Thread started for internal run(PoolStatistics@)<httpdDomain> admin >create html java.lang.NullPointerException
Now you can see a statistics web page.
Statistics is calculated once per hour at
<HH>:55. The daily
stuff is calculated at 23:55. Without
manual intervention, it takes two midnights before all HTML
statistics pages are available. There is a way to get this
done after just one midnight. After the first midnight
following the first startup of the statistics module, log into
the PoolStatistics cell and run the following commands in the
given sequence. The specified date has to be the
Year/Month/Day of today.
(PoolStatistics@)<httpdDomain> admin >create html <YYYY> <MM> <DD> done(PoolStatistics@)<httpdDomain> admin >create html <YYYY> <MM> done(PoolStatistics@)<httpdDomain> admin >create html <YYYY> done(PoolStatistics@)<httpdDomain> admin >create html done
You will see an empty statistics page at
http://<head-node.example.org>:2288/statistics/.
On the Statistics Help Page
http://<head-node.example.org>:2288/docs/statisticsHelp.html
you find an explanation for the colors.
The file formats of the
/var/lib/dcache/statistics/YYYY/MM/DD/YYYY-MM-DD-HH.raw
and the
/var/lib/dcache/statistics/YYYY/MM/DD/YYYY-MM-DD-day.raw
files are similar. The file
/var/lib/dcache/statistics/YYYY/MM/DD/YYYY-MM-DD-HH.raw
does not contain columns 2 and 3 as these are related to the
day and not to the hour.
Example:
The file format of the
/var/lib/dcache/statistics/YYYY/MM/DD/YYYY-MM-DD-day.raw
files:
# # timestamp=1361364900897 # date=Wed Feb 20 13:55:00 CET 2013 # pool1 StoreA:GroupB@osm 21307929 10155 2466935 10155 0 925 0 0 0 0 85362 0
Format of YYYY-MM-DD-day.raw files.
| Column Number | Column Description |
|---|---|
| 0 | Pool Name |
| 1 | Storage Class |
| 2 | Bytes stored on this pool for this storage class at beginning of day — green bar |
| 3 | Number of files stored on this pool for this storage class at beginning of day |
| 4 | Bytes stored on this pool for this storage class at this hour or end of day — red bar |
| 5 | Number of files stored on this pool for this storage class at this hour or end of day |
| 6 | Total Number of transfers (in and out, dCache-client) |
| 7 | Total Number of restores (HSM to dCache) |
| 8 | Total Number of stores (dCache to HSM) |
| 9 | Total Number errors |
| 10 | Total Number of bytes transferred from client into dCache — blue bar |
| 11 | Total Number of bytes transferred from dCache to clients — yellow bar |
| 12 | Total Number of bytes tranferred from HSM to dCache — pink bar |
| 13 | Total Number of bytes tranferred from dCache to HSM — orange bar |
The
YYYY/MM/DD/YYYY-MM-DD-HH.raw
files do not contain line 2 and 3.
Table of Contents
dCache has built-in monitoring capabilities which provide an overview of the activity and performance of the installation’s doors and pools. There are two options for how this data can be represented and stored:
- a set of log files written to a known location
- a database (the billing database).
These options can be enabled simultaneously. If the database option is selected, the data in those tables will also be displayed as a set of histogram plots on the installation’s web page.
If you installed dCache following the instructions in the
Chapter Installing dCache you
enabled the billing in the domain where the httpd
service is running (see the extract of the layout file).
... [httpdDomain] [httpdDomain/httpd] [httpdDomain/billing] [httpdDomain/srm-loginbroker] ...
Use the property billingLogsDir to set the
location of the log files and the property
billingDisableTxt to control whether the
plain-text log files are generated.
By default the log files are located in the directory /var/lib/dcache/billing. Under this
directory the log files are organized in a tree data structure
based on date (YYYY/MM). A separate file is generated for
errors. The log file and the error file are tagged with the
date.
Example:
log file:
/var/lib/dcache/billing/2012/09/billing-2012.09.25
error file:
/var/lib/dcache/billing/2012/09/billing-error-2012.09.25
The log files may contain information about the time, the pool, the pnfsID and size of the transferred file, the storage class, the actual number of bytes transferred, the number of milliseconds the transfer took, the protocol, the subject (identity of the user given as a collection of principals), the data transfer listen port, the return status and a possible error message. The logged information depends on the protocol.
A log entry for a write operation has the default format:
<MM.dd> <HH:mm:ss> [pool:<pool-name>:transfer]
[<pnfsId>,<filesize>] [<path>]
<StoreName>:<StorageGroup>@<type-of-storage-system>
<transferred-bytes> <connectionTime> <true/false> {<protocol>}
<initiator> {<return-status>:"<error-message>"}Example:
A typical logging entry would look like this for writing. In the log file each entry is in one line. For readability we split it into separate lines in this documentation.:
12.10 14:19:42 [pool:pool2@poolDomain-1:transfer]
[0000062774D07847475BA78AC99C60F2C2FC,10475] [Unknown]
<Unknown>:<Unknown>@osm 10475 40 true {GFtp-1.0 131.169.72.103 37850}
[door:WebDAV-example.org@webdavDomain:1355145582248-1355145582485] {0:""}
The formatting of the log messages can be customized by
redefining the
<billing.format.someInfoMessage>
properties in the layout configuration, where
<billing.format.someInfoMessage> can be
replaced by
billing.format.MoverInfoMessagebilling.format.RemoveFileInfoMessagebilling.format.DoorRequestInfoMessagebilling.format.StorageInfoMessage
A full explanation of the formatting is given in the
/usr/share/dcache/defaults/billing.properties
file. For syntax questions please consult StringTemplate
v3 documentation or the cheat
sheet.
On the web page generated by the httpd service (default
port 2288), there is a link to Action
Log. The table which appears there gives a summary
overview extracted from the data contained in the billing log
files.
In order to enable the database, the following steps must be taken.
If the "billing" database does not already exist (see further below on migrating from an existing one), create it (we assume PostgreSQL here):
[root] #createdb -O srmdcache -U postgres billingIf you are using a version of PostgreSQL prior to 8.4, you will also need to do:
[root] #createlang -U srmdcache plpgsql billingNo further manual preparation is needed, as the necessary tables, indices, functions and triggers will automatically be generated when you (re)start the domain with the billing database logging turned on (see below).
The property
billingToDbcontrols whether the billing cell sends billing messages to the database. By default the option is disabled. To activate, set the value toyesand restart the domain in which thehttpdservice is running.Example:
Extract from the layout file:
[httpdDomain] billingToDb=yes [httpdDomain/httpd] [httpdDomain/billing] ...[root] #dcache restart httpdDomainStopping httpdDomain 0 1 done Starting httpdDomain done
In most cases, the billing service will be run out-of-the-box; nevertheless, the administrator does have control, if this is desired, over the database configuration.
Database name, host, user, and password can be easily modified using the properties:
billingDbNamebillingDbHostbillingDbUserbillingDbPass
The current database values can be checked with the dcache database ls command.
Example:
# dcache database ls DOMAIN CELL DATABASE HOST USER MANAGEABLE AUTO namespaceDomain PnfsManager chimera localhost chimera Yes Yes namespaceDomain cleaner chimera localhost chimera No No httpdDomain billing billing localhost srmdcache Yes Yes
Database inserts are batched for performance, and are controlled by the following properties:
billingMaxInsertsBeforeCommit(defaults to10000)billingMaxTimeBeforeCommitInSecs(defaults to5)
The default settings should usually be sufficient.
Should finer control over the DataNucleus layer (which talks to the database) be needed, then a new
datanucleus.propertiesfile must be provided. The path to this file, which will override the internal settings, should be indicated using:billingInfoAccessPropertiesFile(defaults to"")
Changing this configuration requires an understanding of DataNucleus , and we expect it will be rather uncommon to utilize this option (it is suggested that the administrator in this case consult with a member of the dCache team).
Changing the database type (which defaults to PostgreSQL) to something else would entail the above-mentioned necessary modification of the
datanucleus.propertiesas well as changing thebillingDbDriverandbillingDbUrlproperties appropriately. This is not a recommended procedure, though in certain exceptional circumstances, it may be desirable or necessary. Once again, consultation with the dCache team is suggested in this case.
If you have selected to store billing messages to the database,
it is also possible to generate and display a set of histograms
from the data in these tables. To turn on plot generation, set
the property generatePlots to
true and restart the domain in which the
httpd is running.
Example:
Extract from the layout file:
[httpdDomain]
billingToDb=yes
generatePlots=true
[httpdDomain/httpd]
[httpdDomain/billing]
...
The the frequency of plot refreshing and the type of plot produced can be controlled by:
billingPlotsTimeoutInMins(defaults to30)billingPlotsExportType(defaults topngand can be set togif)
The plots are linked off of the /webadmin
page (itself also linked via New Admin Pages
from the static page created by the httpd service). On
the menu bar at the top, click Billing Plots
to view them. These provide aggregate views of the data for
24-hour, 7-day, 30-day and 365-day periods.
The plot types are:
(Giga)bytes read and written for both dCache and HSM backend (if any)
Number of transactions/transfers for both dCache and HSM backend (if any)
Maximum, minimum and average connection time
Cache hits and misses
Note
The data for this last histogram is not automatically sent, since it contributes significantly to message traffic between the pool manager and the billing service. To store this data (and thus generate the relevant plots), the
poolmanager.cache-hit-messages.enabledproperty must be set either indcache.confor in the layout file for the domain where thepoolmanagerruns:poolmanager.cache-hit-messages.enabled=true
Each individual plot can be magnified by clicking on it.
As with the database itself, it is expected that the
standard/default set-up for plotting will usually be sufficient.
In the case where alteration of the look and feel of the plotting
is desired, a new plot.properties file needs
to be provided. The path to this file, which will override the
internal settings, should be indicated using the property
billingPlotPropertiesFile.
This configuration file contains settings relevant to the JAIDA/Freehep libraries
used to create the graphics. The meaning of most of these
properties is rather straightforward. For possible alternatives,
it is suggested you consult the Freehep
reference pages (note that the
histogram.factory property must be included in
any custom file but will normally have the same value).
To view the internal plot.properties settings
extract the
dcache-core-<version>.jar
to some temporary directory.
[root] #ls /usr/share/dcache/classes/dcache-core*/usr/share/dcache/classes/dcache-core-<version>[root] #cd /tmp[root] #jar xf /usr/share/dcache/classes/dcache-core-<version>.jar org/dcache/services/billing/plot/plot.properties[root] #less org/dcache/services/billing/plot/plot.properties
Because it is possible that the newer version may be deployed over an existing installation which already uses the billing database, the Liquibase change-set has been written in such a way as to look for existing tables and to modify them only as necessary.
If you start the domain containing the billing service over
a pre-existing installation of the billing
database, depending on what was already there, you may observe
some messages like the following in the domain log having to do with the logic
governing table initialization.
Example:
INFO 8/23/12 10:35 AM:liquibase: Successfully acquired change log lock INFO 8/23/12 10:35 AM:liquibase: Reading from databasechangelog INFO 8/23/12 10:35 AM:liquibase: Reading from databasechangelog INFO 8/23/12 10:35 AM:liquibase: Successfully released change log lock INFO 8/23/12 10:35 AM:liquibase: Successfully released change log lock INFO 8/23/12 10:35 AM:liquibase: Successfully acquired change log lock INFO 8/23/12 10:35 AM:liquibase: Reading from databasechangelog INFO 8/23/12 10:35 AM:liquibase: Reading from databasechangelog INFO 8/23/12 10:35 AM:liquibase: ChangeSet org/dcache/services/billing/ db/sql/billing.changelog-1.9.13.xml::4.1.7::arossi ran successfully in 264ms INFO 8/23/12 10:35 AM:liquibase: Marking ChangeSet: org/dcache/services/ billing/db/sql/billing.changelog-1.9.13.xml::4.1.8::arossi::(Checksum: 3:faff07731c4ac867864824ca31e8ae81) ran despite precondition failure due to onFail='MARK_RAN': classpath:org/dcache/services/billing/db/sql/ billing.changelog-master.xml : SQL Precondition failed. Expected '0' got '1' INFO 8/23/12 10:35 AM:liquibase: ChangeSet org/dcache/services/billing/db/sql/ billing.changelog-1.9.13.xml::4.1.9::arossi ran successfully in 14ms INFO 8/23/12 10:35 AM:liquibase: Successfully released change log lock INFO 8/23/12 10:35 AM:liquibase: Successfully released change log lock
Anything logged at a level lower than ERROR is
usually entirely normal. Liquibase regularly reports when the
preconditions determining whether it needs to do something are not
met. All this means is that the update step was not necessary and
it will be skipped in the future.
If, on the other hand, there is an ERROR logged
by Liquibase, it is possible there may be some other conflict
resulting from the upgrade (this should be rare). Such an error
will block the domain from starting. One remedy which often works
in this case is to do a clean re-initialization by dropping the
Liquibase tables from the database:
[root] #psql -U srmdcache billingbilling=>drop table databasechangelogbilling=>drop table databasechangeloglockbilling->\q[root] #
and then restarting the domain.
Note
If the billing database already exists, but contains tables other than the following:
[root] #psql -U srmdcache billingbilling=> \dt List of relations Schema | Name | Type | Owner -------+-----------------------+-------+----------- public | billinginfo | table | srmdcache public | billinginfo_rd_daily | table | srmdcache public | billinginfo_tm_daily | table | srmdcache public | billinginfo_wr_daily | table | srmdcache public | databasechangelog | table | srmdcache public | databasechangeloglock | table | srmdcache public | doorinfo | table | srmdcache public | hitinfo | table | srmdcache public | hitinfo_daily | table | srmdcache public | storageinfo | table | srmdcache public | storageinfo_rd_daily | table | srmdcache public | storageinfo_wr_daily | table | srmdcache billing->\q[root] #
that is, if it has been previously modified by hand or out-of-band
to include custom tables not used directly by dCache, the
existence of such extraneous tables should not impede dCache
from working correctly, provided those other tables are
READ-accessible by the database user for
billing, which by default is srmdcache. This is
a requirement imposed by the use of Liquibase. You thus may need
explicitly to grant READ privileges to the
billing database user on any such tables if
they are owned by another database user.
Table of Contents
dCache has an alarms service which allows any logging
event to be marked as an alarm. This
capability allows administrators to be directly notified of
problems which need immediate attention and rectification. The
alarms data can be stored in an XML file or in a database. In
the basic configuration the data will be stored in an XML file.
The webadmin servlet running inside the httpd
service has a special page for querying, displaying and tracking
these alarms.
It is advisable to run the alarms service in a separate
domain and list this domain first in the layout file. That way
the alarms service gets booted first and can catch
startup errors reported by the other domains. Since both the
httpd service and the alarms service will access
the storage file generated at
/var/lib/dcache/alarms/alarms.xml the
alarms service should be defined on the same host as the
httpd service. You can modify where this file is placed
by setting the property alarms.store.path to
a different location.
Add a domain for the alarms service to the layout file
where the httpd service is defined.
[alarmserverDomain] [alarmserverDomain/alarms] ... [httpdDomain]
If all of the dCache domains run on the same host, then the default setting (localhost) will work.
In general your dCache will not be configured to run on one
node. In this case each node needs to know on which node the
alarms service is running. The alarms service
and the httpd will run on one of the nodes. On all the
other nodes you need to modify the
/etc/dcache/dcache.conf file or the
layout file to set the alarms.server.host
property to the host on which the alarms service is
running and restart dCache.
Example:
Look at an example of a dCache which consists of a head
node, some door nodes and some pool nodes. Assume that the
httpd service and the alarms service are
running on the head node. Then you would need to set the
property alarms.server.host on the pool
nodes and on the door nodes to the host on which the
alarms service is running.
alarms.server.host=<head-node>
The alarms defined are listed below. There are four
different levels of severity, CRITICAL,
HIGH, MODERATE and
LOW.
CRITICALSERVICE_CREATION_FAILUREDB_OUT_OF_CONNECTIONSDB_UNAVAILABLEJVM_OUT_OF_MEMORYOUT_OF_FILE_DESCRIPTORS
The affected dCache can’t work (is down).
HIGHIO_ERRORHSM_READ_FAILUREHSM_WRITE_FAILURELOCATION_MANAGER_UNAVAILABLEPOOL_MANAGER_UNAVAILABLE
These functions are affected and not working or not working properly, even though the dCache domain may be running.
MODERATEPOOL_DISABLEDCHECKSUM
There is an issue which should be taken care of in the interest of performance or usability, but which is not impeding the functioning of the system as a whole.
LOWThis issue might be worth investigating if it occurs, but is not urgent.
Given that an alarm has been triggered, you will find an entry
in the file
/var/lib/dcache/alarms/alarms.xml.
As it is not very convenient to read an XML file, the Alarms Web Page can be used to inspect and manage the generated warnings.
The Alarms Web Page is an admin page and thus requires authentication. You
must enable HTTPS and you can give a gid (by default the gid
is 1000):
Note
For the authenticated mode you need to have a host certificate
for your server host and place the
hostcert.p12 in the directory /etc/dcache.
[httpdDomain]
authenticated=true
webadminAdminGid=<1234>
[httpdDomain/httpd]
-
The QUERY FILTER form can be used to limit the display of
alarms in the table. The top three rows control an actual
query to the database based on
after date,before date,severityandalarm typename. (The date is the last update of the alarm, not the first arrival.) Each click of theRefreshbutton will reload the data from the database based on these three settings. The default behavior isALL(unspecified properties). Placing a single date in the Beginning box will give you all alarms from that date up to today (inclusive); a single date in the Ending box will give all alarms up to that date (inclusive). -
The
Match Expressionfilters in memory by appending all fields to a single string and doing a search. If theRegular Expressionbox is checked, the expression given is considered a regex (Java-style). -
The header to the table contains two checkboxes which allow
you to check or uncheck the respective columns for all
displayed items. Checking
Deleteand then clickingRefreshwill actually eliminate the entry from persistent store. Closedis a way of marking the alarm as having been dealt with while maintaining a record of it. TheShow Closed Alarmscheckbox allows you to display them (turned off by default).- All column titles appearing in white can be clicked to sort the table by that column.
Notesis an editable field to be used for any special remarks.
When Refresh is clicked, any updates to
Closed and Notes are first
saved, then any Deletes are processed, and
finally, the table is repopulated using the current query
filter. The entire form is set to auto-refresh every 60 seconds.
An additional feature of the alarms infrastructure is automatic
cleanup of processed alarms. An internal thread runs every so
often, and purges all alarms marked as closed
with a timestamp earlier than the given window. This daemon can
be configured using the properties
webadmin.alarm.cleaner.enabled,
webadmin.alarm.cleaner.timeout and
webadmin.alarm.cleaner.delete-threshold.
It might be useful to have a history of alarms. The XML file that is (in the default setup) used to store the alarms is cleaned on a regular basis as it would grow too big otherwise. You can configure to use a database instead of the XML file to obtain a history. Another advantage of the use of a database is that it is easier to search through a database than through a series of log files.
To use a database instead of the XML file you need to modify
the /etc/dcache/dcache.conf file. Set the
property alarms.store.db.type to
rdbms. Moreover, as you want to maintain a
history you should disable the
webadmin.alarm.cleaner.enabled.
Create the alarms database.
[root] #createdb -U srmdcache alarms
Modify the /etc/dcache/dcache.conf file
alarms.store.db.type=rdbms webadmin.alarm.cleaner.enabled=false
and restart dCache.
[root] #dcache restart
To configure to send an email on alarm you need to modify
the /etc/dcachelogback.xml file.
<appender name="ALARM_MAIL" class="ch.qos.logback.classic.net.SMTPAppender">
<!-- this filter ensures that only events sent marked as ALARM
are received by this appender -->
<filter class="org.dcache.alarms.logback.AlarmMarkerFilter"/>
<smtpHost></smtpHost>
<to></to>
<to></to>
<from></from>
<subject>dCache Alarm</subject>
<layout class="ch.qos.logback.classic.PatternLayout">
<pattern>%d{dd MMM yyyy HH:mm:ss} \(%X{cells.cell}\) [%X{org.dcache.ndc}] %m%n</pattern>
</layout>
<cyclicBufferTracker class="ch.qos.logback.core.spi.CyclicBufferTrackerImpl">
<!-- send just one log entry per email -->
<bufferSize>1</bufferSize>
</cyclicBufferTracker>
</appender>
The file logback.xml found in the
/etc/dcache
directory adds an
org.dcache.alarms.logback.AlarmDefinitionAppender
to the root logger. This alarm appender embeds a child
SocketAppender set to send events on the port specified by
the property alarms.server.port to a host
specified by the property
alarms.server.host.
The alarms defined are listed in the the section called “The Defined Alarms”.
Define additional alarms simply by including other
<alarmType> elements in the
<filter> element.
Example:
Extract of the definition of the
SERVICE_CREATION_FAILURE and the
CHECKSUM alarms in the
/etc/dcache/logback.xml file.
<alarmType>
regex:"(.+) from ac_create",
type:SERVICE_CREATION_FAILURE,
level:ERROR,
severity:CRITICAL,
include-in-key:group1 type host domain service
</alarmType>
.
.
.
<alarmType>
logger:org.dcache.pool.classic.ChecksumScanner,
regex:"Checksum mismatch detected for (.+) - marking as BROKEN",
type:CHECKSUM,
level:ERROR,
severity:MODERATE,
include-in-key:group1 type host service domain
</alarmType>
The text of the <alarmType> element
must be formed as a JSON string but without
the beginning and ending braces ( ’{’, ’}’ ); this means, in
essence, a comma-delimited list of
NAME:VALUE pairs, with arbitrary
whitespace between the pairs. The set of properties and
their possible values is as follows:
| Property | Possible values | Required |
|---|---|---|
logger | name of the logger (see example above) | at least one of logger,
regex |
regex | A pattern to match the message with.
NoteIt is advisable to place the regex pattern in double quotes, so that the JSON parser will accept the special characters used in regular expressions: e.g., "[=].[\w]*" | at least one of logger,
regex |
match-exception | False, True | NO |
depth | Integer ≥ 0 | NO |
type | An arbitrary name which will serve as the alarm’s marker. | YES |
level | TRACE, DEBUG,
INFO, WARN,
ERROR | YES |
severity | INDETERMINATE (default),
LOW, MODERATE,
HIGH, CRITICAL | NO |
regex-flags | A string representation of the (Java) regex flags options,
joined by the 'or' pipe symbol: e.g.,
CASE_INSENSITIVE | DOTALL. For fuller
explanation, see the Java Tutorials on Regular
Expressions. | NO |
thread | Thread name (restricts this alarm type only to this particular thread). | NO |
include-in-key | Concatenation of key field names (see below) | YES |
The property match-exception is False by
default. If set to True, it applies the regex pattern to all
embedded exception messages, recursively, until a match is
found.
The property depth is to be used with
the property match-exception. The default is
undefined (null), meaning unbounded. Setting
depth to an integer > 0 indicates the
level to which the match will be applied (in terms of nested
messages). Setting it to 0 is equivalent to setting
match-exception to false.
Example:
Have a look at the extract of the definition of the
DB_UNAVAILABLE alarm in the
/etc/dcache/logback.xml file.
<alarmType>
regex:"Unable to open a test connection to the given database|Connections could not be acquired from the underlying database",
match-exception:true,
depth:1,
type:DB_UNAVAILABLE,
level:ERROR,
severity:CRITICAL,
include-in-key:type host
</alarmType>
The alarm key (the property include-in-key) is
the set of properties whose values uniquely identify the alarm
instance. For example, the checksum alarm defined above does not
include the timestamp in its key, as all reports of this kind of
error for a given file (PNFS id is given in the message body) are
to be considered as duplicates of the first such alarm. The key
field names which can be used to constitute the key are those
which all alarms have in common:
groupN, timestamp,
message, logger,
type, domain,
service, host and
thread.
These property names should be delimited by (an arbitrary number
of) whitespace characters. Note that logger,
timestamp and message
derive from the logging event, host is
determined by static lookup, and domain and
service correspond to the
cells.domain and
cells.cell properties in the event’s MDC map.
The key field name groupN, where
N is an integer, means that the
Nth substring (specified by parentheses) will
be included. For N=0,
group0 is identical to
message, which means that the whole message
string should be included as an identifier.
Example:
Matching on Regex Groups. Have a look at the
extract of the definition of the CHECKSUM
alarm in the /etc/dcache/logback.xml
file.
<alarmType>
logger:org.dcache.pool.classic.ChecksumScanner,
regex:"Checksum mismatch detected for (.+) - marking as BROKEN",
type:CHECKSUM,
level:ERROR,
severity:MODERATE,
include-in-key:group1 type host service domain
</alarmType>
Here the tag group1 in the
include-in-key extracts the PNFS-ID from the
message and includes only that portion of the message string
as an identifier. As usual, group0 is the same as the entire
message.
When the appender applies this alarm definition filter, it relies on an implicit matching function: (logger, level, regex, thread) ⇒ type; hence a given alarm can be generated by more than one logger, and a logger in turn can send multiple types of alarms if these are mapped to different logging levels, thread names and/or regex patterns for the message body.
In most cases, running the alarm server as a dCache service will be adequate. Nevertheless, it is always possible to run the logback server entirely independently from dCache. In that case, you must be sure that the classpath carries the necessary dCache dependencies to provide the alarm appending functionality. Here is a bash snippet which will sufficiently define the classpath based on the dCache classes directory:
#!/bin/sh
case $# in
0)
PORT=60001
;;
1)
PORT=${1}
;;
*)
echo "Usage: $(basename $0) [PORT]" >&2
exit 1
;;
esac
DC=/etc/dcache
CL=/usr/share/dcache/classes
CP=.
CP=${CP}:`find ${CL} -name "activation-*.jar"`
CP=${CP}:`find ${CL} -name "datanucleus-api-jdo-*.jar"`
CP=${CP}:`find ${CL} -name "datanucleus-cache*.jar"`
CP=${CP}:`find ${CL} -name "datanucleus-core*.jar"`
CP=${CP}:`find ${CL} -name "datanucleus-xml*.jar"`
CP=${CP}:`find ${CL} -name "dcache-core*.jar"`
CP=${CP}:`find ${CL} -name "guava-*.jar"`
CP=${CP}:`find ${CL} -name "jargs-*.jar"`
CP=${CP}:`find ${CL} -name "jaxb-*.jar" | tr '\n' ':'`
CP=${CP}:`find ${CL} -name "jaxrpc-*.jar" | tr '\n' ':'`
CP=${CP}:`find ${CL} -name "jdo-api-*.jar"`
CP=${CP}:`find ${CL} -name "json-*.jar"`
CP=${CP}:`find ${CL} -name "log4j-over-slf4j-*.jar"`
CP=${CP}:`find ${CL} -name "logback-classic-*.jar"`
CP=${CP}:`find ${CL} -name "logback-core-*.jar"`
CP=${CP}:`find ${CL} -name "mail-*.jar"`
CP=${CP}:`find ${CL} -name "slf4j-api-*.jar"`
java -cp ${CP} ch.qos.logback.classic.net.SimpleSocketServer ${PORT} /var/lib/dcache/alarms/logback-server.xml &
This is a set of properties you might want to modify. Check
the files
/usr/share/dcache/alarms.properties and
/usr/share/dcache/httpd.properties for the
complete list.
- alarms.dir
Default:
/var/lib/dcache/alarmsThe main alarms area.
- alarms.server.port
Default:
60001The port on which the alarm server will listen.
- alarms.server.host
Default:
localhostThe host on which the
alarmsservice is running.- alarms.server.config
Default:
${alarms.dir}/logback-server.xmlThe logback configuration for the alarm server.
- alarms.store.db.type
Default:
xmlDefines what kind of database (either XML or PostgreSQL). Set
alarms.store.db.type=rdbmsto use PostgreSQL.- alarms.store.db.changelog
Default:
org/dcache/alarms/db/sql/alarms.changelog-master.xmlLiquibase master changelog.
- alarms.store.path
Default:
${alarms.dir}/alarms.xmlThe path of the
alarms.xml. Used ifalarms.store.db.type=xml.- alarms.store.db.rdbms
Default:
postgresqlIf this value is changed from its default the
alarms.store.db.driverproperty must also be changed.- alarms.store.db.driver
Default:
org.postgresql.DriverThis property should give the correct namespace for the RDBMS set by the property
alarms.store.db.rdbms.- alarms.store.db.host
Default:
localhostRDBMS/JDBC Database host name.
- alarms.store.db.user
Default:
RDBMS/JDBC Database user name.
- alarms.store.db.pass
Default:
no passwordRDBMS/JDBC Database user password.
- alarms.store.db.properties
Default:
${alarms.dir}/datanucleus.propertiesPath for overriding the internally set DAO (DataNucleus) properties for alarm storage, for instance, to configure an RDBMS database; will be used only if the URL does not point to the XML default.
- webadmin.alarm.cleaner.enabled
Default:
trueIf set to true a thread which automatically removes closed alarms older than a given threshold will run.
- webadmin.alarm.cleaner.timeout
Default:
168(24 x 7 hours)Wait interval between successive sweeps of the cleanup daemon.
- webadmin.alarm.cleaner.delete-threshold
Default:
336(24 X 14 hours)Closed alarms will be deleted after this time.
Table of Contents
This part describes how to configure the webadmin service
which runs inside the httpdDomain and offers additional
features to admins like sending admin-commands equal to those of
admin interface (CLI) to chosen cells or displaying billing plots.
For authentication and authorisation it offers usage of
username/password (currently the kpwd-Plugin) or grid
certificate talking to gPlazma2. It also offers a
non-authenticated read-only mode.
If you are logged in as admin it is possible to send a command to multiple pools or a whole poolgroup in one go. It is even possible to send a command to any dCache cell. Also, there is information like their size, their id and used space on linkgroups and spacetokens available.
From the technical point of view the webadmin service
uses a Jetty-Server which is embedded in an ordinary
httpd cell. It is using apache-wicket (a
webfrontend-framework) and YAML (a
CSS-Template Framework).
For the authenticated mode a configured gPlazma is
required (see also the section called “gPlazma config example to work with authenticated webadmin”). The user may either
authenticate by presenting his grid certificate or by entering a
valid username/password combination. This way it is possible to
login even if the user does not have a grid certificate. For a
non-authenticated webadmin service you just need to start
the httpd service.
For the authenticated mode using a grid certificate the host certificate has to be imported into the dCache-keystore. In the grid world host certificates are usually signed by national Grid-CAs. Refer to the documentation provided by the Grid-CA to find out how to request a certificate. To import them into the dCache-keystore use this command:
[root] #dcache import hostcert
Now you have to initialise your truststore (this is the certificate-store used for the SSL connections) by using this command:
[root] #dcache import cacerts
The webadmin service uses the same truststore as
webdav service, so you can skip this step if you have
webdav configured with SSL.
The default instance name is the name of the host which runs the
httpdDomain and the default http port number is
2288 (this is the default port number of the
httpd service). Now you should be able to have a
read-only access to the webpage
http://example.com:2288/webadmin.
In the following example we will enable the authenticated mode.
Example:
[httpdDomain]
authenticated=true
The most important value is
webadminAdminGid, because it configures
who is allowed to alter dCache behaviour, which certainly
should not be everyone:
# # When a user has this GID he can become an Admin for the webadmin interface # webadminAdminGid=1000
To see all webadmin specific property values have a look
at
/usr/share/dcache/defaults/httpd.properties.
For information on gPlazma configuration have a look
at Chapter 10, Authorization in dCache and for a special example
the section called “gPlazma config example to work with authenticated webadmin”.
Table of Contents
dCache includes support for Access Control Lists (ACLs). This support is conforming to the NFS version 4 Protocol specification.
This chapter provides some background information and details on configuring dCache to use ACLs and how to administer the resulting system.
ACLs and pnfs
ACLs are only supported with the Chimera name space
backend. Versions before 1.9.12 had partial support for ACLs
with the pnfs backend, however due to the limitations of that
implementation ACLs were practically useless with pnfs.
dCache allows control over namespace operations (e.g., creating new files and directories, deleting items, renaming items) and data operations (reading data, writing data) using the standard Unix permission model. In this model, files and directories have both owner and group-owner attributes and a set of permissions that apply to the owner, permissions for users that are members of the group-owner group and permissions for other users.
Although Unix permission model is flexible enough for many deployment scenarios there are configurations that either cannot configured easily or are impossible. To satisfy these more complex permission handling dCache has support for ACL-based permission handling.
An Access Control List (ACL) is a set of rules for determining whether an end-user is allowed to undertake some specific operation. Each ACL is tied to a specific namespace entry: a file or directory. When an end-user wishes to undertake some operation then the ACL for that namespace entry is checked to see if that user is authorised. If the operation is to create a new file or directory then the ACL of the parent directory is checked.
File- and directory- ACLs
Each ACL is associated with a specific file or directory in dCache. Although the general form is the same whether the ACL is associated with a file or directory, some aspects of an ACL may change. Because of this, we introduce the terms file-ACL and directory-ACL when taking about ACLs associated with a file or a directory respectively. If the term ACL is used then it refers to both file-ACLs and directory-ACLs.
Each ACL contains a list of one or more Access Control Entries (ACEs). The ACEs describe how dCache determines whether an end-user is authorised. Each ACE contains information about which group of end users it applies to and describes whether this group is authorised for some subset of possible operations.
The order of the ACEs within an ACL is significant. When checking whether an end-user is authorised each ACE is checked in turn to see if it applies to the end-user and the requested operation. If it does then that ACE determines whether that end-user is authorised. If not then the next ACE is checked. Thus an ACL can have several ACEs and the first matched ACE “wins”.
One of the problems with traditional Unix-based permission model is its inflexible handling of newly created files and directories. With transitional filesystems, the permissions that are set are under the control of the user-process creating the file. The sysadmin has no direct control over the permissions that newly files or directories will have. The ACL permission model solves this problem by allowing explicit configuration using inheritance.
ACL inheritance is when a new file or directory is created with an ACL containing a set of ACEs from the parent directory’s ACL. The inherited ACEs are specially marked so that only those that are intended will be inherited.
Inheritance only happens when a new file or directory is created. After creation, the ACL of the new file or directory is completely decoupled from the parent directory’s ACL: the ACL of the parent directory may be altered without affecting the ACL of the new file or directory and visa versa.
Inheritance is optional. Within a directory’s ACL some ACEs may be inherited whilst others are not. New files or directories will receive only those ACEs that are configured; the remaining ACEs will not be copied.
ACL support requires database tables to store ACL and ACE information. These tables are part of the Chimera name space backend and for a new installation no additional steps are needed to prepare the database.
Early versions of Chimera (before dCache 1.9.3) did not create the ACL table during installation. If the database is lacking the extra table then it has to be created before enabling ACL support. This is achieved by applying two SQL files:
[root] #psql chimera < /usr/share/dcache/chimera/sql/addACLtoChimeraDB.sql[root] #psql chimera < /usr/share/dcache/chimera/sql/pgsql-procedures.sql
The dcache.conf and layout files contain a
number of settings that may be adjusted to configure dCache’s
permission settings. These settings are are described in this
section.
To enable ACL support set the property
aclEnabled to true. This
property applies to the pnfsmanager and acl services
and only need to be defined for these services.
To query and define ACLs on files and directories enable
the acl service. This service exposes a command line
interface to administer ACLs. The command line interface
of the service is described in section the section called “Administrating ACLs”.
To enable the acl service, you have to change the
layout file corresponding to your dCache-instance.
Enable the acl service within the domain that you
want to run it in by adding the following line
.. [<domainName>/acl] ..
Altering dCache ACL behaviour is achieved by connecting to
the PnfsManager well-known cell using
the administrator interface. For further details about how to
use the administrator interface, see the section called “The Admin Interface”.
The info and help commands
are available within PnfsManager and fulfil their usual
functions.
The setfacl command is used to set a new ACL. This command accepts arguments with the following form:
setfacl <ID> <ACE> [<ACE>...]
The <ID> argument is either a
pnfs-ID or the absolute path of some file or directory in
dCache. The setfacl command requires one
or more <ACE> arguments seperated by
spaces.
The setfacl command creates a new ACL for the file or directory represented by <ID>. This new ACL replaces any existing ACEs for <ID>.
An ACL has one or more ACEs. Each ACE defines permissions to access this resource for some Subject. The ACEs are space-separated and the ordering is significant. The format and description of these ACE values are described below.
The <ACE> arguments to the setfacl command have a specific format. This format is described below in Extended Backus-Naur Form (EBNF).
|
The various options are described below.
The Subject defines to which user or group of users the ACE will apply. It acts as a filter so that only those users that match the Subject will have their access rights affected.
As indicated by the EBNF above, the Subject of an ACE can take one of several forms. These are described below:
|
The |
|
The |
|
The |
|
The |
|
The |
|
The |
|
The |
Authenticated or anonymous
An end user of dCache is either authenticated or is
unauthenticated, but never both. Because of this, an end
user operation will either match ACEs with
ANONYMOUS@ Subjects or
AUTHENTICATED@ Subjects but the request
will never match both at the same time.
Access (defined in the ACE EBNF above) describes what kind of operations are being described by the ACE and whether the ACE is granting permission or denying it.
An individual ACE can either grant permissions or deny them, but never both. However, an ACL may be composed of any mixture of authorising- and denying- ACEs. The first character of Access describes whether the ACE is authorising or denying.
If Access begins with a plus symbol
(+) then the ACE authorises the
Subject some operations. The ACE
EVERYONE@:+r authorises all users to
read a file since the Access begins with a
+.
If the Access begins with a minus symbol
(-) then the ACE denies the
Subject some operations. The ACE
EVERYONE@:-r prevents any user from
reading a file since the Access begins with a
-.
The first character of Access must be
+ or -, no other
possibility is allowed. The initial +
or - of Access is followed by one
or more operation letters. These letters form the ACE’s
access mask (Mask in ACE EBNF above).
The access mask describes which operations may be allowed
or denied by the ACE. Each type of operation has a
corresponding letter; for example, obtaining a directory
listing has a corresponding letter l.
If a user attempts an operation of a type corresponding to
a letter present in the access mask then the ACE may
affect whether the operation is authorised. If the
corresponding letter is absent from the access mask then
the ACE will be ignored for this operation.
The following table describes the access mask letters and the corresponding operations:
File- and directory- specific operations
Some operations and, correspondingly, some access mask letters only make sense for ACLs attached to certain types of items. Some operations only apply to directories, some operations are only for files and some operations apply to both files and directories.
When configuring an ACL, if an ACE has an operation
letter in the access mask that is not applicable to
whatever the ACL is associated with then the letter is
converted to an equivalent. For example, if
l (list directory) is in the access
mask of an ACE that is part of a file-ACL then it is
converted to r. These mappings are
described in the following table.
|
reading data from a file. Specifying
|
|
listing the contents of a directory. Specifying
|
|
overwriting a file’s existing contents. Specifying
|
|
creating a new file within a directory. Specifying
|
|
creating a subdirectory within a directory.
Specifying |
|
appending data to the end of a file. Specifying
|
|
reading attributes. Specifying |
|
write attributes. Specifying |
|
executing a file or entering a directory.
Specifying
Specifying |
|
deleting a namespace entry. Specifying
|
|
deleting a child of a directory. Specifying
|
|
reading basic attributes. Specifying
|
|
altering basic attributes. Specifying
|
|
reading ACL information. Specifying
|
|
writing ACL information. Specifying
|
|
altering owner and owner-group information.
Specifying |
To enable ACL inheritance, the optional inheritance flags must be defined. The flag is a list of letters. There are three possible letters that may be included and the order doesn’t matter.
ACE Inheritance Flags
|
This inheritance flag only affects those ACEs that
form part of an directory-ACL. If the ACE is
part of a file-ACL then specifying
If a file is created in a directory with an ACE
with
Specifying |
|
This inheritance flag only affect those ACEs that
form part of an directory-ACL. If the ACE is
part of a file-ACL then specifying
Specifying
If a subdirectory is created in a directory with an
ACE with |
|
The
Specifying
When a file or directory inherits from an ACE with
An |
This section gives some specific examples of how to set ACLs to achieve some specific behaviour.
Example 18.1. ACL allowing specific user to delete files in a directory
This example demonstrates how to configure a
directory-ACL so user 3750 can delete any file within
the directory /pnfs/example.org/data/exampleDir.
(PnfsManager) admin >setfacl /pnfs/example.org/data/exampleDir EVERYONE@:+l USER:3750:D (...line continues...) USER:3750:+d:of(PnfsManager) admin >setfacl /pnfs/example.org/data/exampleDir/existingFile1 (...line continues...) USER:3750:+d:f(PnfsManager) admin >setfacl /pnfs/example.org/data/exampleDir/existingFile2 (...line continues...) USER:3750:+d:f
The first command creates an ACL for the directory. This ACL has three ACEs. The first ACE allows anyone to list the contents of the directory. The second ACE allows user 3750 to delete content within the directory in general. The third ACE is inherited by all newly created files and specifies that user 3750 is authorised to delete the file independent of that file’s ownership.
The second and third commands creates an ACL for files that already exists within the directory. Since ACL inheritance only applies to newly created files or directories, any existing files must have an ACL explicitly set.
Example 18.2. ACL to deny a group
The following example demonstrates authorising all end users to list a directory. Members of group 1000 can also create subdirectories. However, any member of group 2000 can do neither.
(PnfsManager) admin >setfacl /pnfs/example.org/data/exampleDir GROUP:2000:-sl (...line continues...) EVERYONE@:+l GROUP:1000:+s
The first ACE denies any member of group 2000 the ability to create subdirectories or list the directory contents. As this ACE is first, it takes precedence over other ACEs.
The second ACE allows everyone to list the directory’s content. If an end user who is a member of group 2000 attempts to list a directory then their request will match the first ACE so will be denied. End users attempting to list a directory that are not a member of group 2000 will not match the first ACE but will match the second ACE and will be authorised.
The final ACE authorises members of group 1000 to create subdirectories. If an end user who is a member of group 1000 and group 2000 attempts to create a subdirectory then their request will match the first ACE and be denied.
Example 18.3. ACL to allow a user to delete all files and subdirectories
This example is an extension to Example 18.1, “ACL allowing specific user to delete files in a directory”. The previous example allowed deletion of the contents of a directory but not the contents of any subdirectories. This example allows user 3750 to delete all files and subdirectories within the directory.
(PnfsManager) admin >setfacl /pnfs/example.org/data/exampleDir USER:3750:+D:d (...line continues...) USER:3750:+d:odf
The first ACE is USER:3750:+D:d.
This authorises user 3750 to delete any contents of
directory /pnfs/example.org/data/exampleDir
that has an ACL authorising them with
d operation.
The first ACE also contains the inheritance flag
d so newly created subdirectories will
inherit this ACE. Since the inherited ACE will also
contain the d inheritance flag, this
ACE will be copied to all subdirectories when they are
created.
The second ACE is USER:3750:+d:odf.
The ACE authorises user 3750 to delete whichever item
the ACL containing this ACE is associated with.
However, since the ACE contains the o
in the inheritance flags, user 3750 is
not authorised to delete the
directory /pnfs/example.org/data/exampleDir
Since the second ACE has both the d
and f inheritance flags, it will be
inherited by all files and subdirectories of /pnfs/example.org/data/exampleDir,
but without the o flag. This
authorises user 3750 to delete these items.
Subdirectories (and files) will inherit the second ACE
with both d and f
inheritance flags. This implies that all files and
sub-subdirecties within a subdirectory of /pnfs/example.org/data/exampleDir
will also inherit this ACE, so will also be deletable by user 3750.
The getfacl is used to obtain the current ACL for some item in dCache namespace. It takes the following arguments.
getfacl [<pnfsId>] | [<globalPath>]
The getfacl command fetches the ACL
information of a namespace item (a file or directory). The
item may be specified by its pnfs-ID or its absolute path.
Example 18.4. Obtain ACL information by absolute path
(PnfsManager) admin >getfacl /pnfs/example.org/data/exampleDirACL: rsId = 00004EEFE7E59A3441198E7EB744B0D8BA54, rsType = DIR order = 0, type = A, accessMsk = lfsD, who = USER, whoID = 12457 order = 1, type = A, flags = f, accessMsk = lfd, who = USER, whoID = 87552 In extra format: USER:12457:+lfsD USER:87552:+lfd:f
The information is provided twice. The first part gives
detailed information about the ACL. The second part, after
the In extra format: heading, provides a
list of ACEs that may be used when updating the ACL using
the setfacl command.
Table of Contents
The GLUE information provider supplied with dCache provides the information about the dCache instance in a standard format called GLUE. This is necessary so that WLCG infrastructure (such as FTS) and clients using WLCG tools can discover the dCache instance and use it correctly.
The process of configuring the info-provider is designed to have the minimum overhead so you can configure it manually; however, you may prefer to use an automatic configuration tool, such as YAIM.
Note
Be sure you have at least v2.0.8 of glue-schema RPM installed on the node running the info-provider.This chapter describes how to enable and test the dCache-internal collection of information needed by the info-provider. It also describes how to configure the info-provider and verify that it is working correctly. Finally, it describes how to publish this information within BDII, verify that this is working and troubleshoot any problems.
Warning
Please be aware that changing information provider may result in a brief interruption to published information. This may have an adverse affect on client software that make use of this information.
The info-provider takes as much information as possible from
dCache. To achieve this, it needs the internal
information-collecting service, info, to be running and a
means to collect that information: httpd. Make sure that
both the httpd and info services are running
within your dCache instance. By default, the info
service is started on the admin-node; but it is possible to
configure dCache so it runs on a different node. You should
run only one info service per dCache instance.
The traditional (pre-1.9.7) allocation of services to domains
has the info cell running in the infoDomain domain. A
dCache system that has been migrated from this old
configuration will have the following fragment in the node’s
layout file:
[infoDomain] [infoDomain/info]
It is also possible to run the info service inside a
domain that runs other services. The following example show the
information domain that hosts the admin,
httpd, topo and info services.
[information] [information/admin] [information/httpd] [information/topo] [information/info]
For more information on configuring dCache layout files, see the section called “Defining domains and services”.
Use the dcache services command to see if a
particular node is configured to run the info service.
The following shows the output if the node has an
information domain that is configured to run the
info cell.
[root] #dcache services | grep infoinformation info info /var/log/dCache/information.log
If a node has no domain configured to host the info
service then the above dcache services
command will give no output:
[root] #dcache services | grep info
If no running domain within any node of
your dCache instance is running the info service then
you must add the service to a domain and restart that domain.
Example:
In this example, the info service is added to the
example domain. Note that the specific choice of
domain (example) is just to give a concrete example;
the same process may be applied to a different domain.
The layouts file for this node includes the following
definition for the example domain:
[example] [example/admin] [example/httpd] [example/topo]
By adding the extra line [example/info]
to the layouts file, in future, the example
domain will host the info service.
[example] [example/admin] [example/httpd] [example/topo] [example/info]
To actually start the info cell, the
example domain must be restarted.
[root] #dcache restart exampleStopping example (pid=30471) 0 done Starting example done
With the example domain restarted, the info
service is now running.
You can also verify both the httpd and info
services are running using the wget command.
The specific command assumes that you are logged into the node
that has the httpd service (by default, the admin node).
You may run the command on any node by replacing localhost with the hostname of
the node running the httpd service.
The following example shows the output from the
wget when the info service is running
correctly:
[root] #wget -O/dev/null http://localhost:2288/info--17:57:38-- http://localhost:2288/info Resolving localhost... 127.0.0.1 Connecting to localhost|127.0.0.1|:2288... connected. HTTP request sent, awaiting response... 200 Document follows Length: 372962 (364K) [application/xml] Saving to: `/dev/null' 100%[=========================================================================== ===>] 372,962 --.-K/s in 0.001s 17:57:38 (346 MB/s) - `/dev/null' saved [372962/372962]
If the httpd service isn’t running then the command will
generate the following output:
[root] #wget -O/dev/null http://localhost:2288/info--10:05:35-- http://localhost:2288/info => `/dev/null' Resolving localhost... 127.0.0.1 Connecting to localhost|127.0.0.1|:2288... failed: Connection refused.
To fix the problem, ensure that the httpd service is
running within your dCache instance. This is the service that
provides the web server monitoring within dCache. To enable
the service, follow the same procedure for enabling the
info cell, but add the httpd service within one of
the domains in dCache.
If running the wget command gives an error
message with Unable to contact the info cell. Please
ensure the info cell is running:
[root] #wget -O/dev/null http://localhost:2288/info--10:03:13-- http://localhost:2288/info => `/dev/null' Resolving localhost... 127.0.0.1 Connecting to localhost|127.0.0.1|:2288... connected. HTTP request sent, awaiting response... 503 Unable to contact the info cell. Pl ease ensure the info cell is running. 10:03:13 ERROR 503: Unable to contact the info cell. Please ensure the info cel l is running..
This means that the info service is not running. Follow
the instructions for starting the info service given
above.
In the directory /etc/dcache you will find the
file info-provider.xml. This file is where
you configure the info-provider. It provides information that
is difficult or impossible to obtain from the running dCache
directly.
You must edit the info-provider.xml to
customise its content to match your dCache instance. In some
places, the file contains place-holder values. These
place-holder values must be changed to the correct values for
your dCache instance.
Careful with < and & charaters
Take care when editing the
info-provider.xml file! After changing
the contents, the file must remain valid, well-formed XML.
In particular, be very careful when writing a less-than symbol
(<) or an ampersand symbol
(&).
Only use an ampersand symbol (
&) if it is part of an entity reference. An entity reference is a sequence that starts with an ampersand symbol and is terminated with a semi-colon (;), for example>and'are entity markups.If you want to include an ampersand character in the text then you must use the
&entity; for example, to include the text “me & you” the XML file would includeme & you.Only use a less-than symbol (
<) when starting an XML element; for example,<constant id="TEST">A test value</constant>.If you want to include a less-than character in the text then you must use the
<entity; for example, to include the text “1 < 2” the XML file would include1 < 2.
Example:
The following example shows the SE-NAME
constant (which provides a human-readable description of the
dCache instance) from a well-formed
info-provider.xml configuration file:
<constant id="SE-NAME">Simple & small dCache instance for small VOs (typically < 20 users)</constant>
The SE-NAME constant is configured to
have the value “Simple & small dCache instance for
small VOs (typically < 20 users)”. This
illustrates how to include ampersand and less-than
characters in an XML file.
When editing the info-provider.xml file,
you should only edit text between two
elements or add more elements (for lists and mappings). You
should never alter the text inside
double-quote marks.
Example:
This example shows how to edit the
SITE-UNIQUE-ID constant. This constant has
a default value EXAMPLESITE-ID, which is a
place-holder value and must be edited.
<constant id="SITE-UNIQUE-ID">EXAMPLESITE-ID</constant>
To edit the constant’s value, you must change the text between
the start- and end-element tags:
EXAMPLESITE-ID. You should
not edit the text SITE-UNIQUE-ID
as it is in double-quote marks. After editing, the file may
read:
<constant id="SITE-UNIQUE-ID">DESY-HH</constant>
The info-provider.xml contains detailed
descriptions of all the properties that are editable. You
should refer to this documentation when editing the
info-provider.xml.
Once you have configured info-provider.xml
to reflect your site’s configuration, you may test that the info
provider produces meaningful results.
Running the info-provider script should produce GLUE information in LDIF format; for example:
[root] #dcache-info-provider | head -20# # LDIF generated by Xylophone v0.2 # # XSLT processing using SAXON 6.5.5 from Michael Kay 1 (http://saxon.sf.ne t/) # at: 2011-05-11T14:08:45+02:00 # dn: GlueSEUniqueID=dcache-host.example.org,mds-vo-name=resource,o=grid objectClass: GlueSETop objectClass: GlueSE objectClass: GlueKey objectClass: GlueSchemaVersion GlueSEStatus: Production GlueSEUniqueID: dcache-host.example.org GlueSEImplementationName: dCache GlueSEArchitecture: multidisk GlueSEImplementationVersion: 2.5.0 (ns=Chimera) GlueSESizeTotal: 86
The actual values you see will be site-specific and depend on
the contents of the info-provider.xml file
and your dCache configuration.
To verify that there are no problems, redirect standard-out to
/dev/null to show only
the error messages:
[root] #dcache-info-provider >/dev/null
If you see error messages (which may be repeated several times) of the form:
[root] #dcache-info-provider >/dev/nullRecoverable error Failure reading http://localhost:2288/info: no more input
then it is likely that either the httpd or info
service has not been started. Use the above
wget test to check that both services are
running. You can also see which services are available by
running the dcache services and
dcache status commands.
Sites that were using the old (pre-1.9.5) info provider should ensure that there are no remnants of this old info-provider on their machine. Although the old info-provider has been removed from dCache, it relied on static LDIF files, which might still exist. If so, then BDII will obtain some information from the current info-provider and some out-of-date information from the static LDIF files. BDII will then attempt to merge the two sources of information. The merged information may provide a confusing description of your dCache instance, which may prevent clients from working correctly.
The old info provider had two static LDIF files and a symbolic link for BDII. These are:
The file
lcg-info-static-SE.ldif,The file:
lcg-info-static-dSE.ldif,The symbolic link
/opt/glite/etc/gip/plugin, which points to/opt/d-cache/jobs/infoDynamicSE-plugin-dcache.
The two files (lcg-info-static-SE.ldif and
lcg-info-static-dSE.ldif) appear in the
/opt/lcg/var/gip/ldif
directory; however, it is possible to alter the location BDII
will use. In BDII v4, the directory is controlled by the
static_dir variable (see
/opt/glite/etc/gip/glite-info-generic.conf
or /opt/lcg/etc/lcg-info-generic.conf).
For BDII v5, the BDII_LDIF_DIR variable
(defined in /opt/bdii/etc/bdii.conf)
controls this behaviour.
You must delete the above three entries:
lcg-info-static-SE.ldif,
lcg-info-static-dSE.ldif and the plugin symbolic link.
The directory with the static LDIF, /opt/lcg/var/gip/ldif or /opt/glite/etc/gip/ldif by default,
may contain other static LDIF entries that are relics of
previous info-providers. These may have filenames like
static-file-SE.ldif.
Delete any static LDIF file that contain information about
dCache. With the info-provider, all LDIF information comes
from the info-provider; there should be no static LDIF files.
Be careful not to delete any static LDIF files that come as
part of BDII; for example, the
default.ldif file, if present.
BDII obtains information by querying different sources. One
such source of information is by running an info-provider
command and taking the resulting LDIF output. To allow BDII
to obtain dCache information, you must allow BDII to run the
dCache info-provider. This is achieved by symbolically
linking the dcache-info-provider
script into the BDII plugins directory:
[root] #ln -s /usr/sbin/dcache-info-provider /opt/glite/etc/gip/provider/
If the BDII daemons are running, then you will see the information appear in BDII after a short delay; by default this is (at most) 60 seconds.
You can verify that information is present in BDII by querying BDII using the ldapsearch command. Here is an example that queries for GLUE v1.3 objects:
[root] #ldapsearch -LLL -x -H ldap://<dcache-host>:2170 -b o=grid \ '(objectClass=GlueSE)'dn: GlueSEUniqueID=dcache-host.example.org,Mds-Vo-name=resource,o=grid GlueSEStatus: Production objectClass: GlueSETop objectClass: GlueSE objectClass: GlueKey objectClass: GlueSchemaVersion GlueSETotalNearlineSize: 0 GlueSEArchitecture: multidisk GlueSchemaVersionMinor: 3 GlueSEUsedNearlineSize: 0 GlueChunkKey: GlueSEUniqueID=dcache-host.example.org GlueForeignKey: GlueSiteUniqueID=example.org GlueSchemaVersionMajor: 1 GlueSEImplementationName: dCache GlueSEUniqueID: dcache-host.example.org GlueSEImplementationVersion: 2.5-3 (ns=Chimera) GlueSESizeFree: 84 GlueSEUsedOnlineSize: 2 GlueSETotalOnlineSize: 86 GlueSESizeTotal: 86
Careful with the hostname
You must replace <dcache-host>
in the URI ldap://<dcache-host>:2170/
with the actual hostname of your node.
It’s tempting to use localhost in the URI when
executing the ldapsearch command; however,
BDII binds to the ethernet device (e.g.,
eth0). Typically, localhost is
associated with the loopback device (lo),
so querying BDII with the URI ldap://localhost:2170/ will fail.
The LDAP query uses the o=grid object as
the base; all reported objects are descendant objects of this
base object. The o=grid base selects only
the GLUE v1.3 objects. To see GLUE v2.0 objects, the base
object must be o=glue.
The above ldapsearch command queries BDII
using the (objectClass=GlueSE) filter. This
filter selects only objects that provide the highest-level
summary information about a storage-element. Since each
storage-element has only one such object and this BDII
instance only describes a single dCache instance, the command
returns only the single LDAP object.
To see all GLUE v1.3 objects in BDII, repeat the above
ldapsearch command but omit the
(objectClass=GlueSE) filter:
ldapsearch -LLL -x -H
ldap://<dcache-host>:2170 -b
o=grid. This command will output all GLUE v1.3
LDAP objects, which includes all the GLUE v1.3 objects from
the info-provider.
Searching for all GLUE v2.0 objects in BDII is achieved by
repeating the above ldapsearch command but
omitting the (objectClass=GlueSE) filter and
changing the search base to o=glue:
ldapsearch -LLL -x -H ldap://<dcache-host>:2170 -b
o=glue. This command returns a completely different
set of objects from the GLUE v1.3 queries.
You should be able to compare this output with the output from running the info-provider script manually: BDII should contain all the objects that the dCache info-provider is supplying. Unfortunately, the order in which the objects are returned and the order of an object’s properties is not guaranteed; therefore a direct comparison of the output isn’t possible. However, it is possible to calculate the number of objects in GLUE v1.3 and GLUE v2.0.
First, calculate the number of GLUE v1.3 objects in BDII and compare that to the number of GLUE v1.3 objects that the info-provider supplies.
[root] #ldapsearch -LLL -x -H ldap://<dcache-host>:2170 -b o=grid \ '(objectClass=GlueSchemaVersion)' | grep ^dn | wc -l10[root] #dcache-info-provider | \ grep -i "objectClass: GlueSchemaVersion" | wc -l10
Now calculate the number of GLUE v2.0 objects in BDII describing your dCache instance and compare that to the number provided by the info-provider:
[root] #ldapsearch -LLL -x -H ldap://<dcache-host>:2170 -b o=glue | perl -p00e 's/\n //g' | \ grep dn.*GLUE2ServiceID | wc -l27[root] #dcache-info-provider | perl -p00e 's/\n //g' | \ grep ^dn.*GLUE2ServiceID | wc -l27
If there is a discrepancy in the pair of numbers obtains in the above commands then BDII has rejecting some of the objects. This is likely due to malformed LDAP objects from the info-provider.
The BDII log file should explain why objects are not accepted;
for example, due to a badly formatted attribute. The default
location of the log file is
/var/log/bdii/bdii-update.log, but the
location is configured by the BDII_LOG_FILE
option in the /opt/bdii/etc/bdii.conf file.
The BDII log files may show entries like:
2011-05-11 04:04:58,711: [WARNING] dn: o=shadow 2011-05-11 04:04:58,711: [WARNING] ldapadd: Invalid syntax (21) 2011-05-11 04:04:58,711: [WARNING] additional info: objectclass: value #1 invalid per syntax
This problem comes when BDII is attempting to inject new
information. Unfortunately, the information isn’t detailed
enough for further investigation. To obtain more detailed
information from BDII, switch the
BDII_LOG_LEVEL option in
/opt/bdii/etc/bdii.conf to
DEBUG. This will provide more information in
the BDII log file.
Logging at DEBUG level has another effect;
BDII no longer deletes some temporary files. These temporary
files are located in the directory controlled by the
BDII_VAR_DIR option. This is /var/run/bdii by default.
There are several temporary files located in the /var/run/bdii directory. When BDII
decides which objects to add, modify and remove, it creates
LDIF instructions inside temporary files
add.ldif, modify.ldif
and delete.ldif respectively. Any problems
in the attempt to add, modify and delete LDAP objects are
logged to corresponding error files: errors with
add.ldif are logged to
add.err, modify.ldif to
modify.err and so on.
Once information in BDII has stablised, the only new, incoming
objects for BDII come from those objects that it was unable to
add previously. This means that add.ldif
will contain these badly formatted objects and
add.err will contain the corresponding
errors.
The information contained within the info service may
take a short time to achieve a complete overview of dCache’s
state. For certain gathered information it may take a few
minutes before the information stabilises. This delay is
intentional and prevents the gathering of information from
adversely affecting dCache’s performance.
The information presented by the LDAP server is updated
periodically by BDII requesting fresh information from the
info-provider. The info-provider obtains this information by
requesting dCache’s current status from info service.
By default, BDII will query the info-provider every 60
seconds. This will introduce an additional delay between a
change in dCache’s state and that information propagating.
Some information is hard-coded within the
info-provider.xml file; that is, you will
need to edit this file before the published value(s) will
change. These values are ones that typically a site-admin must
choose independently of dCache’s current operations.
Table of Contents
A dCache system administrator may specify a list of DNs/FQANs which are allowed to trigger tape restores for files not being available on disk. Users, requesting tape-only files, and not being on that white list, will receive a permission error and no tape operation is launched. Stage protection can be enhanced to allow authorization specific to a dCache storage group. The additional configuration parameter is optional allowing the stage protection to be backwards compatible when stage authorization is not specific to a storage group.
Stage protection can optionally be configured in the
poolmanager rather than on the doors and the pinmanager. Thus
the white list needs to be present on a single node only. To
enable this, define the following parameter in
/etc/dcache/dcache.conf:
stagePolicyEnforcementPoint=PoolManager
The file name of the white list must be configured by setting the
stageConfigurationFilePath parameter in
/etc/dcache/dcache.conf:
stageConfigurationFilePath=/etc/dcache/StageConfiguration.conf
The parameter needs to be defined on all nodes which enforce the
stage protection, i.e., either on the doors and the
pinmanager, or in the poolmanager depending on the stage
policy enforcement point.
The Stage Configuration File will contain a white list. Each line of the white list may contain up to three regular expressions enclosed in double quotes. The regular expressions match the DN, FQAN, and the Storage Group written in the following format:
"<DN>" ["<FQAN>" ["<StorageGroup>"] ]
Lines starting with a hash symbol # are discarded as comments.
The regular expression syntax follows the syntax defined for the Java Pattern class .
Example:
Here are some examples of the White List Records:
".*" "/atlas/Role=production" "/C=DE/O=DESY/CN=Kermit the frog" "/C=DE/O=DESY/CN=Beaker" "/desy" "/O=GermanGrid/.*" "/desy/Role=.*"
This example authorizes a number of different groups of users:
-
Any user with the FQAN
/atlas/Role=production. -
The user with the DN
/C=DE/O=DESY/CN=Kermit the frog, irrespective of which VOMS groups he belongs to. -
The user with the DN
/C=DE/O=DESY/CN=Beakerbut only if he is also identified as a member of VOdesy(FQAN/desy) -
Any user with DN and FQAN that match
/O=GermanGrid/.*and/desy/Role=.*respectively.
If a storage group is specified all three parameters must be provided.
The regular expression ".*" may be used to authorize any DN
or any FQAN. Consider the following example:
Example:
".*" "/atlas/Role=production" "h1:raw@osm" "/C=DE/O=DESY/CN=Scooter" ".*" "sql:chimera@osm"
In the example above:
-
Any user with FQAN
/atlas/Role=productionis allowed to stage files located in the storage grouph1:raw@osm. -
The user
/C=DE/O=DESY/CN=Scooter, irrespective of which VOMS groups he belongs to, is allowed to stage files located in the storage groupsql:chimera@osm.
With the plain dCap protocol the DN and FQAN are not known
for any users.
Example:
In order to allow all dCap users to stage files
the white list should contain the following record:
"" ""
In case this line is commented or not present in the white list,
all dCap users will be disallowed to stage files.
It is possible to allow all dCap users to stage files located in a certain storage group.
Example:
In this example, all dCap users are allowed to stage files
located in the storage group h1:raw@osm:
"" "" "h1:raw@osm"
This part contains guides for specific tasks a system administrator might want to perform.
Table of Contents
- 21. dCache Clients.
- 22. Pool Operations
- 23. PostgreSQL and dCache
- 24. Complex Network Configuration
- 25. Protocols
- 26. Advanced Tuning
Table of Contents
There are many client tools for dCache. These can most easily be classified by communication protocol.
dCache provides a GSI-FTP door, which is in effect a
GSI authenticated FTP access point to dCache
To list the content of a dCache directory, the GSI-FTP protocol can be used;
[user] $edg-gridftp-ls gsiftp://gridftp-door.example.org/pnfs/example.org/data/dteam/
To check the existence of a file with GSI-FTP.
[user] $edg-gridftp-exists gsiftp://gridftp-door.example.org/pnfs/example.org/data/dteam/filler_test20050819130209790873000[user] $echo $?0[user] $edg-gridftp-exists gsiftp://gridftp-door.example.org/pnfs/example.org/data/dteam/filler_test200508191302097908730002error the server sent an error response: 451 451 /pnfs/example.org/data/dteam/filler_test200508191302097908730002 not found[user] $echo $?1
Use the return code
Please note the echo $? show the
return code of the last run application. The error message
returned from the client this should not be scripted
against as it is one of many possible errors.
To delete files with GSI-FTP use the edg-gridftp-rm command.
[user] $edg-gridftp-rm gsiftp://gridftp-door.example.org/pnfs/example.org/data/dteam/filler_test20050811160948926780000
This deletes the file
filler_test20050811160948926780000 from
the /pnfs/example.org/data/dteam
using the door running on the host gridftp-door.example.org
within the dCache cluster example.org
globus-url-copy [[command line options]] [<srcUrl>] [<destinationUrl>] ...
Copying file with globus-url-copy follows the syntax source, destination.
Example:
The following example copies the file
/etc/group into dCache as the file
/pnfs/example.org/data/dteam/test_GlobusUrlCopy.clinton.504.22080.20071102160121.2
[user] $globus-url-copy \ file://///etc/group \ gsiftp://gridftp-door.example.org/pnfs/example.org/data/dteam/test_GlobusUrlCopy.clinton.504.22080.20071102160121.2
Please note that the five slashes are really needed.
When using dccp client or using the interposition
library the errors Command
failed! can be safely ignored.
The following example shows dccp being used to copy
the file /etc/group into dCache as
the the file
/pnfs/example.org/data/dteam/test6.
The dccp program will connect to dCache without
authenticating.
[user] $/opt/d-cache/dcap/bin/dccp /etc/group dcap://dcap-door.example.org:22125/pnfs/example.org/data/dteam/test6Command failed! Server error message for [1]: "path /pnfs/example.org/data/dteam/test6 not found" (errno 10001). 597 bytes in 0 seconds
The following example shows dccp being used to upload
the file /etc/group. In this example,
dccp will authenticate with dCache using the GSI
protocol.
[user] $/opt/d-cache/dcap/bin/dccp /etc/group gsidcap://gsidcap-door.example.org:22128/pnfs/example.org/data/dteam/test5Command failed! Server error message for [1]: "path /pnfs/example.org/data/dteam/test5 not found" (errno 10001). 597 bytes in 0 seconds
The following example shows dccp with the debugging
enabled. The value 63 controls how much
information is displayed.
[user] $/opt/d-cache/dcap/bin/dccp -d 63 /etc/group dcap://dcap-door.example.org:22128/pnfs/example.org/data/dteam/test3Dcap Version version-1-2-42 Jul 10 2007 19:56:02 Using system native stat64 for /etc/group. Allocated message queues 0, used 0 Using environment variable as configuration Allocated message queues 1, used 1 Creating a new control connection to dcap-door.example.org:22128. Activating IO tunnel. Provider: [libgsiTunnel.so]. Added IO tunneling plugin libgsiTunnel.so for dcap-door.example.org:22128. Setting IO timeout to 20 seconds. Connected in 0.00s. Removing IO timeout handler. Sending control message: 0 0 client hello 0 0 2 42 -uid=501 -pid=32253 -gid=501 Server reply: welcome. dcap_pool: POLLIN on control line [3] id=1 Connected to dcap-door.example.org:22128 Sending control message: 1 0 client stat "dcap://dcap-door.example.org:22128/pnfs/example.org/data/dteam/test3" -uid=501 Command failed! Server error message for [1]: "path //pnfs/example.org/data/dteam/test3 not found" (errno 10001). [-1] unpluging node Removing unneeded queue [1] [-1] destroing node Real file name: /etc/group. Using system native open for /etc/group. extra option: -alloc-size=597 [Fri Sep 7 17:50:56 2007] Going to open file dcap://dcap-door.example.org:22128/pnfs/example.org/data/dteam/test3 in cache. Allocated message queues 2, used 1 Using environment variable as configuration Activating IO tunnel. Provider: [libgsiTunnel.so]. Added IO tunneling plugin libgsiTunnel.so for dcap-door.example.org:22128. Using existing control connection to dcap-door.example.org:22128. Setting hostname to dcap-door.example.org. Sending control message: 2 0 client open "dcap://dcap-door.example.org:22128/pnfs/example.org/data/dteam/test3" w -mode=0644 -truncate dcap-door.example.org 33122 -timeout=- 1 -onerror=default -alloc-size=597 -uid=501 Polling data for destination[6] queueID[2]. Got callback connection from dcap-door.example.org:35905 for session 2, myID 2. cache_open -> OK Enabling checksumming on write. Cache open succeeded in 0.62s. [7] Sending IOCMD_WRITE. Entered sendDataMessage. Polling data for destination[7] queueID[2]. [7] Got reply 4x12 bytes len. [7] Reply: code[6] response[1] result[0]. get_reply: no special fields defined for that type of response. [7] Got reply 4x12 bytes len. [7] Reply: code[7] response[1] result[0]. get_reply: no special fields defined for that type of response. [7] Expected position: 597 @ 597 bytes written. Using system native close for [5]. [7] unpluging node File checksum is: 460898156 Sending CLOSE for fd:7 ID:2. Setting IO timeout to 300 seconds. Entered sendDataMessage. Polling data for destination[7] queueID[2]. [7] Got reply 4x12 bytes len. [7] Reply: code[6] response[4] result[0]. get_reply: no special fields defined for that type of response. Server reply: ok destination [2]. Removing IO timeout handler. Removing unneeded queue [2] [7] destroing node 597 bytes in 0 seconds Debugging
Finding the GSI tunnel.
When the LD_PRELOAD library
libpdcap.so variable produces errors
finding the GSI tunnel it can be useful to specify the
location of the GSI tunnel library directly using the
following command:
[user] $export DCACHE_IO_TUNNEL=/opt/d-cache/dcap/lib/libgsiTunnel.so
Please see http://www.dcache.org/manuals/experts_docs/tunnel-HOWTO.html for further details on tunnel setup for the server.
dCap is a POSIX like interface for
accessing dCache, allowing unmodified applications to
access dCache transparently. This access method uses a
proprietary data transfer protocol, which can emulate
POSIX access across the
LAN or WAN.
Unfortunately the client requires inbound connectivity and so it is not practical to use this protocol over the WAN as most sites will not allow inbound connectivity to worker nodes.
To make non dCache aware applications access files within
dCache through dCap all that is needed is set the
LD_PRELOAD environment variable to
/opt/d-cache/dcap/lib/libpdcap.so.
[user] $export LD_PRELOAD=/opt/d-cache/dcap/lib/libpdcap.so
Setting the LD_PRELOAD environment variable
results in the library libpdcap.so
overriding the operating system calls. After setting this
environment variable, the standard shell command should work
with dCap and GSIdCap URLs.
Example:
The following session demonstrates copying a file into dCache, checking the file is present with the ls command, reading the first 3 lines from dCache and finally deleting the file.
[user] $cp /etc/group gsidcap://gsidcap-door.example.org:22128/pnfs/example.org/data/dteam/myFile[user] $ls gsidcap://gsidcap-door.example.org:22128/pnfs/example.org/data/dteam/DirOrFile[user] $head -3 gsidcap://gsidcap-door.example.org:22128/pnfs/example.org/data/dteam/myFileroot:x:0: daemon:x:1: bin:x:2:[user] $rm gsidcap://gsidcap-door.example.org:22128/pnfs/example.org/data/dteam/MyFile
dCache provides a series of clients one of which is the
SRM client which supports a large number operations, but is
just one Java application, the script name is sent to the Java
applications command line to invoke each operation.
This page just shows the scripts command line and not the invocation of the Java application directly.
Usage:
srmmkdir [[command line options]] [<srmUrl>]
Example:
Example:
The following example creates the directory /pnfs/example.org/data/dteam/myDir.
[user] $srmmkdir srm://srm-door.example.org:8443/pnfs/example.org/data/dteam/myDir
Usage:
srmrm [[command line options]] [<srmUrl> ...]
Example:
[user] $srmrm srm://srm-door.example.org:8443/pnfs/example.org/data/dteam/myDir/myFile
It is allowed to remove only empty directories as well as trees of empty directories.
Usage:
srmrmdir [command line options] [<srmUrl>]
Examples:
Example:
[user] $srmrmdir srm://srm-door.example.org:8443/pnfs/example.org/data/dteam/myDir
Example:
[user] $srmrmdir -recursive=true srm://srm-door.example.org:8443/pnfs/example.org/data/dteam/myDir
Usage:
srmcp [command line options] <source>... [<destination>]
or
srmcp [command line options] [-copyjobfile] <file>
Example:
[user] $srmcp -webservice_protocol=http \ file://///etc/group \ srm://srm-door.example.org:8443/pnfs/example.org/data/dteam/test_Srm.clinton.501.32050.20070907153055.0
[user] $srmcp -webservice_protocol=http \ srm://srm-door.example.org:8443/pnfs/example.org/data/dteam/test_Srm.clinton.501.32050.20070907153055.0 \ file://///tmp/testfile1 -streams_num=1
The srmping command will tell you the version of dCache. This only works for authorized users and not just authenticated users.
[user] $srmping -2 srm://srm-door.example.org:8443/pnfsWARNING: SRM_PATH is defined, which might cause a wrong version of srm client to be executed WARNING: SRM_PATH=/opt/d-cache/srm VersionInfo : v2.2 backend_type:dCache backend_version:production-1-9-1-11
Space token support must be set up and reserving space
with the admin interface this is also documented in the SRM section and in
the
dCache wiki.
Usage:
get-space-tokens [command line options] [<srmUrl>]
Example 21.1. surveying the space tokens available in a directory.
[user] $srm-get-space-tokens srm://srm-door.example.org:8443/pnfs/example.org/data/dteam -srm_protocol_version=2
A successful result:
return status code : SRM_SUCCESS return status expl. : OK Space Reservation Tokens: 148241 148311 148317 28839 148253 148227 148229 148289 148231 148352
Example 21.2. Listing the space tokens for a SRM:
[user] $srm-get-space-tokens srm://srm-door.example.org:8443Space Reservation Tokens: 145614 145615 144248 144249 25099 145585 145607 28839 145589
Usage:
srm-reserve-space [[command line options]] [<srmUrl>]
[user] $srm-reserve-space \ -desired_size 2000 \ -srm_protocol_version=2 \ -retention_policy=REPLICA \ -access_latency=ONLINE \ -guaranteed_size 1024 \ -lifetime 36000 \ srm://srm-door.example.org:8443/pnfs/example.org/data/dteam
A successful result:
Space token =144573
A typical failure
SRMClientV2 : srmStatusOfReserveSpaceRequest , contacting service httpg://srm-door.example.org:8443/srm/managerv2 status: code=SRM_NO_FREE_SPACE explanantion= at Thu Nov 08 15:29:44 CET 2007 state Failed : no space available lifetime = null access latency = ONLINE retention policy = REPLICA guaranteed size = null total size = 34
Also you can get info for this space token
144573:
[user] $srm-get-space-metadata srm://srm-door.example.org:8443/pnfs/example.org/data/dteam -space_tokens=144573
Possible result:
Space Reservation with token=120047
owner:VoGroup=/dteam VoRole=NULL
totalSize:1024
guaranteedSize:1024
unusedSize:1024
lifetimeAssigned:36000
lifetimeLeft:25071
accessLatency:ONLINE
retentionPolicy:REPLICAUsage: srmcp [command line options] source(s) destination
Examples:
[user] $srmcp -protocols=gsiftp -space_token=144573 \ file://///home/user/path/to/myFile \ srm://srm-door.example.org:8443/pnfs/example.org/data/dteam/myFile
[user] $srmcp -protocols=gsiftp -space_token=144573 \ file://///home/user/path/to/myFile1 \ file://///home/user/path/to/myFile2 \ srm://srm-door.example.org:8443/pnfs/example.org/data/dteam
Users can get the metadata available for the space, but the ability to query the metadata of a space reservation may be restricted so that only certain users can obtain this information.
[user] $srm-get-space-metadata srm://srm-door.example.org:8443/pnfs/example.org/data/dteam -space_tokens=120049 WARNING: SRM_PATH is defined, which might cause a wrong version of srm client to be executed WARNING: SRM_PATH=/opt/d-cache/srmSpace Reservation with token=120049 owner:VoGroup=/dteam VoRole=NULL totalSize:1024 guaranteedSize:1024 unusedSize:1024 lifetimeAssigned:36000 lifetimeLeft:30204 accessLatency:ONLINE retentionPolicy:REPLICA
Removes a space token from the SRM.
[user] $srm-release-space srm://srm-door.example.org:8443 -space_token=15
SRM version 2.2 has a much richer set of file listing
commands.
Usage:
srmls [command line options] <srmUrl>...
Example 21.3. Using srmls -l:
[user] $srmls srm://srm-door.example.org:8443/pnfs/example.org/data/dteam/testdir -20 /pnfs/example.org/data/dteam/testdir/ 31 /pnfs/example.org/data/dteam/testdir/testFile1 31 /pnfs/example.org/data/dteam/testdir/testFile2 31 /pnfs/example.org/data/dteam/testdir/testFile3 31 /pnfs/example.org/data/dteam/testdir/testFile4 31 /pnfs/example.org/data/dteam/testdir/testFile5
Note
The -l option results in
srmls providing additional
information. Collecting this additional information may
result in a dramatic increase in execution time.
Example 21.4. Using srmls -l:
[user] $srmls -l srm://srm-door.example.org:8443/pnfs/example.org/data/dteam/testdir -20 /pnfs/example.org/data/dteam/testdir/ storage type:PERMANENT retention policy:CUSTODIAL access latency:NEARLINE locality:NEARLINE locality: null UserPermission: uid=18118 PermissionsRWX GroupPermission: gid=2688 PermissionsRWX WorldPermission: RX created at:2007/10/31 16:16:32 modified at:2007/11/08 18:03:39 - Assigned lifetime (in seconds): -1 - Lifetime left (in seconds): -1 - Original SURL: /pnfs/example.org/data/dteam/testdir - Status: null - Type: DIRECTORY 31 /pnfs/example.org/data/dteam/testdir/testFile1 storage type:PERMANENT retention policy:CUSTODIAL access latency:NEARLINE locality:NEARLINE - Checksum value: 84d007af - Checksum type: adler32 UserPermission: uid=18118 PermissionsRW GroupPermission: gid=2688 PermissionsR WorldPermission: R created at:2007/11/08 15:47:13 modified at:2007/11/08 15:47:13 - Assigned lifetime (in seconds): -1 - Lifetime left (in seconds): -1 - Original SURL: /pnfs/example.org/data/dteam/testdir/testFile1 - Status: null - Type: FILE
If you have more than 1000 entries in your directory then dCache will return only the first 1000. To view directories with more than 1000 entries, please use the following parameters:
srmls parameters
- -count=<integer>
The number of entries to report.
- -offset=<integer>
Example 21.5. Limited directory listing
The first command shows the output without specifying
-count or -offset.
Since the directory contains less than 1000 entries, all
entries are listed.
[user] $srmls srm://srm-door.example.org:8443/pnfs/example.org/data/dteam/dir1 \ srm://srm-door.example.org:8443/pnfs/example.org/data/dteam/dir20 /pnfs/example.org/data/dteam/dir1/ 31 /pnfs/example.org/data/dteam/dir1/myFile1 28 /pnfs/example.org/data/dteam/dir1/myFile2 47 /pnfs/example.org/data/dteam/dir1/myFile3 0 /pnfs/example.org/data/dteam/dir2/ 25 /pnfs/example.org/data/dteam/dir2/fileA 59 /pnfs/example.org/data/dteam/dir2/fileB
The following examples shows the result when using the
-count option to listing the first
three entries.
[user] $srmls -count=3 srm://srm-door.example.org:8443/pnfs/example.org/data/dteam/testdir -srm_protocol_version=20 /pnfs/example.org/data/dteam/testdir/ 31 /pnfs/example.org/data/dteam/testdir/testFile1 31 /pnfs/example.org/data/dteam/testdir/testFile2 31 /pnfs/example.org/data/dteam/testdir/testFile3
In the next command, the -offset option
is used to view a different set of entries.
[user] $srmls -count=3 -offset=1 srm://srm-door.example.org:8443/pnfs/example.org/data/dteam/testdir -srm_protocol_version=20 /pnfs/example.org/data/dteam/testdir/ 31 /pnfs/example.org/data/dteam/testdir/testFile2 31 /pnfs/example.org/data/dteam/testdir/testFile3 31 /pnfs/example.org/data/dteam/testdir/testFile4
dCache is commonly deployed with the BDII. The information provider within dCache publishes information to BDII. To querying the dCache BDII is a matter of using the standard command ldapsearch. For grid the standard ldap port is set to 2170 from the previous value of 2135.
[user] $ldapsearch -x -H ldap://localhost:2170 -b mds-vo-name=resource,o=grid > /tmp/ldap.output.ldif[user] $wc -l /tmp/ldap.output.ldif205 /tmp/ldap.output.ldif
As can be seen from above even a single node standard install of dCache returns a considerable number of lines and for this reason we have not included the output, in this case 205 lines where written.
The lcg_util RPM
contains many small command line applications which interact
with SRM implementations, these where developed
independently from dCache and provided by the
LCG grid computing effort.
Each command line application operates on a different method
of the SRM interface. These applications where not designed
for normal use but to provide components upon which operations
can be built.
lcg-gt queries the BDII information server. This adds an additional requirement that the BDII information server can be found by lcg-gt, please only attempt to contact servers found on your user interface using.
[user] $lcg-infosites --vo dteam se
SRM provides a protocol negotiating interface, and returns
a TURL (transfer URL). The protocol specified by the
client will be returned by the server if the server supports
the requested protocol.
To read a file from dCache using lcg-gt
you must specify two parameters the SURL (storage URL),
and the protcol (GSIdCap or GSI-FTP) you wish to use to
access the file.
[user] $lcg-gt srm://srm-door.example.org/pnfs/example.org/data/dteam/group gsidcapgsidcap://gsidcap-door.example.org:22128/pnfs/example.org/data/dteam/group -2147365977 -2147365976
Each of the above three lines contains different information. These are explained below.
gsidcap://gsidcap-door.example.org:22128/pnfs/example.org/data/dteam/group
is the transfer URL (TURL).
-2147365977 is the SRM Request
Id, Please note that it is a negative number in
this example, which is allowed by the specification.
-2147365976 is the Unique identifier for
the file with respect to the Request
Id. Please note that with this example this is a
negative number.
Remember to return your Request Id
dCache limits the number of Request
Ids a user may have. All Request
Ids should be returned to dCache using the
command lcg-sd.
If you use lcg-gt to request a file with
a protocol that is not supported by dCache the command
will block for some time as dCache’s SRM interface times
out after approximately 10 minutes.
This command should be used to return any TURLs given by
dCache’s SRM interface. This is because dCache
provides a limited number of TURLs available concurrently.
lcg-sd takes four parameters: the SURL,
the Request Id, the File
Id with respect to the Request
Id, and the direction of data transfer.
The following example is to complete the get operation, the values are taken form the above example of lcg-gt.
[user] $lcg-sd srm://srm-door.example.org:22128/pnfs/example.org/data/dteam/group " -2147365977" " -2147365976" 0
Negative numbers
dCache returns negative numbers for Request
Id and File Id. Please note
that lcg-sd requires that these values
are places in double-quotes with a single space before the
- sign.
The Request Id is one of the values
returned by the lcg-gt command. In this
example, the value (-2147365977) comes
from the above example lcg-gt.
The File Id is also one of the values
returned returned by the lcg-gt command.
In this example, the value (-2147365976)
comes from the above example lcg-gt.
The direction parameter indicates in which direction data
was transferred: 0 for reading data and
1 for writing data.
Table of Contents
The following section describes how to enable checksum
calculation on write transfers with maximum security. Two
checksums will be computed on different points for each
transfer: on the fly during file arrival and once the file was
completely written to disk . Both checksums are compared with
each other and (if available) with another checksum sent by
the client. If, and only if, all of them match, the transfer
is considered to be successful and the checksum is stored in
pnfs.
To enable checksumming (independent from access protocol
type), make sure the following option appears in the
pool.batch-file:
define context startPools endDefine
create diskCacheV111.pools.MultiProtocolPool2 ${0} \
..
-calculate-transfer-crc \
..
"
Additionally, the checksum policy must be customized
accordingly. This is done by modifying the pool-setup-file
(found at
<poolPath>/pool/setup)
such that it contains the following line:
csm set policy -onwrite=on -ontransfer=on -enforcecrc=on
Now a restart of the pool should activate all changes. Please repeat the upper procedure on all write-pools you want to have checksum-enabled.
Warning
Please note that the following policy options should not be touched:
- getcrcfromhsm
this option is tailored to DESY’s HSM and won’t work anywhere else
- onread
reserved for future use, no checksum handling on read transfers for now.
- frequently
reserved for future use (recalculating checksums for files residing in the pool on a regular basis).
When setting up a pool from scratch, the default policy is to
calculate only the checksum on the file written to disk, but
not on the fly upon arrival. In case there is a client
checksum available (always true for dCap), they get compared
and must match. Otherwise, the checksum computed on the
written disk file will be stored in pnfs instead.
To reset the default behavior, set the following line in the pool-setup-file and restart the pool:
csm set policy -onwrite=on -enforcecrc=on
When writing data into the dCache, and possibly later on into an HSM, checksums may be calculated at different points within this chain.
- Client Checksum
The client calculates the checksum before or while the data is sent to the dCache. The checksum value, depending on when it has been calculated, may sent together with the open request to the door and stored into
pnfsbefore the data transfer begins or it may be sent with the close operation after the data has been transferred.The
dCapprotocol providing both methods, but thedCapclients use the latter by default.The
FTPprotocol does not provide a mechanism to send a checksum. Nevertheless, someFTPclients can (mis-)use the “site” command to send the checksum prior to the actual data transfer.- Transfer Checksum
While data is coming in, the server data mover may calculate the checksum on the fly.
- Server File Checksum
After all the file data has been received by the dCache server and the file has been fully written to disk, the server may calculate the checksum, based on the disk file.
The graph below sketches the different schemes for dCap and
FTP with and without client checksum calculation:
Table 22.1. Checksum calculation flow
| Step | FTP (w/o initial CRC) | FTP (with initial CRC) | dCap |
|---|---|---|---|
| 1 | Create Entry | ||
| 2 | Store Client CRC in pnfs | ||
| 3 | Server calculates transfer CRC | ||
| 4 | Get Client CRC from pnfs | Get Client CRC from mover | |
| 5 | Compare Client and Server CRC | ||
| 6 | Store transfer CRC in pnfs | Store client CRC in pnfs | |
| 7 | Server calculates disk file CRC | ||
As far as the server data mover is concerned, only the
Client Checksum and the
Transfer Checksum are of interrest. While
the client checksum is just delivered to the server mover as
part of the protocol (e.g. close operation for dCap), the
transfer checksum has to be calcalated by the server mover on
the fly. In order to communicate the different checksums to
the embedding pool, the server mover has to implement the
ChecksumMover interface in addition to
the MoverProtocol Interface. A mover, not
implementing the MoverProtocol is assumed
not to handle checksums at all. The Disk File
Checksum is calculated independedly of the mover
within the pool itself.
public interface ChecksumMover {
public void setDigest( Checksum transferChecksum ) ;
public Checksum getClientChecksum() ;
public Checksum getTransferChecksum() ;
}The pool will or will not call the setDigest method to advise the mover which checksum algorithm to use. If setDigest is not called, the mover is not assumed to calculate the Transfer Checksum.
java.security.MessageDigest transferDigest = transferChecksum.getMessageDigest() ;
***
while( ... ){
rc = read( buffer , 0 , buffer.length ) ;
***
transferDigest.update( buffer , 0 , rc ) ;
}getClientChecksum and getTransferChecksum are called by the pool after the MoverProtocols runIO method has been successfully processed. These routines should return null if the corresponding checksum could not be determined for whatever reason.
public void setDigest( Checksum transferChecksum ){
this.transferChecksum = transferChecksum ;
}
public Checksum getClientChecksum(){
return clientChecksumString == null ?
null :
Checksum( clientChecksumString ) ;
}
public Checksum getTransferChecksum(){ return transferChecksum ; }The DCapProtocol_3_nio mover implements the ChecksumMover interface and is able to report the Client Checksum and the Transfer Checksum to the pool. To enable the DCapProtocol_3_nio Mover to calculate the Transfer Checksum, either the cell context dCap3-calculate-transfer-crc or the cell batch line option calculate-transfer-crc must be set to true. The latter may as well be set in the *.poolist file. DCapProtocol_3_nio disables checksum calculation as soon as the mover receives a client command except ’write’ (e.g. read, seek or seek_and_write).
The checksum module (as part of the Pool) and its command subset (csm ...) determines the behavious of the checksum calculation.
csm set policy -ontransfer=onMovers, implementing the ChecksumMover interface, are requested to calculate the Transfer Checksum. Whether or not the mover actually performance the calculation might depend on additional, mover specific flags, like the dCap3-calculate-transfer-crc flag for the DCapProtocol_3_nio mover.
If the mover reports the Transfer Checksum and there is a Client Checksum available, either from
pnfsor from the mover protocol, the Transfer Checksum and the Client Checksum are compared. A mismatch will result in a CRC Exception .If there is no Client Checksum available whatsoever, the Transfer Checksum is stored in
pnfs.csm set policy -onwrite=onAfter the dataset has been completely and successfully written to disk, the pool calculates the checksum based on the disk file (Server File Checksum). The result is compared to either the Client Checksum or the Transfer Checksum and a CRC Exception is thrown in case of a mismatch.
If there is neither the Client Checksum nor the Transfer Checksum available, the Server File Checksum is stored in
pnfs.csm set policy -enforcecrc=onIn case of -onwrite=off, this options enforces the calculation of the Server File Checksum ONLY if neither the Client Checksum nor the Transfer Checksum has been sucessfully calculated. The result is stored in
pnfs.
The migration module is a component of dCache pools introduced in version 1.9.1. The purpose of the component is essentially to copy or move the content of a pool to one or more other pools. The migration module replaces the copy manager found in previous releases of dCache. We advice against using the old copy manager, as it known to have problems.
Typical use cases for the migration module include:
Vacating pools, that is, moving all files to other pools before decomisioning the pool.
Caching data on other pools, thus distributing the load and increasing availability.
As an alternative to the hopping manager.
The migration module runs inside pools and hosts a number of migration jobs. Each job operates on a set of files on the pool on which it is executed and can copy or move those files to other pools. The migration module provides filters for defining the set of files on which a job operates.
The act of copying or moving a single file is called a migration task. A task selects a target pool and asks it to perform a pool to pool transfer from the source pool. The actual transfer is performed by the same component performing other pool to pool transfers. The migration module does not perform the transfer; it only orchestrates it.
The state of the target copy (the target state) as well as the source copy (the source state) can be explicitly defined. For instance, for vacating a pool the target state is set to be the same as the original source state, and the source state is changed to removed; for caching files, the target state is set to cached, and the source state is unmodified.
Sticky flags owned by the pin manager are never touched by a migration job, however the migration module can ask the pin manager to move the pin to the target pool. Care has been taken that unless the pin is moved by the pin manager, the source file is not deleted by a migration job, even if asked to do so. To illustrate this, assume a source file marked precious and with two sticky flags, one owned by foobar and the other by the pin manager. If a migration job is configured to delete the source file, but not to move the pin, the result will be that the file is marked cached, and the sticky flag owned by foobar is removed. The pin remains. Once it expires, the file is eligible for garbage collection.
All operations are idempotent. This means that a migration job can be safely rerun, and as long as everything else is unchanged, files will not be transferred again. Because jobs are idempotent they do not need to maintain persistent state, which in turns means the migration module becomes simpler and more robust. Should a pool crash during a migration job, the job can be rerun and the remaining files will be transfered.
It is safe to run migration jobs while pools are in use. Once started, migration jobs run to completion and do only operate on those files that matched the selection filters at the time the migration job started. New files that arrive on the pool are not touched. Neither are files that change state after a migration job has been initialized, even though the selection filters would match the new state of the file. The exception to the rule is when files are deleted from the pool or change state so that they no longer match the selection filter. Such files will be excluded from the migration job, unless the file was already processed. Rerunning a migration job will force it to pick up any new files. Because the job is idempotent, any files copied before are not copied again.
Permanent migration jobs behave differently. Rather than running to completion, permanent jobs keep running until explicitly cancelled. They monitor the pool for any new files or state changes, and dynamically add or remove files from the transfer queue. Permanent jobs are made persistent when the save command is executed and will be recreated on pool restart. The main use case for permanent jobs is as an alternative to using a central hopping manager.
Idempotence is achieved by locating existing copies of a file on any of the target pools. If an existing copy is found, rather than creating a new copy, the state of the existing copy is updated to reflect the target state specified for the migration job. Care is taken to never make a file more volatile than it already is: Sticky flags are added, or existing sticky flags are extended, but never removed or shortened; cached files may be marked precious, but not vice versa. One caveat is when the target pool containing the existing copy is offline. In that case the existence of the copy cannot be verified. Rather than creating a new copy, the task fails and the file is put back into the transfer queue. This behaviour can be modified by marking a migration job as eager. Eager jobs create new copies if an existing copy cannot be immediately verified. As a rule of thumb, permanent jobs should never be marked eager. This is to avoid that a large number of unnecessary copies are created when several pools are restarted simultaneously.
A migration task aborts whenever it runs into a problem. The file will be reinserted at the end of the transfer queue. Consequently, once a migration job terminates, all files have been successfully transferred. If for some reason tasks for particular files keep failing, then the migration job will never terminate by itself as it retries indefinitely.
All commands begin with the string migration, e.g. migration copy. The commands migration copy, migration cache and migration move create new migration jobs. These commands take the same options and only differ in default values. Except for the number of concurrent tasks, transfer parameters of existing jobs cannot be changed. This is by design to ensure idempotency of jobs. The concurrency can be altered through the migration concurrency command.
Jobs are assinged a job ID and are executed in the background. The status of a job may be queried through the migration info command. A list of all jobs can be obtained through migration ls. Jobs stay in the list even after they have terminated. Terminated jobs can be cleared from the list through the migration clear command.
Jobs can be suspended, resumed and cancelled through the migration suspend, migration resume and migration cancel commands. Existing tasks are allowed to finish before a job is suspended or cancelled.
To vacate <sourcePool>, we first mark the pool read-only to avoid that more files are added to the pool, and then move all files to <targetPool>. It is not strictly necessary to mark the pool read-only, however if not done there is no guarantee that the pool is empty when the migration job terminates. The job can be rerun to move remaining files.
(<sourcePool>) admin >pool disable -rdonly(<sourcePool>) admin >migration move <targetPool>[1] RUNNING migration move <targetPool>(<sourcePool>) admin >migration info 1Command : migration move <targetPool> State : RUNNING Queued : 0 Attempts : 1 Targets : <targetPool> Completed : 0 files; 0 bytes; 0% Total : 830424 bytes Concurrency: 1 Running tasks: [0] 0001000000000000000BFAE0: TASK.Copying -> [<targetPool>@local](<sourcePool>) admin >migration info 1Command : migration move <targetPool> State : FINISHED Queued : 0 Attempts : 1 Targets : <targetPool> Completed : 1 files; 830424 bytes Total : 830424 bytes Concurrency: 1 Running tasks:(<sourcePool>) admin >rep ls(<sourcePool>) admin >
Say we want to cache all files belonging to the storage group atlas:default and accessed within the last month on a set of low-cost cache pools defined by pool group cache_pools. We can achieve this through the following command.
(<sourcePool>) admin >migration cache -target=pgroup -accessed=0..2592000 -storage=atlas:default cache_pools[1] INITIALIZING migration cache -target=pgroup -accessed=0..2592000 -storage=atlas:default cache_pools(<sourcePool>) admin >migration info 1Command : migration cache -target=pgroup -accessed=0..2592000 -storage=atlas:default cache_pools State : RUNNING Queued : 2577 Attempts : 2 Targets : pool group cache_pools, 5 pools Completed : 1 files; 830424 bytes; 0% Total : 2143621320 bytes Concurrency: 1 Running tasks: [72] 00010000000000000000BE10: TASK.Copying -> [pool_2@local]
The files on the source pool will not be altered. Any file copied to one of the target pools will be marked cached.
A pool may be renamed with the following procedure, regardless of the type of files stored on it.
Disable file transfers from and to the pool with
(<poolname>) admin >pool disable-strict
Then make sure, no transfers are being processed anymore. All the following commands should give no output:
(<poolname>) admin >queue ls queue(<poolname>) admin >mover ls(<poolname>) admin >p2p ls(<poolname>) admin >pp ls(<poolname>) admin >st jobs ls(<poolname>) admin >rh jobs ls
Now the files on the pools have to be unregistered on the namespace server with
(<poolname>) admin >pnfs unregister
Note
Do not get confused that the commands pnfs unregister and pnfs register containpnfs in their names. They also
apply to dCache instances with Chimera and are named like
that for legacy reasons.
Even if the pool contains precious files, this is no problem, since we will register them again in a moment. The files might not be available for a short moment, though. Log out of the pool, and stop the domain running the pool:
[root] #dcache stop <poolDomain>Stopping <poolDomain> (pid=6070) 0 1 2 3 done[root] #
Adapt the name of the pool in the layout files of your dCache installation to include your new pool-name. For a general overview of layout-files see the section called “Defining domains and services”.
Example:
For example, to rename a pool from
swimmingPool to carPool, change
your layout file from
[<poolDomain>] [<poolDomain>/pool] name=swimmingPool path=/pool/
to
[<poolDomain>] [<poolDomain>/pool] name=carPool path=/pool/
Warning
Be careful about renaming pools in the layout after users have already been writing to them. This can cause inconsistencies in other components of dCache, if they are relying on pool names to provide their functionality. An example of such a component is the Chimera cache info.
Start the domain running the pool:
[root] #dcache start <poolDomain>Starting poolDomain done[root] #
Register the files on the pool with
(<poolname>) admin >pnfs register
You may pin a file locally within the private pool repository:
(<poolname>) admin >rep set sticky <pnfsid>on|off
the ’sticky’ mode will stay with the file as long as the file is in the pool. If the file is removed from the pool and recreated afterwards this information gets lost.
You may use the same mechanism globally: in the command line interface (local mode) there is the command
(<poolname>) admin >set sticky <pnfsid>
This command does:
Flags the file as sticky in the name space database (pnfs). So from now the filename is globally set sticky.
Will go to all pools where it finds the file and will flag it sticky in the pools.
All new copies of the file will become sticky.
Table of Contents
PostgreSQL is used for various things in a dCache system: The
SRM, the pin manager, the space manager, the
replica
manager, the pnfs companion, the
billing, and the
pnfs server might make use of one or more databases in a single
or several separate PostgreSQL servers.
The SRM, the pin manager, the space manager, the replica
manager, and the pnfs companion will use the PostgreSQL database as
configured at cell start-up in the corresponding batch files. The
billing will only write the accounting information into a
database if it is configured with the option
-useSQL. The pnfs server will use a PostgreSQL
server if the pnfs-posgresql version is
used. It will use several databases in the PostgreSQL server.
The preferred way to set up a PostgreSQL server should be the installation of the version provided by your OS distribution; however, version 8.3 or later is required.
Install the PostgreSQL server, client and JDBC support with the tools of the operating system.
Initialize the database directory (for PostgreSQL version 9.2 this
is /var/lib/pgsql/9.2/data/) , start the
database server, and make sure that it is started at system
start-up.
[root] #service postgresql-9.2 initdbInitializing database: [ OK ][root] #service postgresql-9.2 startStarting postgresql-9.2 service: [ OK ][root] #chkconfig postgresql-9.2 on
In the installation guide instructions are given for configuring one
PostgreSQL server on the admin node for all the above described purposes
with generous access rights. This is done to make the installation as easy as
possible. The access rights are configured in the file
<database_directory_name>/data/pg_hba.conf.
According to the installation guide the end of the file should look like
... # TYPE DATABASE USER IP-ADDRESS IP-MASK METHOD local all all trust host all all 127.0.0.1/32 trust host all all ::1/128 trust host all all <HostIP>/32 trust
This gives access to all databases in the PostgreSQL server to all users on the admin host.
The databases can be secured by restricting access with this file. E.g.
... # TYPE DATABASE USER IP-ADDRESS METHOD local all postgres ident sameuser local all pnfsserver password local all all md5 host all all 127.0.0.1/32 md5 host all all ::1/128 md5 host all all <HostIP>/32 md5
To make the server aware of this you need to reload the
configuration file as the user postgres by:
[root] #su - postgres[postgres] #pg_ctl reload
And the password for e.g. the user pnfsserver can be
set with
[postgres] #psql template1 -c "ALTER USER pnfsserver WITH PASSWORD '<yourPassword>'"
The pnfs server is made aware of this password by changing the variable
dbConnectString in the file
/usr/etc/pnfsSetup:
... export dbConnectString="user=pnfsserver password=<yourPassword>"
User access should be prohibited to this file with
[root] #chmod go-rwx /usr/etc/pnfsSetup
On small systems it should never be a problem to use one single
PostgreSQL server for all the functions listed above. In the
standard installation, the ReplicaManager, the pnfs
companion are not activated by default. The billing will
only write to a file by default.
Whenever the PostgreSQL server is going to be used for another
functionality, the impact on performance should be checked
carefully. To improve the performance, the functionality should
be installed on a separate host. Generally, a PostgreSQL server
for a specific funcionality should be on the same host as the
dCache cell accessing that PostgreSQL server, and the
PostgreSQL server containing the databases for the pnfs server
should run on the same host as the pnfs server and the
PnfsManager cell of the dCache system accessing
it. Accordingly, the pnfs companion and the pnfs server
itself will use the same PostgreSQL server.
It is especially useful to use a separate PostgreSQL server for the
billing cell.
Note
The following is work-in-progress.
Create PostgreSQL user with the name you will be using to run pnfs server.
Make sure it has CREATEDB privilege.
[user] $psql -U postgres template1 -c "CREATE USER johndoe with CREATEDB"[user] $dropuser pnfsserver[user] $createuser --no-adduser --createdb --pwprompt pnfsserver
Table 23.1. Protocol Overview
| Component | Database Host | Database Name | Database User | Database Password |
|---|---|---|---|---|
| SRM | srmDatabaseHostor if not set: srmDbHost or if not set: localhost | dcache | srmdcache | srmdcache |
| pin manag | pinManagerDatabaseHost or if not set: srmDbHost or if not set: localhost | dcache | srmdcache | srmdcache |
SpaceManager | spaceManagerDatabaseHost or if not set: srmDbHost or if not set: localhost | dcache | srmdcache | srmdcache |
| companion | companionDatabaseHost or if not set: localhost | companion | srmdcache | srmdcache |
ReplicaManager | replicaManagerDatabaseHost or if not set: localhost | replicas | srmdcache | srmdcache |
pnfs server | localhost | admin, data1, exp0, ... | pnfsserver | --free-- |
| billing | billingDatabaseHost or if not set: localhost | billing | srmdcache | srmdcache |
Table of Contents
This chapter contains solutions for several non-trivial network configurations. The first section discusses the interoperation of dCache with firewalls and does not require any background knowledge about dCache other than what is given in the installation guide (Chapter 2, Installing dCache) and the first steps tutorial (Chapter 3, Getting in Touch with dCache). The following sections will deal with more complex network topologies, e.g. private subnets. Even though not every case is covered, these cases might help solve other problems, as well. Intermediate knowledge about dCache is required. Since most tasks require changes in the start-up configuration, the background information on how to configure the cell start-up, given in Chapter 5, The Cell Package will be useful.
The components of a dCache instance may be distributed over several hosts (nodes). Some of these components are accessed from outside and consequently the firewall needs to be aware of that. This section assumes that all nodes are behind a firewall and have full access to each other. More complex setups are described in the following sections. Depending on the access method, certain ports have to be opened to only some of the nodes. We will describe the behaviour of a standard installation using the default values. Since dCache is very flexible, most port numbers may be changed in the configuration. The location (node) of any dCache component might also be changed from this standard.
The dCap protocol should be used for local, trusted access
only, because it is not authenticated. The traditional method
is to mount pnfs locally on the client and use paths to the
files on this local mount to address files. For this, the
client has to be able to mount the NFS export of the pnfs
server. It is also possible to use the dCap protocol with a
URL instead of a local path within a pnfs mount. The URL
has the form
dcap://<dCapDoorHostFQN>:<dCapDoorPort>/<fullPnfsPath>
If the <dCapDoorPort> is not
specified, 22125 is used to establish a TCP connection to
<dCapDoorHostFQN> (see next
paragraph). In this case no NFS mount is needed
anymore. However, the access is unauthenticated and therefore
access is only granted if the “other” part of the
UNIX rights are set accordingly. In other words: The user is
mapped to nobody for unauthenticated dCap access.
In both cases (pnfs mount and URL access) the dCap
client (dCap library or dccp command)
will connect to the dCap door
(doorDomain) on the admin node with TCP
port 22125 (can be changed in
config/dCacheSetup with dCapPort). After the pool
manager selected a pool to be used for the transfer (the section called “The Pool Selection Mechanism” describes how to configure that
selection mechanism.) this pool will establish the data
connection to the client on a TCP port which has been selected
by the client. The port range to use may be specified on the
client side (e.g. by the -p option of the
dccp command.)
The GSIdCap protocol is the dCap protocol with a GSI
authentication wrapper (tunnel). The mechanism is the same as
described for the URL-stype dCap protocol in the previous
section. The only difference is the default port number: For
the GSIdCap door the default port number is 22128. It is
specified in config/dCacheSetup with the
parameter dCapGsiPort.
Another difference between the dCap door and GSIdCap
doors is that the dCap door is started on the admin node
and there can only be one in the standard configuration, while
there may be several GSIdCap doors on separate
nodes. Correspondingly, ports have to be opened in a
firewall. Note that it should not be necessary to run as many
GSIdCap doors as GridFTP doors (see below), because no
data is transfered through the GSIdCap door.
A GridFTP client connects to one of the GridFTP doors on
TCP port 2811. The data connections are established
independent of the direction of the data transfer. In
“active” FTP mode the server connects to the
client while in “passive” FTP mode the client
connects to the server.
In “active” FTP mode the pool selected by the
pool manager (see the section called “The Pool Selection Mechanism”) will open one
or more data connections to the client on a TCP port in the
range between 20000 and 25000. In “passive” FTP
mode, the client will establish the data connections to the
GridFTP door in the same port range. The pool will connect
to the door and the door will route the data traffic. It is
not possible to establish a direct connection between pool and
client in “passive” mode, because the FTP
protocol redirection mechanism has to be triggered before the
client sends the name of the requested file.
An SRM is a webservice which uses the https as transport
protocol and negotiates data transfers between the client and
the server as well as between the server and another
server. For the actual data transfer one of the other
protocols is negotiated. Usually this is GridFTP -
especially for wide-area transfers. There are two things to
note about SRM-initiated GridFTP transfers:
For reading data, only “active” FTP mode will be used, i.e. the pool containing the data will connect to the client or to the server which should receive the data. For writing, only “passive” FTP mode will be used, i.e. the client or the pool containing the data will connect to the client or to the server which should receive the data.
Apart from SRM put and get operations which always copy
data between one SRM and the client there is also a true
SRM copy from one SRM to another SRM. There are two
modes for SRM copy: “pull” and
“push” mode. If the destination SRM is
dCache based and SRM pull mode (default) is used, the
destination pool will play the role of the GridFTP client,
will contact the GridFTP door of the source instance and
receive the data directly from the source pool (if the source
system is a dCache system). If push mode is used and the
source is a dCache based SRM, the source pool will be
the GridFTP client and will send the data to the GridFTP
door of the destination. All this might have to be considered
when designing the system and configuring the firewall.
Restricting wide-area transfers to a subset of your dCache pools may be done with the pool selection unit in the pool manager. the section called “The Pool Selection Mechanism” contains a describtion on how to do that. This can be useful to ease firewall configurations, optimize throughput, and improve security.
The following table gives an overview about the default ports
used by the client protocols supported by dCache. Note that
all of them may be changed in
config/dCacheSetup.
Table 24.1. Protocol Overview
| Protocol | Port(s) | Direction | Nodes |
|---|---|---|---|
dCap | 22125 | incoming | doorDomain (admin node) |
| any | outgoing | pools | |
GSIdCap | 22128 | incoming | gsidcapDomain (where GSIDCAP=yes in node_config) |
| any | outgoing | pools | |
GridFTP | 2811 | incoming | gridftpDomain (where GRIDFTP=yes in node_config) |
| 20000-25000 | outgoing (active FTP) | pools | |
| 20000-25000 | incoming (passive FTP) | gridftpDomain | |
SRM | 8443 | incoming | srmDomain |
The host on which the GridFTP door is running has several
network interfaces and is supposed to accept client
connections via all those interfaces. The interfaces might
even belong to separate networks with no routing from one
network to the other.
As long as the data connection is opened by the GridFTP
server (active FTP mode), there is no problem with having more
than one interface. However, when the client opens the data
connection (passive FTP mode), the door (FTP server) has to
supply it with the correct interface it should connect to. If
this is the wrong interface, the client might not be able to
connect to it, because there is no route or the connection
might be inefficient.
Also, since a GridFTP server has to authenticate with an SSL
grid certificate and key, there needs to be a separate
certificate and key pair for each name of the host. Since each
network interface might have a different name, several
certificates and keys are needed and the correct one has to be
used, when authenticating via each of the interfaces.
Start a separate GridFTP server cell on the host for each
interface on which connections should be
accepted.
The cells may be started in one domain or in separate
domains. The cells have to have different names, since they
are well
known cells. Each cell has to be configured, only
to listen on the interface it should serve with the
-listen option. The locations of the grid
host certificate and key files for the interface have to be
specified explicitly with the -service-cert
and -service-key options.
The following example shows a setup for two network interfaces
with the hostnames door-a.grid.domain
(111.111.111.5) and door-b.other.domain
(222.222.222.5) which are served by two GridFTP door cells
in one domain:
Example 24.1. Batch file for two GridFTP doors serving separate network interfaces
set printout default 2
set printout CellGlue none
onerror shutdown
check -strong setupFile
copy file:${setupFile} context:setupContext
import context -c setupContext
check -strong serviceLocatorPort serviceLocatorHost
check -strong sshPort ftpPort
create dmg.cells.services.RoutingManager RoutingMgr
create dmg.cells.services.LocationManager lm \
"${serviceLocatorHost} ${serviceLocatorPort}"
create dmg.cells.services.login.LoginManager GFTP-door-a \
"2811 \
-listen=111.111.111.5 \
-export \
diskCacheV111.doors.GsiFtpDoorV1 \
-prot=raw \
-service-cert=/etc/grid-security/door-a.grid.domain-cert.pem \
-service-key=/etc/grid-security/door-a.grid.domain-key.pem \
..
..
"
create dmg.cells.services.login.LoginManager GFTP-door-b \
"2811 \
-listen=222.222.222.5 \
-export \
diskCacheV111.doors.GsiFtpDoorV1 \
-prot=raw \
-service-cert=/etc/grid-security/door-b.other.domain-cert.pem \
-service-key=/etc/grid-security/door-b.other.domain-key.pem \
..
..
"
This batch file is very similar to the batch file for the
GridFTP door in the standard setup. (Comments have been left
out.) It only contains an additional create command for the
second cell and the emphasized changes within the two create
commands: The cell names, the -listen
option with the IP address of the corresponding interface
and the -service-cert and
-service-key options with the host
certificate and key files.
If pool nodes of a dCache instance are connected to a
secondary
interface of the GridFTP door, e.g. because they
are in a private subnet, the GridFTP door will still tell
the pool to connect to its primary interface, which might be
unreachable.
The reason for this is that the control communication
between the door and the pool is done via the network of TCP
connections which have been established at start-up. In the
standard setup this communication is routed via the dCache
domain. However, for the data transfer, the pool connects to
the GridFTP door. The IP address it connects to is sent by
the GridFTP door to the pool via the control
connection. Since the GridFTP door cannot find out which of
its interfaces the pool should use, it normally sends the IP
address of the primary
interface.
Tell the GridFTP door explicitly which IP it should send to
the pool for the data connection with the
-ftp-adapter-internal-interface
option. E.g. if the pools should connect to the secondary
interface of the GridFTP door host which has the IP address
10.0.1.1, the following batch file would
be appropriate:
Example 24.2. Batch file for two GridFTP doors serving separate network interfaces
set printout default 2
set printout CellGlue none
onerror shutdown
check -strong setupFile
copy file:${setupFile} context:setupContext
import context -c setupContext
check -strong serviceLocatorPort serviceLocatorHost
check -strong sshPort ftpPort
create dmg.cells.services.RoutingManager RoutingMgr
create dmg.cells.services.LocationManager lm \
"${serviceLocatorHost} ${serviceLocatorPort}"
create dmg.cells.services.login.LoginManager GFTP \
"2811 \
-export \
diskCacheV111.doors.GsiFtpDoorV1 \
-prot=raw \
-clientDataPortRange=${clientDataPortRange} \
-root=${ftpBase} \
-kpwd-file=${kpwdFile} \
-tlog=/tmp/dcache-ftp-tlog \
-maxLogin=100 \
-brokerUpdateTime=5 \
-protocolFamily=gsiftp \
-loginBroker=LoginBroker \
-poolManagerTimeout=5400 \
-pnfsTimeout=120 \
-maxRetries=80 \
-maxStreamsPerClient=10 \
-ftp-adapter-internal-interface=10.0.1.1 \
"
This batch file is very similar to the batch file for the
GridFTP door in the standard setup. (Comments have been left
out.) The emphasized last line has the desired effect.
Some doors - e.g. for grid access - are located in the DMZ
while the rest of the dCache instance is in the
intranet. The firewall is configured in such a way that the
doors cannot reach the location manager (usually on the
admin node together with the pool manager) via port 11111
(or as configured in the variable
serviceLocatorPort in
config/lmSetup).
Please contact <support@dcache.org> if you need
a solution for this problem.
Table of Contents
dCap is the native random access I/O protocol for files within
dCache. In additition to the usual data transfer mechanisms,
it supports all necessary file metadata and name space
manipulation operations.
In order to optimize I/O transferrates and memory consumption
dCap allows to configure parameters within the client and the
server. e.g:
TCP Socket send and receive buffer sizes.
I/O buffers sizes.
There are two parameters per I/O direction, determining the
actual TCP send/recv buffer size used for each transfer. Those
values can be set within the
config/pool.batch file on the pool nodes.
defaultSend/RecvBufferSize: this value is used if the dCap client doesn’t try to set this value. The default value for this parameter is 256K Bytes.maxSend/RecvBufferSize: this value is the maximum value, the mover is allowed to use. It’s used if either thedefaultSend/RecvBufferSizeis larger or the client asks for a larger value. The default value for this parameter is 1MBytes.
On the server side, the max/defaultSend/RecvBuffer value can
either be set in the config/pool.batch
file or in the config/*.poollist files.
Using the batch context :
set context dCap3-maxSendBufferSizevalue in bytesset context dCap3-maxRecvBufferSizevalue in bytesset context dCap3-defaultSendBufferSizevalue in bytesset context dCap3-defaultRecvBufferSizevalue in bytes
Or it may specified in the create ... command line
create diskCacheV111.pools.MultiProtocolPool2 ${0} \
"!MoverMap \
${1} \
-defaultSendBufferSize=value in bytes \
*** \
-${2} -${3} -${4} -${5} -${6} -${7} -${8} \
"
The most appropriate way to specify those values on the server
side is certainly to add the corresponding entry in the
config/...poollist. The entry would look
like
dcache30_1 /dcache/pool sticky=allowed maxSendBufferSize=value in bytes tag.hostname=dcache30 ***Please note the different ways of using the ’=’ and the ’-’ sign in the different alternatives.
For a full list of dCap library API calls and dccp options,
please refer to to
http://www.dcache.org/manuals/libdcap.shtml
and
http://www.dcache.org/manuals/dccp.shtml
respectively. To set the local and remote TCP buffer send and
receive buffers either use the API call
dc_setTCPSend/ReceiveBuffer(int size) or
the -r SIZE -s SIZE dccp options. In both
cases the value is transferred to the remote mover which tries
to set the corresponding values. Please not the the server
protects itself by having a maximum size for those values
which it doesn’t exceed. Please check the section ’TCP
send/recv buffer sizes from the servers point of view’ to
learn how to change those values.
In cases where dccp/dcap requests a file which is still on
tertiary storage, the user resp. the administrator might what to
limit the time, dccp/dCap waits in the open call until the file
has been fetched from backend storage. This, so called
openTimeout, can be specified on the server
or on the client. In all cases the -keepAlive
must be specified with an appropriate number of seconds on the
cell create command in the door batch files. The following
mechanisms are available to specify open timeouts :
Table 25.1. Open Timeout mechanisms
| Precedence | Mechanism | Key Name | Example |
|---|---|---|---|
| Lowest | context | dCap-openTimeout | set context dCap-openTimeout 200 |
| ... | context | openTimeout | set context openTimeout 200 |
| ... | cell create command line | openTimeout | -openTimeout=200 |
| Highest | dccp command line | -o | dccp -o200 SOURCE DESTINATION |
#
# dCap D o o r (create command line example)
#
create dmg.cells.services.login.LoginManager DCap-2 \
"${specialDCapPort} \
diskCacheV111.doors.DCapDoor \
-export \
*** \
-keepAlive=60 \
-openTimeout=300 \
*** \
-loginBroker=LoginBroker"#
# dCap D o o r (context example)
#
set context dCap-openTimeout 200
#
create dmg.cells.services.login.LoginManager DCap-2 \
"${specialDCapPort} \
diskCacheV111.doors.DCapDoor \
-export \
*** \
-keepAlive=60 \
*** \
-loginBroker=LoginBroker"[user] $dccp -o200 /pnfs/desy.de/data/dteam/private/myfile /dev/null
If the openTimeout expires while a read transfer is already active, this transfer will be interrupted, but it will automatically resume because the client can’t destinguish between a network failure and a timeout. So the timeout disturbes the read but it will finally succeed. This is different for write. If a write is interrupted by a timeout in the middle of a transfer, dccp will stuck. (This is not a feature and needs further investigation).
The dCap protocol allows to check whether a dataset is on
tape only or has a copy on a dCache disk. The dCap library
API call is int dc_check(const char *path, const char
*location) and the dccp options are -t -1
-P. For a full list of dCap library API calls and
dccp options, please refer to to
http://www.dcache.org/manuals/libdcap.shtml
and http://www.dcache.org/manuals/dccp.shtml
respectively. Using a standard dCache installation those
calls will return a guess on the file location only. It is
neither checked whether the file is really on that pool or if
the pool is up. To get a strict checking a dCap door
#
# dCap D o o r
#
create dmg.cells.services.login.LoginManager DCap-strict \
"${specialDCapPort} \
diskCacheV111.doors.DCapDoor \
-check=strict \
-export \
-prot=telnet -localOk \
-maxLogin=1500 \
-brokerUpdateTime=120 \
-protocolFamily=dcap \
-loginBroker=LoginBroker"
This door will do a precise checking (-check=strict). To get the
dCap lib and dccp to use this door only, the
DCACHE_DOOR environment variable has to be
set to doorHost:specialDCapPort in the shell,
dccp is going to be used. In the following example we assume
that the specialDCapPort has been set to
23126 :
[user] $export DCACHE_DOOR=dcachedoorhost:23126[user] $dccp -P -t -1 /pnfs/domain.tv/data/cms/users/waste.txt
If dccp returns File is not cached and
this dCache instance is connected to an HSM, the file is no
longer on one of the dCache pools but is assumed to have a
copy within the HSM. If the dccp returns this message
and no HSM is attached, the file is either on a pool which is
currently down or the file is lost.
The dCap protocol, similiar to FTP, uses a control channel
to request a transfer which is subsequently done through data
channels. Per default, the data channel is initiated by the
server, connecting to an open port in the client library. This
is commonly known as active transfer. Starting with dCache
1.7.0 the dCap protocol supports passive transfer mode as
well, which consequently means that the client connects to the
server pool to initiate the data channel. This is essential to
support dCap clients running behind firewalls and within
private networks.
The port(s), the server pools should listens on, can be
specified by the
org.dcache.net.tcp.portrange variable, as
part of the ’java_options’ directive in the
config/dCacheSetup configuration file. A
range has to be given if pools are split amoung multiple
JVMs. E.g:
java_options="-server ... -Dorg.dcache.dcap.port=0 -Dorg.dcache.net.tcp.portrange=33115:33145"
Note
The commonly used expression ’passive’ is seen from the server perspective and actually means ’server passive’. From the client perspective this is of course ’active’. Both means that the client connects to the server to establish the data connection. This mode is supported by the server starting with 1.7.0 and dccp with 1-2-40 (included in 1.7.0)
The following dCap API call switches all subsequent dc_open
calls to server-passive mode if this mode is supported by the
corresponding door. (dCache Version >= 1.7.0).
void dc_setClientActive()
The environment variable DCACHE_CLIENT_ACTIVE
switches the dCap library to server-passive. This is true
for dCap, dCap preload and dccp.
dccp switches to server-passive when issuing the -A command line option.
This describes firewall issues from the clients perspective. the section called “Firewall Configuration” discusses the server side.
When files are transferred in GridFTP active mode from
GridFTP server to the GridFTP client, server establishes
data channel(s) by connecting to the client. In this case client
creates a TCP socket, bound to some particular address on the
client host, and sends the client host IP and port to the
server. If the client host is running a firewall, firewall might
refuse server’s connection to the client’s listening socket.
Common solution to this problem is establishing a range of ports
on the client’s host that are allowed to be connected from
Internet by changing firewall rules.Once the port range is
defined the client can be directed to use one of the ports from
the port ranges when creating listening tcp sockets.
If you are using srmcp as a client you need to do the following:
create a directory
$HOME/.globusif it does not exist.create and/or edit a file
$HOME/.globus/cog.propertiesby appending a new line readingtcp.port.range=<min>,<max>
where <min> and <max> are the lower and upper bounds of the port range.
With the latest srmcp release you can use the
globus_tcp_port_range option:
[user] $srmcp -globus_tcp_port_range=<minValue>:<maxValue> ...
A range of ports open for TCP connections is specified as a
pair of positive integers separated by ":". This is not set by
default.
If you are transferring files from gridftp server using
globus-url-copy, you need to define an environment
variable GLOBUS_TCP_PORT_RANGE, in the same
shell in which globus-url-copy will be executed.
In sh/bash you do that by invoking the following command:
[user] $export GLOBUS_TCP_PORT_RANGE="<min>,<max>"
in csh/tcsh you invoke:
[user] $setenv GLOBUS_TCP_PORT_RANGE "<min>,<max>"
here <min> and <max> are again the lower and upper bounds of the port range
In some cases SRM transfers fail because they are tried via
the plain dCap protocol (URL starts with
dcap://). Since plain dCap is
unauthenticated, the dCache server will have no information
about the user trying to access the system. While the transfer
will succeed if the UNIX file permissions allow access to
anybody (e.g. mode 777), it will fail otherwise.
Usually all doors are registered in SRM as potential access
points for dCache. During a protocol negotiation the SRM
chooses one of the available doors. You can force srmcp
to use the GSIdCap protocol
(-protocol=gsidcap) or you can unregister
plain, unauthenticated dCap from known protocols: From the
file config/door.batch remove
-loginBroker=LoginBroker and restart
dCap door
[root] #jobs/door stop[root] #jobs/door -logfile=<dCacheLocation>/log/door.log start
Table of Contents
The use cases described in this chapter are only relevant for large-scale dCache instances which require special tuning according to a longer experience with client behaviour.
Client requests to a dCache system may have rather diverse behaviour. Sometimes it is possible to classify them into several typical usage patterns. An example are the following two concurrent usage patterns:
Example:
Data is copied with a high transfer rate to the dCache
system from an external source. This is done via the
GridFTP protocol. At the same time batch jobs on a local
farm process data. Since they only need a small part of each
file, they use the dCap protocol via the dCap library
and seek to the position in the file they are interested in,
read a few bytes, do a few hours of calculations, and
finally read some more data.
As long as the number of active requests does not exceed the
maximum number of allowed active requests, the two types of
requests are processed concurrently. The GridFTP transfers
complete at a high rate while the processing jobs take hours
to finish. This maximum number of allowed requests is set with
mover set max active and
should be tuned according to capabilities of the pool host.
However, if requests are queued, the slow processing jobs
might clog up the queue and not let the fast GridFTP request
through, even though the pool just sits there waiting for the
processing jobs to request more data. While this could be
temporarily remedied by setting the maximum active requests to
a higher value, then in turn GridFTP request would put a
very high load on the pool host.
The above example is pretty realistic: As a rule of thumb,
GridFTP requests are fastest, dCap requests with the
dccp program are a little slower and dCap requests
with the dCap library are very slow. However, the usage
patterns might be different at other sites and also might
change over time.
Use separate queues for the movers, depending on the door initiating them. This easily allows for a separation of requests of separate protocols. (Transfers from and to a tape backend and pool-to-pool transfers are handled by separate queues, one for each of these transfers.)
A finer grained queue selection mechanism based on, e.g. the
IP address of the client or the file which has been
requested, is not possible with this mechanism. However, the
pool selection unit
(PSU) may provide a separation onto separate pools
using those criteria.
In the above example, two separate queues for fast GridFTP
transfers and slow dCap library access would solve the
problem. The maximum number of active movers for the GridFTP
queue should be set to a lower value compared to the dCap
queue since the fast GridFTP transfers will put a high load
on the system while the dCap requests will be mostly idle.
For a multi mover queue setup, the pools have to be told to
start several queues and the doors have to be configured to
use one of these. It makes sense to create the same queues on
all pools. This is done by the following change to the file
/etc/dcache/dcache.conf:
poolIoQueue=queueA,queueB
Each door may be configured to use a particular mover queue. The pool, selected for this request, does not depend on the selected mover queue. So a request may go to a pool which does not have the particular mover queue configured and will consequently end up in the default mover queue of that pool.
gsiftpIoQueue=queueA dcapIoQueue=queueB
All requests send from this kind of door will ask to be scheduled to the given mover queue. The selection of the pool is not affected.
The doors are configured to use a particular mover queue as in the following example:
Example:
Create the queues queueA and
queueB, where queueA
shall be the queue for the GridFTP transfers and
queueB for dCap.
poolIoQueue=queueA,queueB gsiftpIoQueue=queueA dcapIoQueue=queueB
If the pools should not all have the same queues you can define queues for pools in the layout file. Here you might as well define that a specific door is using a specific queue.
Example:
In this example queueCis defined for
pool1 and queueD is
defined for pool2. The GridFTP door
running in the domain myDoors is using the
queue queueB.
[myPools] [myPools/pool1] poolIoQueue=queueC [myPools/pool2] poolIoQueue=queueD [myDoors] [myDoors/dcap] dcapIoQueue=queueC [myDoors/gridftp] gsiftpIoQueue=queueD
There is always a default queue called
regular. Transfers not requesting a
particular mover queue or requesting a mover queue not
existing on the selected pool, are handled by the
regular queue.
The pool cell commands mover ls and
mover set max active have a
-queue option to select the mover queue to
operate on. Without this option, mover set max active will act on the default
queue while mover ls will list all
active and waiting client transfer requests.
For the dCap protocol, it is possible to allow the client to
choose another queue name than the one defined in the file
dcache.conf. To achieve this
the property dcapIoQueueOverwrite needs to
be set to allowed.
Example:
Create the queues queueA and
queue_dccp, where queueA
shall be the queue for dCap.
poolIoQueue=queueA,queue_dccp dcapIoQueue=queueA dcapIoQueueOverwrite=allowed
With the dccp command the queue can now be specified as follows:
[user] $dccp -X-io-queue=queue_dccp <source> <destination>
Since dccp requests may be quite different from other
requests with the dCap protocol, this feature may be used to
use separate queues for dccp requests and other dCap
library requests. Therefore, the dccp command may be
changed in future releases to request a special
dccp-queue by default.
| Property | Default Value | Description |
|---|---|---|
| poolIoQueue | Not set | I/O queue name |
| dcapIoQueue | Not set | Insecure dCap I/O queue name |
| gsidcapIoQueue | Not set | GSIdCap I/O queue name |
| dcapIoQueueOverwrite | denied | Controls whether an application is allowed to overwrite a queue name |
| gsidcapIoQueueOverwrite | denied | Controls whether an application is allowed to overwrite a queue name |
| kerberosdcapIoQueueOverwrite | denied | Controls whether an application is allowed to overwrite a queue name |
| gsiftpIoQueue | Not set | GSI-FTP I/O queue name |
| nfsIoQueue | Not set | NFS I/O queue name |
| remoteGsiftpIoQueue | Not set | queue used for SRM third-party transfers (i.e. the srmCopy command) |
| webdavIoQueue | Not set | WebDAV and HTTP I/O queue name |
| xrootdIoQueue | Not set | xrootd I/O queue name |
Table 26.1. Property Overview
| Property | Default Value | Description |
|---|---|---|
| gsidcapIoQueue | Not set | GSIdCap I/O queue name |
| dcapIoQueue | Not set | Insecure dCap I/O queue name |
| gsidcapIoQueueOverwrite | denied | Is application allowed to overwrite queue name? |
| dcapIoQueueOverwrite | denied | Is application allowed to overwrite queue name? |
Table 26.2. Property Overview
| Property | Default Value | Description |
|---|---|---|
| gsiFtpPortNumber | 2811 | GSI-FTP port listen port |
| spaceReservation | False | Use the space reservation service |
| spaceReservationStrict | False | Use the space reservation service |
| performanceMarkerPeriod | 180 | Performance markers in seconds |
| gplazmaPolicy | ${ourHomeDir}/etc/dcachesrm-gplazma.policy | Location of the gPlazma Policy File |
| useGPlazmaAuthorizationModule | False | Use the gPlazma module |
| useGPlazmaAuthorizationCell | True | Use the gPlazma cell |
| gsiftpPoolManagerTimeout | 5400 | Pool Manager timeout in seconds |
| gsiftpPoolTimeout | 600 | Pool timeout in seconds |
| gsiftpPnfsTimeout | 300 | Pnfs timeout in seconds |
| gsiftpMaxRetries | 80 | Number of PUT/GET retries |
| gsiftpMaxStreamsPerClient | 10 | Number of parallel streams per FTP PUT/GET |
| gsiftpDeleteOnConnectionClosed | True | Delete file on connection closed |
| gsiftpMaxLogin | 100 | Maximum number of concurrently logged in users |
| gsiftpAdapterInternalInterface | Not set | In case of two interfaces |
| clientDataPortRange | 20000:25000 | The client data port range |
| kpwdFile | ${ourHomeDir}/etc/dcache.kpwd | Legacy authorization |
Table 26.3. Property Overview
| Property | Default Value | Description |
|---|---|---|
| srmPort | 8443 | srmPort |
| srmDatabaseHost | localhost | srmDatabaseHost |
| srmTimeout | 3600 | srmTimeout |
| srmVacuum | True | srmVacuum |
| srmVacuumPeriod | 21600 | srmVacuumPeriod |
| srmProxiesDirectory | /tmp | srmProxiesDirectory |
| srmBufferSize | 1048576 | srmBufferSize |
| srmTcpBufferSize | 1048576 | srmTcpBufferSize |
| srmDebug | True | srmDebug |
| srmGetReqThreadQueueSize | 1000 | srmGetReqThreadQueueSize |
| srmGetReqThreadPoolSize | 100 | srmGetReqThreadPoolSize |
| srmGetReqMaxWaitingRequests | 1000 | srmGetReqMaxWaitingRequests |
| srmGetReqReadyQueueSize | 1000 | srmGetReqReadyQueueSize |
| srmGetReqMaxReadyRequests | 100 | srmGetReqMaxReadyRequests |
| srmGetReqMaxNumberOfRetries | 10 | srmGetReqMaxNumberOfRetries |
| srmGetReqRetryTimeout | 60000 | srmGetReqRetryTimeout |
| srmGetReqMaxNumOfRunningBySameOwner | 10 | srmGetReqMaxNumOfRunningBySameOwner |
| srmPutReqThreadQueueSize | 1000 | srmPutReqThreadQueueSize |
| srmPutReqThreadPoolSize | 100 | srmPutReqThreadPoolSize |
| srmPutReqMaxWaitingRequests | 1000 | srmPutReqMaxWaitingRequests |
| srmPutReqReadyQueueSize | 1000 | srmPutReqReadyQueueSize |
| srmPutReqMaxReadyRequests | 100 | srmPutReqMaxReadyRequests |
| srmPutReqMaxNumberOfRetries | 10 | srmPutReqMaxNumberOfRetries |
| srmPutReqRetryTimeout | 60000 | srmPutReqRetryTimeout |
| srmPutReqMaxNumOfRunningBySameOwner | 10 | srmPutReqMaxNumOfRunningBySameOwner |
| srmCopyReqThreadQueueSize | 1000 | srmCopyReqThreadQueueSize |
| srmCopyReqThreadPoolSize | 100 | srmCopyReqThreadPoolSize |
| srmCopyReqMaxWaitingRequests | 1000 | srmCopyReqMaxWaitingRequests |
| srmCopyReqMaxNumberOfRetries | 30 | srmCopyReqMaxNumberOfRetries |
| srmCopyReqRetryTimeout | 60000 | srmCopyReqRetryTimeout |
| srmCopyReqMaxNumOfRunningBySameOwner | 10 | srmCopyReqMaxNumOfRunningBySameOwner |
Table of Contents
- 27. dCache Clients
- The
SRMClient Suite - dccp
- dccp — Copy a file from or to a dCache server.
- The
- 28. dCache Cell Commands
- Common Cell Commands
- pin — Adds a comment to the pinboard.
- info — Print info about the cell.
- dump pinboard — Dump the full pinboard of the cell to a file.
- show pinboard — Print a part of the pinboard of the cell to STDOUT.
PnfsManagerCommands- pnfsidof — Print the
pnfsid of a file given by its global path. - flags remove — Remove a flag from a file.
- flags ls — List the flags of a file.
- flags set — Set a flag for a file.
- metadataof — Print the meta-data of a file.
- pathfinder — Print the global or local path of a file from its PNFS id.
- set meta — Set the meta-data of a file.
- storageinfoof — Print the storage info of a file.
- cacheinfoof — Print the cache info of a file.
- pnfsidof — Print the
- Pool Commands
- rep ls — List the files currently in the repository of the pool.
- st set max active — Set the maximum number of active store transfers.
- rh set max active — Set the maximum number of active restore transfers.
- mover set max active — Set the maximum number of active client transfers.
- mover set max active -queue=p2p — Set the maximum number of active pool-to-pool server transfers.
- pp set max active —
Set the value used for scaling the performance cost of
pool-to-pool client transfers analogous to the other
set max active-commands. - set gap — Set the gap parameter - the size of free space below which it will be assumed that the pool is full within the cost calculations.
- set breakeven — Set the breakeven parameter - used within the cost calculations.
- mover ls — List the active and waiting client transfer requests.
- migration cache — Caches replicas on other pools.
- migration cancel — Cancels a migration job
- migration clear — Removes completed migration jobs.
- migration concurrency — Adjusts the concurrency of a job.
- migration copy — Copies files to other pools.
- migration info — Shows detailed information about a migration job.
- migration ls — Lists all migration jobs.
- migration move — Moves replicas to other pools.
- migration suspend — Suspends a migration job.
- migration resume — Resumes a suspended migration job.
PoolManagerCommands- rc ls — List the requests currently handled by the
PoolManager - cm ls — List information about the pools in the cost module cache.
- set pool decision — Set the factors for the calculation of the total costs of the pools.
- rc ls — List the requests currently handled by the
- 29. dCache Default Port Values
- 30. Glossary
Table of Contents
- The
SRMClient Suite - dccp
- dccp — Copy a file from or to a dCache server.
An SRM URL has the form
srm://dmx.lbl.gov:6253//srm/DRM/srmv1?SFN=/tmp/try1
and the file URL looks like file:////tmp/aaa.
srmcp
srmcp — Copy a file from or to an SRM or between two SRMs.
Synopsis
srmcp [option...] <sourceUrl> <destUrl>
Arguments
- sourceUrl
The URL of the source file.
- destUrl
The URL of the destination file.
Options
gss_expected_nameTo enable the user to specify the gss expected name in the DN (Distinguished Name) of the srm server. The default value is
host.Example:
If the CN of host where srm server is running is
CN=srm/tam01.fnal.gov, thengss_expected_nameshould besrm.[user] $srmcp --gss_expected_name=srm <sourceUrl> <destinationUrl>globus_tcp_port_rangeTo enable the user to specify a range of ports open for tcp connections as a pair of positive integers separated by “
:”, not set by default.This takes care of compute nodes that are behind firewall.
Example:
globus_tcp_port_range=40000:50000[user] $srmcp --globus_tcp_port_range=<minVal>:<maxVal> <sourceUrl> <destinationUrl>streams_numTo enable the user to specify the number of streams to be used for data transfer. If set to 1, then stream mode is used, otherwise extended block mode is used.
Example:
[user] $srmcp --streams_num=1 <sourceUrl> <destinationUrl>server_modeTo enable the user to set the (gridftp) server mode for data transfer. Can be
activeorpassive,passiveby default.This option will have effect only if transfer is performed in a stream mode (see
streams_num)Example:
[user] $srmcp --streams_num=1 --server_mode=active <sourceUrl> <destinationUrl>
dccp
dccp — Copy a file from or to a dCache server.
Arguments
The following arguments are required:
sourceUrlThe URL of the source file.
destUrlThe URL of the destination file.
Description
The dccp utility provides a cp(1)
like functionality on the dCache file system. The source
must be a single file while the destination could be a
directory name or a file name. If the directory is a
destination, a new file with the same name as the source name
will be created there and the contents of the source will be
copied. If the final destination file exists in dCache, it
won’t be overwritten and an error code will be returned. Files
in regular file systems will always be overwritten if the
-i option is not specified. If the source and
the final destination file are located on a regular file
system, the dccp utility can be used similar to the
cp(1) program.
Options
The following arguments are optional:
-aEnable read-ahead functionality.
-b<bufferSize>Set read-ahead buffer size. The default value is
1048570Bytes. To disable the buffer this can be set to any value below the default. dccp will attempt to allocate the buffer size so very large values should be used with care.-B<bufferSize>Set buffer size. The size of the buffer is requested in each request, larger buffers will be needed to saturate higher bandwidth connections. The optimum value is network dependent. Too large a value will lead to excessive memory usage, too small a value will lead to excessive network communication.
-d<debug level>Set the debug level. <debug level> is a integer between
0and127. If the value is0then no output is generated, otherwise the value is formed by adding together one or more of the following values:Value Enabled output 1 Error messages 2 Info messages 4 Timing information 8 Trace information 16 Show stack-trace 32 IO operations 32 IO operations 64 Thread information -h<replyHostName>Bind the callback connection to the specific hostname interface.
-iSecure mode. Do not overwrite the existing files.
-l<location>Set location for pre-stage. if the location is not specified, the local host of the door will be used. This option must be used with the -P option.
-p<first_port>:<last_port>Bind the callback data connection to the specified
TCPport/rangeSet port range. Delimited by the ’:’ character, the <first_port> is required but the <last_port> is optional.-PPre-stage. Do not copy the file to a local host but make sure the file is on disk on the dCache server.
-r<bufferSize>TCPreceive buffer size. The default is256K. Setting to0uses the system default value. Memory useage will increase with higher values, but performance better.-s<bufferSize>TCPsend buffer size. The default is256K. Setting to0uses the system default value.-t<time>Stage timeout in seconds. This option must be used with the
-Poption.
Examples:
To copy a file to dCache:
[user] $ dccp /etc/group dcap://example.org/pnfs/desy.de/gading/To copy a file from dCache:
[user] $ dccp dcap://example.org/pnfs/desy.de/gading/group /tmp/Pre-Stage request:
[user] $ dccp -P -t 3600 -l example.org /acs/user_space/data_filestdin:
[user] $ tar cf - data_dir | dccp - /acs/user_space/data_arch.tarstdout:
[user] $ dccp /acs/user_space/data_arch.tar - | tar xf - Table of Contents
- Common Cell Commands
- pin — Adds a comment to the pinboard.
- info — Print info about the cell.
- dump pinboard — Dump the full pinboard of the cell to a file.
- show pinboard — Print a part of the pinboard of the cell to STDOUT.
PnfsManagerCommands- pnfsidof — Print the
pnfsid of a file given by its global path. - flags remove — Remove a flag from a file.
- flags ls — List the flags of a file.
- flags set — Set a flag for a file.
- metadataof — Print the meta-data of a file.
- pathfinder — Print the global or local path of a file from its PNFS id.
- set meta — Set the meta-data of a file.
- storageinfoof — Print the storage info of a file.
- cacheinfoof — Print the cache info of a file.
- pnfsidof — Print the
- Pool Commands
- rep ls — List the files currently in the repository of the pool.
- st set max active — Set the maximum number of active store transfers.
- rh set max active — Set the maximum number of active restore transfers.
- mover set max active — Set the maximum number of active client transfers.
- mover set max active -queue=p2p — Set the maximum number of active pool-to-pool server transfers.
- pp set max active —
Set the value used for scaling the performance cost of
pool-to-pool client transfers analogous to the other
set max active-commands. - set gap — Set the gap parameter - the size of free space below which it will be assumed that the pool is full within the cost calculations.
- set breakeven — Set the breakeven parameter - used within the cost calculations.
- mover ls — List the active and waiting client transfer requests.
- migration cache — Caches replicas on other pools.
- migration cancel — Cancels a migration job
- migration clear — Removes completed migration jobs.
- migration concurrency — Adjusts the concurrency of a job.
- migration copy — Copies files to other pools.
- migration info — Shows detailed information about a migration job.
- migration ls — Lists all migration jobs.
- migration move — Moves replicas to other pools.
- migration suspend — Suspends a migration job.
- migration resume — Resumes a suspended migration job.
PoolManagerCommands- rc ls — List the requests currently handled by the
PoolManager - cm ls — List information about the pools in the cost module cache.
- set pool decision — Set the factors for the calculation of the total costs of the pools.
- rc ls — List the requests currently handled by the
This is the reference to all (important) cell commands in dCache. You should not use any command not documented here, unless you really know what you are doing. Commands not in this reference are used for debugging by the developers.
This chapter serves two purposes: The other parts of this book refer to it, whenever a command is mentioned. Secondly, an administrator may check here, if he wonders what a command does.
pin
pin — Adds a comment to the pinboard.
Synopsis
pin
<comment>
Arguments
- comment
A string which is added to the pinboard.
info
info — Print info about the cell.
Synopsis
info [-a] [-l]
Arguments
- -a
Display more information.
- -l
Display long information.
pnfsidof
pnfsidof — Print the pnfs id of a file given by its global
path.
Synopsis
pnfsidof
<globalPath>
flags remove
flags remove — Remove a flag from a file.
Synopsis
flags remove
<pnfsId>
<key>
...
Arguments
- pnfsId
The
pnfsid of the file of which a flag will be removed.- key
flags which will be removed.
flags ls
flags ls — List the flags of a file.
Synopsis
flags ls
<pnfsId>
- pnfsId
The
pnfsid of the file of which a flag will be listed.
flags set
flags set — Set a flag for a file.
Synopsis
flags set
<pnfsId>
<key>=<value>
...
Arguments
- pnfsId
The
pnfsid of the file of which flags will be set.- key
The flag which will be set.
- value
The value to which the flag will be set.
metadataof
metadataof — Print the meta-data of a file.
Synopsis
metadataof [
<pnfsId>
] | [
<globalPath>
] [-v] [-n] [-se]
Arguments
- pnfsId
The
pnfsid of the file.- globalPath
The global path of the file.
pathfinder
pathfinder — Print the global or local path of a file from its PNFS id.
Synopsis
pathfinder
<pnfsId>
[[-global] | [-local]]
Arguments
- pnfsId
The
pnfsId of the file.- -global
Print the global path of the file.
- -local
Print the local path of the file.
set meta
set meta — Set the meta-data of a file.
Synopsis
set meta [<pnfsId>] | [<globalPath>] <uid> <gid> <perm> <levelInfo>...
Arguments
- pnfsId
The
pnfsid of the file.- globalPath
The global path oa the file.
- uid
The user id of the new owner of the file.
- gid
The new group id of the file.
- perm
The new file permitions.
- levelInfo
The new level information of the file.
rep ls
rep ls — List the files currently in the repository of the pool.
Synopsis
rep ls [pnfsId...] |
[-l= s | p | l | u | nc | e ...
]
[-s= k | m | g | t
]
- pnfsId
The
pnfsID(s) for which the files in the repository will be listed.- -l
List only the files with one of the following properties:
s sticky files p precious files l locked files u files in use nc files which are not cached e files with an error condition
- -s
Unit, the filesize is shown:
k data amount in KBytes m data amount in MBytes g data amount in GBytes t data amount in TBytes
st set max active
st set max active — Set the maximum number of active store transfers.
Synopsis
st set max active <maxActiveStoreTransfers>
- maxActiveStoreTransfers
The maximum number of active store transfers.
Description
Any further requests will be queued. This value will also be used by the cost module for calculating the performance cost.
rh set max active
rh set max active — Set the maximum number of active restore transfers.
Synopsis
rh set max active <maxActiveRetoreTransfers>
- maxActiveRetoreTransfers
The maximum number of active restore transfers.
Description
Any further requests will be queued. This value will also be used by the cost module for calculating the performance cost.
mover set max active
mover set max active — Set the maximum number of active client transfers.
Synopsis
mover set max active <maxActiveClientTransfers> [-queue=<moverQueueName>]
- maxActiveClientTransfers
The maximum number of active client transfers.
- moverQueueName
The mover queue for which the maximum number of active transfers should be set. If this is not specified, the default queue is assumed, in order to be compatible with previous versions which did not support multiple mover queues (before version 1.6.6).
Description
Any further requests will be queued. This value will also be used by the cost module for calculating the performance cost.
mover set max active -queue=p2p
mover set max active -queue=p2p — Set the maximum number of active pool-to-pool server transfers.
Synopsis
mover set max active -queue=p2p <maxActiveP2PTransfers>
- maxActiveP2PTransfers
The maximum number of active pool-to-pool server transfers.
Description
Any further requests will be queued. This value will also be used by the cost module for calculating the performance cost.
pp set max active
pp set max active —
Set the value used for scaling the performance cost of
pool-to-pool client transfers analogous to the other
set max active-commands.
Synopsis
pp set max active <maxActivePPTransfers>
- maxActivePPTransfers
The new scaling value for the cost calculation.
Description
All pool-to-pool client requests will be performed immediately in order to avoid deadlocks. This value will only used by the cost module for calculating the performance cost.
set gap
set gap — Set the gap parameter - the size of free space below which it will be assumed that the pool is full within the cost calculations.
Synopsis
set gap <gapPara>
- gapPara
The size of free space below which it will be assumed that the pool is full. Default is 4GB.
Description
The gap parameter is used within the space cost calculation scheme described in the section called “The Space Cost”. It specifies the size of free space below which it will be assumed that the pool is full and consequently the least recently used file has to be removed if a new file has to be stored on the pool. If, on the other hand, the free space is greater than gapPara, it will be expensive to store a file on the pool which exceeds the free space.
set breakeven
set breakeven — Set the breakeven parameter - used within the cost calculations.
Synopsis
set breakeven <breakevenPara>
- breakevenPara
The breakeven parameter has to be a positive number smaller than 1.0. It specifies the impact of the age of the least recently used file on space cost. It the LRU file is one week old, the space cost will be equal to
(1 + breakeven). Note that this will not be true, if the breakeven parameter has been set to a value greater or equal to 1.
Description
The breakeven parameter is used within the space cost calculation scheme described in the section called “The Space Cost”.
mover ls
mover ls — List the active and waiting client transfer requests.
Synopsis
mover ls [ -queue | -queue=<queueName> ]
- queueName
The name of the mover queue for which the transfers should be listed.
migration cache
migration cache — Caches replicas on other pools.
SYNOPSIS
migration cache [<options>] <target>...
migration concurrency
migration concurrency — Adjusts the concurrency of a job.
SYNOPSIS
migration concurrency <job> <n>
migration copy
migration copy — Copies files to other pools.
SYNOPSIS
migration copy [<options>] <target>...
DESCRIPTION
Copies files to other pools. Unless filter options are specified, all files on the source pool are copied.
The operation is idempotent, that is, it can safely be repeated without creating extra copies of the files. If the replica exists on any of the target pools, then it is not copied again. If the target pool with the existing replica fails to respond, then the operation is retried indefinitely, unless the job is marked as eager.
Please notice that a job is only idempotent as long as the set of target pools does not change. If pools go offline or are excluded as a result of an exclude or include expression then the job may stop being idempotent.
Both the state of the local replica and that of the target replica can be specified. If the target replica already exists, the state is updated to be at least as strong as the specified target state, that is, the lifetime of sticky bits is extended, but never reduced, and cached can be changed to precious, but never the opposite.
Transfers are subject to the checksum computiton policy of the target pool. Thus checksums are verified if and only if the target pool is configured to do so. For existing replicas, the checksum is only verified if the verify option was specified on the migration job.
Jobs can be marked permanent. Permanent jobs never terminate and are stored in the pool setup file with the save command. Permanent jobs watch the repository for state changes and copy any replicas that match the selection criteria, even replicas added after the job was created. Notice that any state change will cause a replica to be reconsidered and enqueued if it matches the selection criteria — also replicas that have been copied before.
Several options allow an expression to be specified. The
following operators are recognized: <,
<=, ==,
!=, >=,
>, lt,
le, eq,
ne, ge,
gt, ~=,
!~, +,
-, *,
/, %,
div, mod,
|, &,
^, ~,
&&, ||,
!, and,
or, not,
?:, =. Literals may be
integer literals, floating point literals, single or double
quoted string literals, and boolean true and false. Depending
on the context, the expression may refer to constants.
Please notice that the list of supported operators may
change in future releases. For permanent jobs we recommend to
limit expressions to the basic operators
<, <=,
==, !=,
>=, >,
+, -,
*, /,
&&, || and
!.
Options
- -accessed=<n>|[<n>]..[<m>]
Only copy replicas accessed <n> seconds ago, or accessed within the given, possibly open-ended, interval; e.g.
-accessed=0..60matches files accessed within the last minute;-accesed=60..matches files accessed one minute or more ago.- -al=ONLINE|NEARLINE
Only copy replicas with the given access latency.
- -pnfsid=<pnfsid>[,<pnfsid>] ...
Only copy replicas with one of the given PNFS IDs.
- -rp=CUSTODIAL|REPLICA|OUTPUT
Only copy replicas with the given retention policy.
- -size=<n>|[<n>]..[<m>]
Only copy replicas with size <n>, or a size within the given, possibly open-ended, interval.
- -state=cached|precious
Only copy replicas in the given state.
- -sticky[=<owner>[,<owner>...]]
Only copy sticky replicas. Can optionally be limited to the list of owners. A sticky flag for each owner must be present for the replica to be selected.
- -storage=<class>
Only copy replicas with the given storage class.
- -concurrency=<concurrency>
Specifies how many concurrent transfers to perform. Defaults to 1.
- -order=[-]size|[-]lru
Sort transfer queue. By default transfers are placed in ascending order, that is, smallest and least recently used first. Transfers are placed in descending order if the key is prefixed by a minus sign. Failed transfers are placed at the end of the queue for retry regardless of the order. This option cannot be used for permanent jobs. Notice that for pools with a large number of files, sorting significantly increases the initialization time of the migration job.
- size
Sort according to file size.
- lru
Sort according to last access time.
- -pins=move|keep
Controls how sticky flags owned by the
PinManagerare handled:- move
Ask
PinManagerto move pins to the target pool.- keep
Keep pins on the source pool.
- -smode=same|cached|precious|removable|delete[+<owner>[(<lifetime>)] ...]
Update the local replica to the given mode after transfer:
- same
does not change the local state (this is the default).
- cached
marks it cached.
- precious
marks it precious.
- removable
marks it cached and strips all existing sticky flags exluding pins.
- delete
deletes the replica unless it is pinned.
An optional list of sticky flags can be specified. The lifetime is in seconds. A lifetime of 0 causes the flag to immediately expire. Notice that existing sticky flags of the same owner are overwritten.
- -tmode=same|cached|precious[+<owner>[(<lifetime>)]...]
Set the mode of the target replica:
- same
applies the state and sticky bits excluding pins of the local replica (this is the default).
- cached
marks it cached.
- precious
marks it precious.
An optional list of sticky flags can be specified. The lifetime is in seconds.
- -verify
- Force checksum computation when an existing target is updated.
- -eager
Copy replicas rather than retrying when pools with existing replicas fail to respond.
- -exclude=<pool>[,<pool>...]
Exclude target pools. Single character (
?) and multi character (*) wildcards may be used.- -exclude-when=<expression>
Exclude target pools for which the expression evaluates to true. The expression may refer to the following constants:
- source.name or target.name
pool name
- source.spaceCost or target.spaceCost
space cost
- source.cpuCost or target.cpuCost
cpu cost
- source.free or target.free
free space in bytes
- source.total or target.total
total space in bytes
- source.removable or target.removable
removable space in bytes
- source.used or target.used
used space in bytes
- -include=<pool>[,<pool>...]
Only include target pools matching any of the patterns. Single character (
?) and multi character (*) wildcards may be used.- -include-when=<expression>
Only include target pools for which the expression evaluates to true. See the description of -exclude-when for the list of allowed constants.
- -refresh=<time>
Specifies the period in seconds of when target pool information is queried from the pool manager. The default is 300 seconds.
- -select=proportional|best|random
Determines how a pool is selected from the set of target pools:
- proportional
selects a pool with a probability inversely proportional to the cost of the pool.
- best
selects the pool with the lowest cost.
- random
selects a pool randomly.
The default is proportional.
- -target=pool|pgroup|link
Determines the interpretation of the target names. The default is ’pool’.
- -pause-when=<expression>
Pauses the job when the expression becomes true. The job continues when the expression once again evaluates to false. The following constants are defined for this pool:
- queue.files
The number of files remaining to be transferred.
- queue.bytes
The number of bytes remaining to be transferred.
- source.name
Pool name.
- source.spaceCost
Space cost.
- source.cpuCost
CPU cost.
- source.free
Free space in bytes.
- source.total
Total space in bytes.
- source.removable
Removable space in bytes.
- source.used
Used space in bytes.
- targets
The number of target pools.
- -permanent
Mark job as permanent.
- -stop-when=<expression>
Terminates the job when the expression becomes true. This option cannot be used for permanent jobs. See the description of -pause-when for the list of constants allowed in the expression.
migration info
migration info — Shows detailed information about a migration job.
SYNOPSIS
migration info <job>
DESCRIPTION
Shows detailed information about a migration job. Possible job states are:
- INITIALIZING
Initial scan of repository
- RUNNING
Job runs (schedules new tasks)
- SLEEPING
A task failed; no tasks are scheduled for 10 seconds
- PAUSED
Pause expression evaluates to true; no tasks are scheduled for 10 seconds.
- STOPPING
Stop expression evaluated to true; waiting for tasks to stop.
- SUSPENDED
Job suspended by user; no tasks are scheduled
- CANCELLING
Job cancelled by user; waiting for tasks to stop
- CANCELLED
Job cancelled by user; no tasks are running
- FINISHED
Job completed
- FAILED
Job failed. Please check the log file for details.
Job tasks may be in any of the following states:
- Queued
Queued for execution
- GettingLocations
Querying PnfsManager for file locations
- UpdatingExistingFile
Updating the state of existing target file
- CancellingUpdate
Task cancelled, waiting for update to complete
- InitiatingCopy
Request send to target, waiting for confirmation
- Copying
Waiting for target to complete the transfer
- Pinging
Ping send to target, waiting for reply
- NoResponse
Cell connection to target lost
- Waiting
Waiting for final confirmation from target
- MovingPin
Waiting for pin manager to move pin
- Cancelling
Attempting to cancel transfer
- Cancelled
Task cancelled, file was not copied
- Failed
The task failed
- Done
The task completed successfully
migration move
migration move — Moves replicas to other pools.
SYNOPSIS
migration move [<options>] <target>...
rc ls
rc ls — List the requests currently handled by the
PoolManager
Synopsis
rc ls [<regularExpression>] [-w]
cm ls
cm ls — List information about the pools in the cost module cache.
Synopsis
cm ls [-r] [-d] [-s] [<fileSize>]
- -r
Also list the tags, the space cost, and performance cost as calculated by the cost module for a file of size <fileSize> (or zero)
- -d
Also list the space cost and performance cost as calculated by the cost module for a file of size <fileSize> (or zero)
- -t
Also list the time since the last update of the cached information in milliseconds.
Description
A typical output reads
(PoolManager) admin >cm ls -r -d -t 12312434442<poolName1>={R={a=0;m=2;q=0};S={a=0;m=2;q=0};M={a=0;m=100;q=0};PS={a=0;m=20;q=0};PC={a=0;m=20;q=0}; (...line continues...) SP={t=2147483648;f=924711076;p=1222772572;r=0;lru=0;{g=20000000;b=0.5}}} <poolName1>={Tag={{hostname=<hostname>}};size=543543543;SC=1.7633947200606475;CC=0.0;} <poolName1>=3180 <poolName2>={R={a=0;m=2;q=0};S={a=0;m=2;q=0};M={a=0;m=100;q=0};PS={a=0;m=20;q=0};PC={a=0;m=20;q=0}; (...line continues...) SP={t=2147483648;f=2147483648;p=0;r=0;lru=0;{g=4294967296;b=250.0}}} <poolName2>={Tag={{hostname=<hostname>}};size=543543543;SC=0.0030372862312942743;CC=0.0;} <poolName2>=3157
set pool decision
set pool decision — Set the factors for the calculation of the total costs of the pools.
Synopsis
set pool decision [-spacecostfactor=<scf>] [-cpucostfactor=<ccf>] [-costcut=<cc>]
- scf
The factor (strength) with which the space cost will be included in the total cost.
- ccf
The factor (strength) with which the performance cost will be included in the total cost.
- cc
Deprecated since version 5 of the pool manager.
Table 29.1.
| Port number | Description | Component |
|---|---|---|
| 32768 and 32768 | is used by the NFS layer within dCache which is based upon rpc. This service is essential for rpc. | NFS |
| 1939 and 33808 | is used by portmapper which is also involved in the rpc dependencies of dCache. | portmap |
| 34075 | is for postmaster listening to requests for the PostgreSQL database for dCache database functionality. | Outbound for SRM, PnfsDomain, dCacheDomain and doors; inbound for PostgreSQL server. |
| 33823 | is used for internal dCache communication. | By default: outbound for all components, inbound for dCache domain. |
| 8443 | is the SRM port. See Chapter 13, dCache Storage Resource Manager | Inbound for SRM |
| 2288 | is used by the web interface to dCache. | Inbound for httpdDomain |
| 22223 | is used for the dCache admin interface. See the section called “The Admin Interface” | Inbound for adminDomain |
| 22125 | is used for the dCache dCap protocol. | Inbound for dCap door |
| 22128 | is used for the dCache GSIdCap . | Inbound for GSIdCap door |
The following terms are used in dCache.
- The
dcache.confFile This is the primary configuration file of a dCache. It is located at
/etc/dcache/dcache.conf.The
dcache.conffile is initially empty. If one of the default configuration values needs to be changed, copy the default setting of this value from one of the properties files in/usr/share/dcache/defaultsto this file and update the value.- The
layoutFile The layout file is located in the directory
/etc/dcache/layouts. It contains lists of the domains and the services that are to be run within these domains.- The
propertiesFiles The properties files are located in the directory
/usr/share/dcache/defaults. They contain the default settings of the dCache.- Chimera
The Chimera namespace is a core component of dCache. It maps each stored file to a unique identification number and allows storing of metadata against either files or directories.
Chimera includes some features like levels, directory tags and many of the dot commands.
- Chimera ID
A Chimera ID is a 36 hexadecimal digit that uniquely defines a file or directory.
- Domain
A domain is a collection of one or more cells that provide a set of related services within a dCache instance. Each domain requires its own Java Virtual Machine. A typical domain might provide external connectivity (i.e., a door) or manage the pools hosted on a machine.
Each domain has at least one cell, called the
Systemcell and many tunnel cells for communicating with other Domains. To provide a useful service, a domain will contain other cells that provide specific behaviour.- Cell
A cell is a collection of Java threads that provide a discrete and simple service within dCache. Each cell is hosted within a domain.
Cells have an address derived from concatenating their name, the
@symbol and their containing domain name.- Well Known Cell
A well-known cell is a cell that registers itself centrally. Within the admin interface, a well-known cell may be referred to by just its cell name.
- Door
Door is the generic name for special cells that provides the first point of access for end clients to communicate with a dCache instance. There are different door implementations (e.g.,
GSIdCapdoor andGridFTPdoor), allowing a dCache instance to support multiple communication protocols.A door will (typically) bind to a well-known port number depending on the protocol the door supports. This allows for only a single door instance per machine for each protocol.
A door will typically identify which pool will satisfy the end user’s operation and redirect the client to the corresponding pool. In some cases this is not possible; for example, some protocols (such as
GridFTPversion 1) do not allow servers to redirect end-clients, in other cases pool servers may be behind a firewall, so preventing direct access. When direct end-client access is not possible, the door may act as a data proxy, streaming data to the client.By default, each door is hosted in a dedicated domain. This allows easy control of whether a protocol is supported from a particular machine.
- Java Virtual Machine (JVM)
Java programs are typically compiled into a binary form called Java byte-code. Byte-code is comparable to the format that computers understand native; however, no mainstream processor understands Java byte-code. Instead compiled Java programs typically require a translation layer for them to run. This translation layer is called a Java Virtual Machine (JVM). It is a standardised execution environment that Java programs may run within. A JVM is typically represented as a process within the host computer.
- tertiary storage system
A mass storage system which stores data and is connected to the dCache system. Each dCache pool will write files to it as soon as they have been completely written to the pool (if the pool is not configured as a LFS). The tertiary storage system is not part of dCache. However, it is possible to connect any mass storage system as tertiary storage system to dCache via a simple interface.
- tape backend
A tertiary storage system which stores data on magnetic tapes.
- Hierarchical Storage Manager (HSM)
- HSM Type
The type of HSM which is connected to dCache as a tertiary storage system. The choice of the HSM type influences the communication between dCache and the HSM. Currently there are
osmandenstore.osmis used for most HSMs (TSM, HPSS, ...).- HSM Instance
- Large File Store (LFS)
A Large File Store is the name for a dCache instance that is acting as a filesystem independent to, or in cooperation with, an HSM system. When dCache is acting as an LFS, files may be stored and later read without involving any HSM system.
Whether a dCache instance provides an LFS depends on whether there are pools configured to do so. The
LFSoption, specified for each pool within thelayoutfile, describes how that pool should behave. This option can take three possible values:nonethe pool does not contribute to any LFS capacity. All newly written files are regarded precious and sent to the HSM backend.
preciousNewly create files are regarded as precious but are not scheduled for the HSM store procedure. Consequently, these file will only disappear from the pool when deleted in the Chimera namespace.
- to store
Copying a file from a dCache pool to the tertiary storage system.
- to restore
Copying a file from the tertiary storage system to one of the dCache pools.
- to stage
See to restore.
- transfer
Any kind of transfer performed by a dCache pool. There are store, restore, pool to pool (client and server), read, and write transfers. The latter two are client transfers.
See Also mover.
- mover
The process/thread within a pool which performs a transfer. Each pool has a limited number of movers that may be active at any time; if this limit is reached then further requests for data are queued.
In many protocols, end clients connect to a mover to transfer file contents. To support this, movers must speak the protocol the end client is using.
See Also transfer.
- Location Manager
The location manager is a cell that instructs a newly started domains to which domain they should connect. This allows domains to form arbitrary network topologies; although, by default, a dCache instance will form a star topology with the
dCacheDomaindomain at the centre.- Pinboard
The pinboard is a collection of messages describing events within dCache and is similar to a log file. Each cell will (typically) have its own pinboard.
- file level
In Chimera, each file can have up to eight independent contents; these file-contents, called levels, may be accessed independently. dCache will store some file metadata in levels 1 and 2, but dCache will not store any file data in Chimera.
- directory tag
Chimera includes the concept of tags. A tag is a keyword-value pair associated with a directory. Subdirectories inherit tags from their parent directory. New values may be assigned, but tags cannot be removed. The dot command
.(tag)(<foo>)may be used to read or write tag <foo>’s value. The dot command.(tags)()may be read for a list of all tags in that file’s subdirectory.More details on directory tags are given in the section called “Directory Tags”.
- dot command
To configure and access some of the special features of the Chimera namespace, special files may be read, written to or created. These files all start with a dot (or period) and have one or more parameters after. Each parameter is contained within a set of parentheses; for example, the file
.(tag)(<foo>)is the Chimera dot command for reading or writing the <foo> directory tag value.Care must be taken when accessing a dot command from a shell. Shells will often expand parentheses so the filename must be protected against this; for example, by quoting the filename or by escaping the parentheses.
- Wormhole
A wormhole is a feature of the Chimera namespace. A wormhole is a file that is accessible in all directories; however, the file is not returned when scanning a directory(e.g., using the ls command).
- Pool to Pool Transfer
A pool-to-pool transfer is one where a file is transferred from one dCache pool to another. This is typically done to satisfy a read request, either as a load-balancing technique or because the file is not available on pools that the end-user has access.
- Storage Class
The storage class is a string of the form
<StoreName>:<StorageGroup>@<type-of-storage-system>
containing exactly one
@-symbol.<StoreName>:<StorageGroup>is a string describing the storage class in a syntax which depends on the storage system.<type-of-storage-system>denotes the type of storage system in use.In general use
<type-of-storage-system>=osm.
A storage class is used by a tertiary storage system to decide where to store the file (i.e. on which set of tapes). dCache can use the storage class for a similar purpose, namely to decide on which pools the file can be stored.
- Replica
It is possible that dCache will choose to make a file accessible from more than one pool using a pool-to-pool copy. If this happens, then each copy of the file is a replica.
A file is independent of which pool is storing the data whereas a replica is uniquely specified by the
pnfsID and the pool name it is stored on.- Precious Replica
A precious replica is a replica that should be stored on tape.
- Cached Replica
A cached replica is a replica that should not be stored on tape.
- Replica Manager
The replica manager keeps track of the number of replicas of each file within a certain subset of pools and makes sure this number is always within a specified range. This way, the system makes sure that enough versions of each file are present and accessible at all times. This is especially useful to ensure resilience of the dCache system, even if the hardware is not reliable. The replica manager cannot be used when the system is connected to a tertiary storage system. The activation and configuration of the replica manager is described in Chapter 6, The
replicaService (Replica Manager).- Storage Resource Manager (SRM)
An SRM provides a standardised webservice interface for managing a storage resource (e.g. a dCache instance). It is possible to reserve space, initiate file storage or retrieve, and replicate files to another SRM. The actual transfer of data is not done via the SRM itself but via any protocol supported by both parties of the transfer. Authentication and authorisation is done with the grid security infrastructure. dCache comes with an implementation of an SRM which can turn any dCache instance into a grid storage element.
- Billing/Accounting
Accounting information is either stored in a text file or in a PostgreSQL database by the
billingcell usually started in thehttpdDomaindomain. This is described in Chapter 15, ThebillingService.- Pool Manager
The pool manager is the cell running in the
dCacheDomaindomain. It is a central component of a dCache instance and decides which pool is used for an incoming request.- Cost Module
The cost module is a Java class responsible for combining the different types of cost associated with a particular operation; for example, if a file is to be stored, the cost module will combine the storage costs and CPU costs for each candidate target pool. The pool manager will choose the candidate pool with the least combined cost.
- Pool Selection Unit
The pool selection unit is a Java class responsible for determining the set of candidate pools for a specific transaction. A detailed account of its configuration and behaviour is given in the section called “The Pool Selection Mechanism”.
- Pin Manager
The pin manager is a cell by default running in the
utilitydomain. It is a central service that can “pin” files to a pool for a certain time. It is used by theSRMto satisfy prestage requests.- Space Manager
The (SRM) Space Manager is a cell by default running in the
srmdomain. It is a central service that records reserved space on pools. A space reservation may be either for a specific duration or never expires. The Space Manager is used by theSRMto satisfy space reservation requests.- Pool
A pool is a cell responsible for storing retrieved files and for providing access to that data. Data access is supported via movers. A machine may have multiple pools, perhaps due to that machine’s storage being split over multiple partitions.
A pool must have a unique name and all pool cells on a particular machine are hosted in a domain that derives its name from the host machine’s name.
The list of directories that are to store pool data are found in definition of the pools in the
layoutFiles, which are located on the pool nodes.- sweeper
A sweeper is an activity located on a pool. It is responsible for deleting files on the pool that have been marked for removal. Files can be marked for removal because their corresponding namespace entry has been deleted or because the local file is a cache copy and more disk space is needed.
- HSM sweeper
The HSM sweeper, if enabled, is a component that is responsible for removing files from the HSM when the corresponding namespace entry has been removed.
- cost
The pool manager determines the pool used for storing a file by calculating a cost value for each available pool. The pool with the lowest cost is used. The costs are calculated by the cost module as described in the section called “Classic Partitions”. The total cost is a linear combination of the performance cost and the space cost. I.e.,
cost=ccf*performance_cost+scf*space_costwhere
ccfandscfare configurable with the command set pool decision.- performance cost
- space cost
See also the section called “The Space Cost”..